

Under-Budget RC
E. H. Schoenberg
Introduction
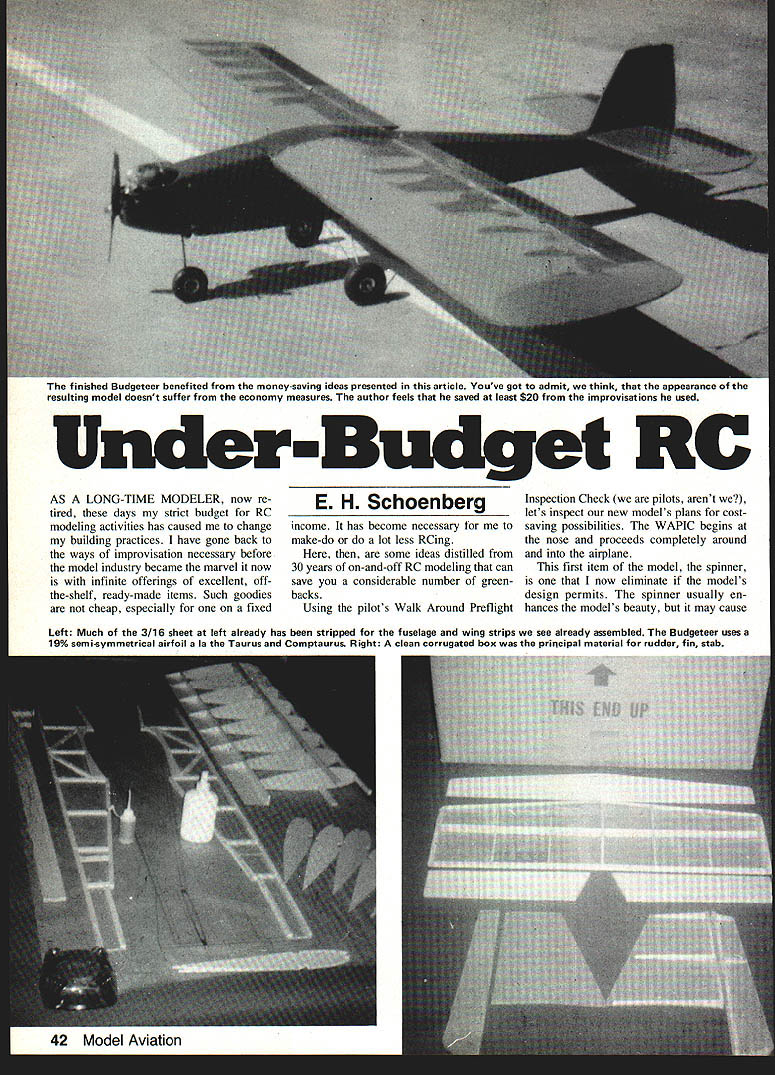
As a long-time modeler, now retired, my strict budget for RC modeling activities has caused me to change my building practices. I have gone back to the improvisation necessary before the model industry became the marvel it now is, with infinite offerings of excellent off-the-shelf, ready-made items. Such goodies are not cheap, especially for one on a fixed income. It has become necessary for me to make do or do a lot less RCing.
Here are some ideas distilled from 30 years of on-and-off RC modeling that can save you a considerable number of greenbacks. Using the pilot’s Walk Around Preflight Inspection Check (we are pilots, aren’t we?), let’s inspect our new model’s plans for cost-saving possibilities. The WAPIC begins at the nose and proceeds completely around the airplane.
Walk-Around Preflight Inspection (nose to tail)
#### Spinner
- The spinner is one item I now eliminate if the model’s design permits. It usually enhances the model’s beauty, but it may cause vibration problems and adds cost.
#### Propeller
- Propellers can be an expense. Wooden props break easily; use flexible plastic ones. If you average a hard landing once in 10 flights, a better plastic prop won’t save you, but if you land gently you may get by with less expensive props.
#### Engine
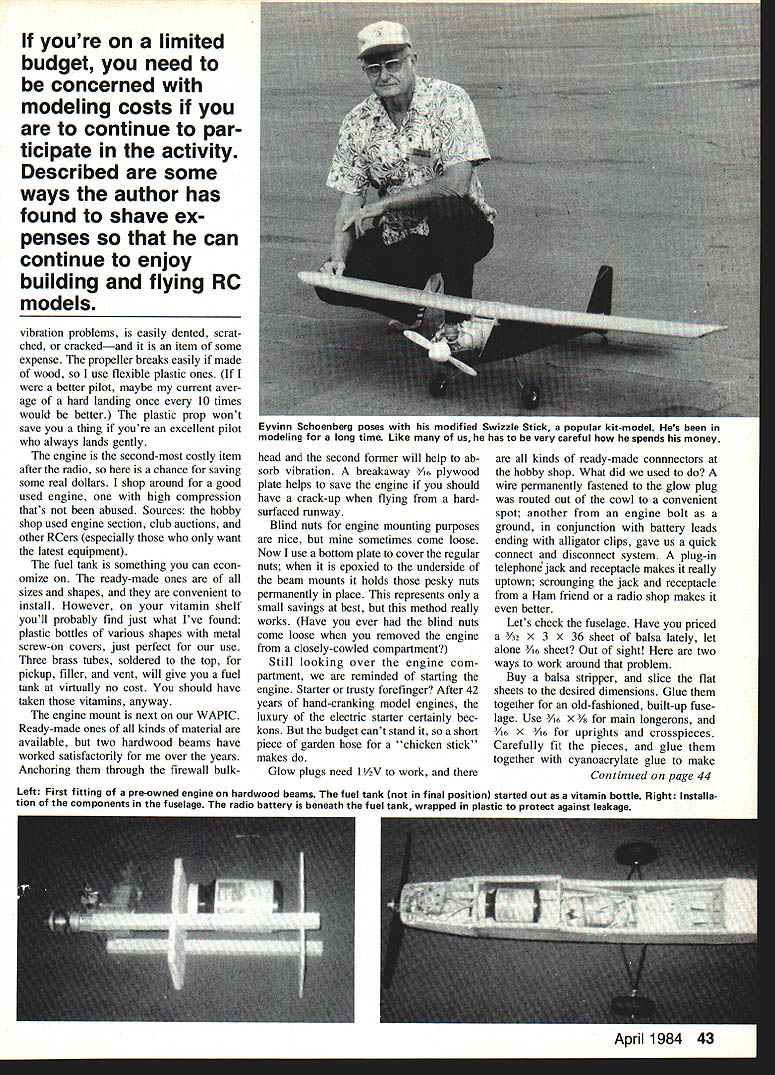
- The engine is the second-most costly item after the radio. You can save real dollars by shopping for a good used engine. A high-compression engine that’s been abused can often be refurbished.
- Sources: hobby shop used-engine sections, club auctions, and other R/Cers who always want the latest equipment.
#### Fuel Tank
- Ready-made tanks are convenient but can be expensive. A cheap alternative is a plastic bottle (vitamin bottles work well) with a metal screw-on cap. Solder three brass tubes to the cap for pickup, filler, and vent to make a serviceable fuel tank at virtually no cost.
#### Engine Mount
- Ready-made mounts are available, but two hardwood beams have worked satisfactorily for me. Anchor them through the firewall bulkhead with a second former to help absorb vibration.
- A plywood breakaway plate (1/8" or 1/16" depending on installation) can help save the engine in a crack-up on a hard-surfaced runway.
- Blind nuts are nice but can come loose. I now use a bottom plate cover with regular nuts epoxied to the underside of the mounts; this holds the nuts permanently in place and avoids the blind-nut problem.
#### Starter and Glow Plug Connections
- After decades of hand-cranking, an electric starter is a luxury; on a tight budget a short piece of garden hose on a “chicken stick” makes a serviceable starter.
- Glow plugs need about 1.5 volts. Rather than buying special connectors, run a wire permanently to the glow plug and route it out of the cowl to a convenient spot; ground to another engine bolt. Battery leads with alligator clips give a quick connect/disconnect system. A plug-in telephone jack/receptacle makes it very tidy — scrounge one from a ham friend or radio shop if possible.
Fuselage Construction
- Sheet balsa prices can be high. Two ways to work around the cost:
- Buy a balsa stripper and slice flat sheets to the desired dimensions.
- Glue together an old-fashioned built-up fuselage using longerons, uprights, and crosspieces.
- Use 3/32" x 1/8" main longerons and 3/32" x 3/32" uprights and crosspieces. Carefully fit pieces and glue together; cyanoacrylate glue makes quick, strong joints.
Wing Construction
- To save weight and cost, use 3/32" medium-hard sheet balsa for ribs and cap-strip them. This gives plenty of strength at lower cost than thicker ribs.
- Using 1/16" x 3/8" top and bottom spars with 1/16" vertical sheet webbing between the spars (I-beam style) provides maximum strength with minimum weight.
- Sheets of 1/16" balsa from the leading edge back to the main spar create a D-tube for added torsional strength and a better airfoil shape.
- Dihedral braces of 1/8" plywood at the back of the leading edge and at the main spar supply the strength necessary for high-stress maneuvers.
- For the adventurous, corrugated cardboard ribs are cheaper than balsa and, with careful work, worthy of experimentation.
Hardware and Control Systems
Inside the model we find the hardware items needed to connect moving surfaces with servos: torque rods, hinges, control horns, landing-gear clips, clevises, and threaded connectors. A quick inventory:
- Hinges: wing hinges, elevator hinges, rudder hinges.
- Control horns: several for ailerons, elevators, and rudder.
- Pushrods and clevises: for aileron, elevator, and rudder linkages.
- Landing gear hold-down clips, servo mounting trays, wing tie-down system.
A check at the hobby shop for these items will add up. Consider making many of them yourself — it’s not hard.
#### Hinges
- Check your sewing box for linen strips. Two strips 3/4" wide by 2" long can be used as one hinge. Cross them over and under the control surfaces and glue them securely in position. This produces excellent hinges for ailerons, elevators, and rudders if the material is strong and well glued.
#### Control Horns
- Control horns can be made from 1/16" Formica sheet or other scrap material available from a ham friend or a radio shop. Cut the horns to shape and anchor them carefully in the movable surfaces with cross pins and epoxy; they’ll hold up well.
#### Pushrods and Linkages
- For aileron and tail connections, a balsa-and-music-wire combination is inexpensive, safe for servos, and very useful. Use 3/16" sheet sliced to about 5/16" width for stiffness, bind music wire to it with sewing thread, and form a Z-bend at the servo end to fit into the servo arm.
- Threaded wire with clevises at the control surface ends allows trim adjustment in the open; for smaller planes a V-bend in the music wire (opened or closed) can substitute for clevises.
- The same system works well for throttle control; run a longer wire smoothly through the firewall bulkhead.
#### Bellcranks and Servo Installation
- L-shaped Formica bellcranks mounted on 1/8" ply bases just ahead of the ailerons can transfer lateral servo motion to fore-and-aft movement. Make sure pushrods don’t bind through formers or ribs.
- Save by making servo trays from 1/8" ply cut to fit your servos and mounted on 3/16" ply rails where needed for balance and space.
Landing Gear and Wing Hold-Down
- Wire landing gears can be fastened to 1/16" ply base plates on fuselage bottoms or low wings using 1/8" metal straps bent around the wire to form clips. Fasten with screws and nuts — wood screws tend to pull out.
- For wing attachment, you don’t need expensive hardware. Double up 3/16" ply inside the fuselage to receive two stove bolts that pass through the reinforced trailing edge of the wing. Hardware-store bolts will self-tap into predrilled ply seats. Reinforce the leading edge with dowels fitted into a ply-reinforced former up front. Pencil stubs rounded to dowel form work fine — no need to buy dowels.
Covering and Finish
- Modern iron-on covering is easy to apply, attractive, and strong. Fuel-proof around the engine with thinned epoxy, then spray or brush fuel-proof paint to finish the Budgeteer.
Field Gear and Toolbox
- Every pilot/mechanic needs a toolbox. A gardener’s tool tray works well for a reasonable number of tools and a small fuel can. A 12" x 16" strawberry crate fitted with a broomstick carrying handle also makes a neat box when compartmented. Paint it and staple your AMA license and club emblem to the sides.
Cost Savings Summary
- Building this way will reduce the airframe and hardware costs of a medium-sized Budgeteer by at least $20, not including the engine (which can save much more if you find a good used unit).
- When a dedicated RC modeler builds several planes a year, these savings add up.
Conclusion
Now you’re ready. Head for the flying field and the flight line: grab your frequency pin, fire up, and do your thing—under budget.
Yes, “under-budget” is more a state of mind than a strict method. The RC manufacturers will tempt us with wonderful new goodies, and we’re hooked. Under-Budget RC is a way to cope with budgetary woes and make your dollars go farther.
Good luck on your Budgeteer.
Transcribed from original scans by AI. Minor OCR errors may remain.

