
upside down little stik
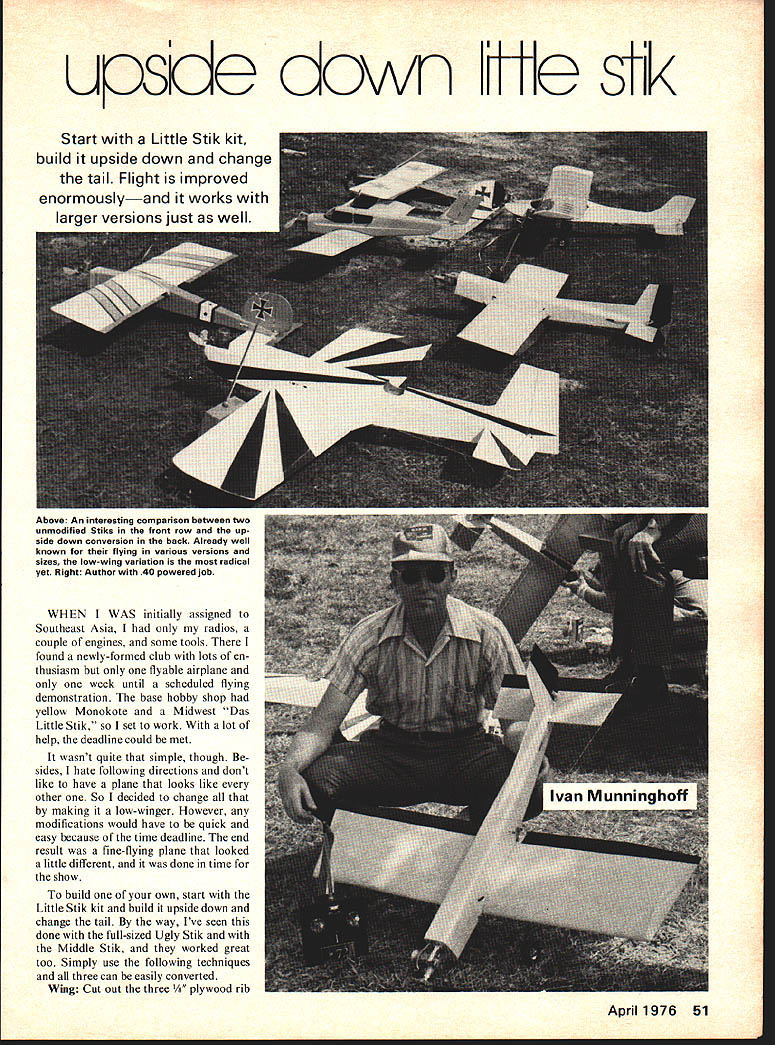
Start with a Little Stik kit, build it upside down and change the tail. Flight is improved enormously—and it works with larger versions just as well.
When I was initially assigned to Southeast Asia, I had only my radios, a couple of engines, and some tools. There I found a newly-formed club with lots of enthusiasm but only one flyable airplane and only one week until a scheduled flying demonstration. The base hobby shop had yellow Monokote and a Midwest "Das Little Stik," so I set to work. With a lot of help, the deadline could be met.
It wasn't quite that simple, though. Besides, I hate following directions and don't like to have a plane that looks like every other one. So I decided to change all that by making it a low-winger. However, any modifications would have to be quick and easy because of the time deadline. The end result was a fine-flying plane that looked a little different, and it was done in time for the show.
To build one of your own, start with the Little Stik kit and build it upside down and change the tail. By the way, I've seen this done with the full-sized Ugly Stik and with the Middle Stik, and they worked great too. Simply use the following techniques and all three can be easily converted.
Wing
Cut out the three 1/4" plywood rib doublers and glue D-1 to the middle wing rib W-1A. Glue D-2 doublers to the farthest outboard W-3. Notch out the balsa ribs between the D-2s to accept the pine landing-gear/dihedral brace block. Drill and groove the block to accept the standard 5/32" music-wire landing gear.
After the entire wing is built flat on a board, butt the outboard panel, raise the trailing-edge tip, saw half the middle rib and sand so the stumps will fit together. Make about 2-1/8" dihedral under the tip and glue back together. At this time add the one-piece landing-gear block. Set the whole assembly aside to dry.
I eliminated the aileron bellcrank system and went to a conventional strip-aero aileron setup with an upright servo and Kaos-style aileron horns. It's lighter, faster and has less slop. I also made new ailerons, tapered to help prevent flutter. I fiberglassed the center section of the wing to help take the abuse I knew it would get. When dry, sand carefully, including making the leading edge rounded as the plans show.
Cut out the hole for the aileron servo and add two hardwood blocks for mounts. Monokote the wing and hinge the ailerons, keeping the gap between wing and ailerons as small as possible. I prefer Robart Hinge Points for simplicity and reliability. With Robart Hinge Points be sure to orient the hinge pins in alternate manner; a sharp rap in one direction will cause them to unsnap. However, if you use flat hinges be sure to drill pin holes and use toothpicks to keep them from pulling out.
Install the 5/32" music-wire landing gear. The wire should be bent forward with the axle directly beneath the leading edge. If you decide to convert to a tricycle-gear setup you can merely turn the main gear around and add a nose gear.
Fuselage
Follow the kit directions through Step Two, except modify the wing saddle as shown in the new drawings; this will give the wing a good fit and the proper incidence. Cut the hole in former F-3 large enough to get the fuel tank and battery pack through. You might eliminate F-3 and replace the balsa sides, top and bottom because the eliminated hatch opening can serve to weaken the nose and let gunky fuel exhaust inside. Double the whole nose area with vertically grained stock for strength.
Drill the firewall to fit the mounts supplied with the kit. Arrange to mount the engine sideways with the needle valve up and the exhaust down. Roughly center the mounts vertically on the firewall; be sure the fuel tank can be positioned with its centerline exactly below the centerline of the needle valve/carburetor body for proper fuel feed.
Assemble the fuselage sides in accordance with Step Two except move former F-4 back to clear the aileron horns. Make sure the rear wing holddown dowel will be behind F-4. Glue the aft ends of the sides together, making certain the entire fuselage is true and unwarped, adding F-6 and F-7.
Sheet the entire top of the fuselage except the stabilizer slot with 1/8" or 3/16" balsa. Add triangular stock full length inside the fuselage top and bottom. You could round the corners to improve appearance if desired. Of course I intended to have cut the corners off formers F-3, F-4, F-6 and F-7.
Add triangle stock around the inside of the firewall for strength and secure blindnuts so the firewall can't be pushed off. Drill the firewall for fuel lines and the nose-gear bracket as desired. Mine had a hole drilled so the engine-mount/nose-gear strut stuck through. Dope or epoxy-resin otherwise thoroughly fuel-proof the inside nose. Cover the bottom nose piece with 1/8" plywood as used in the bottom of the unmodified kit. Sheet the bottom aft fuselage with 1/8" balsa and be sure to do the balsa sheeting on top. doublers and glue D-1 in the middle of the wing on rib W-1A. Glue the D-2 doublers to the farthest outboard W-3. Notch out all the balsa ribs in between the D-2's to accept the pine landing gear block/dihedral brace. This block is drilled and grooved to accept the standard 5/32" music wire landing gear. After the entire wing is built flat on the board with 1/4" wash-out in each panel (raise the trailing edge tip), saw it in half in the middle, and the stumps so that it will fit together with 2 1/2" dihedral under one tip, and glue it back together. At this time, add the one-piece landing gear block and set the whole assembly aside to dry.
On mine, I eliminated the aileron bellcrank system by going to a conventional strip aileron setup with an upright servo and Kaos-style aileron horns. It's lighter, faster, and has less slop. I also made new ailerons tapered to help prevent flutter. I fiberglassed the center section of the wing to help take the abuse I knew it would get.
When the wing is dry, sand it all carefully, including making the leading edge more rounded than the plans show. Cut out the hole for the aileron servo and add two hardwood blocks for mounts. Monokote the wing and hinge your ailerons keeping the gap between the wing and the ailerons as small as possible. I prefer Robart Hinge Points for simplicity and reliability. (With Robart Hinge Points, be sure to orient the hinge pins in them in an alternate manner so that a sharp rap in one direction will not cause them to unsnap.) However, if you use flat hinges, be sure to drill and pin them with toothpicks to keep them from pulling out.
Install the 5/32" music wire landing gear wire. It should be bent forward so that the axle is directly beneath the leading edge. With this bend, should you decide to convert to a tricycle gear setup, you can merely turn the main gear around and add a nose gear.
Fuselage: Follow the directions through Step One, then disregard. Modify the wing saddle as shown on the new drawings. This will give the wing a good fit and the proper incidence. Cut a hole in former F-3 large enough to get your fuel tank and battery pack through. (You might even eliminate F-3 and replace it with 1/4" sq. balsa on the sides and top and bottom.) This is because I eliminated the hatch. Such an opening only serves to weaken the nose and let gunky fuel and exhaust inside. Double the whole nose area with vertically grained 1/8" balsa for strength. Drill the firewall to fit the mounts supplied in the kit, only arrange them so as to mount the engine sideways with the needle valve up and the exhaust down. Roughly center the mounts vertically on the firewall. This is done to make sure that the fuel tank can be positioned so that its centerline is exactly 1/4" to 3/8" below the centerline of the needle valve in the carburetor body for proper fuel feed.
Then assemble the fuselage sides in accordance with Step Two except for moving former F-4 back 1" to clear the aileron horns. Make sure that the rear wing holddown dowel will be behind F-4. Glue the aft ends of the sides together making certain the entire fuselage is true and unwarped while adding F-6 and F-7. Sheet the entire top of the fuselage except for the stabilizer slot with 1/8" or 3/16" balsa. I added 1/2" triangular stock the full length of the fuselage both top and bottom so that I could round all the corners to improve the appearance. Of course, if you intend to do this, you will have to cut the corners off all the formers (F-3, F-4, F-6, F-7) to clear the triangle stock. The large piece of plywood is eliminated. Add triangle stock around the inside of the firewall for strength. Secure the blindnuts on the back of the firewall so they can't be pushed off. Drill the firewall for fuel lines and for a nose gear bracket if desired. (Mine had a hole drilled in each engine mount with the nose gear strut stuck through.) Dope, epoxy-resin, or otherwise thoroughly fuel-proof the inside of the nose. Cover the bottom nose piece with 1/8" plywood as used in the bottom of the unmodified kit. Sheet the bottom aft fuselage with 1/8" balsa. Be sure that all the balsa sheeting (top and bottom) is put on with the grain running across the fuselage, not parallel to it. It will easily split if put on wrong.
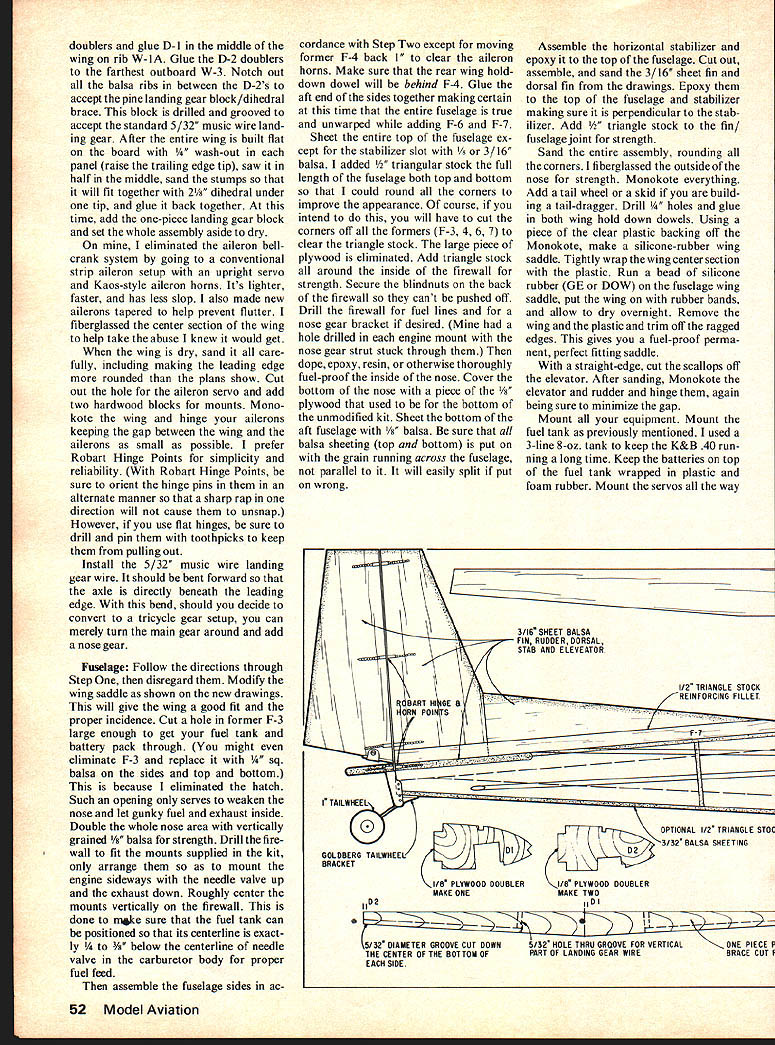
Assemble the horizontal stabilizer and epoxy it to the top of the fuselage. Cut out, assemble and sand the 3/16" sheet fin and dorsal fin from the drawings. Epoxy them to the top of the fuselage and stabilizer making sure it is perpendicular to the stabilizer and add 1/8" triangle stock to the fin/fuselage joint for strength.
Sand the entire assembly, rounding all the corners. I fiberglassed the outside of the nose for strength. Monokote everything. Add a tail wheel or a skid if you are building a tail-dragger. Drill 1/4" holes and glue in both wing hold-down dowels. Using a piece of the clear plastic backing off the Monokote, make a silicone-rubber wing saddle (GE or DOW) on the fuselage wing saddle, put the wing on with rubber bands and allow to dry overnight. Remove the wing and the plastic and trim off the ragged edges. This gives you a fuel-proof, permanent, perfect-fitting saddle.
With a straight-edge, cut the scallops off the elevator. After sanding, Monokote the elevator and rudder and hinge them, again being sure to minimize the gap.
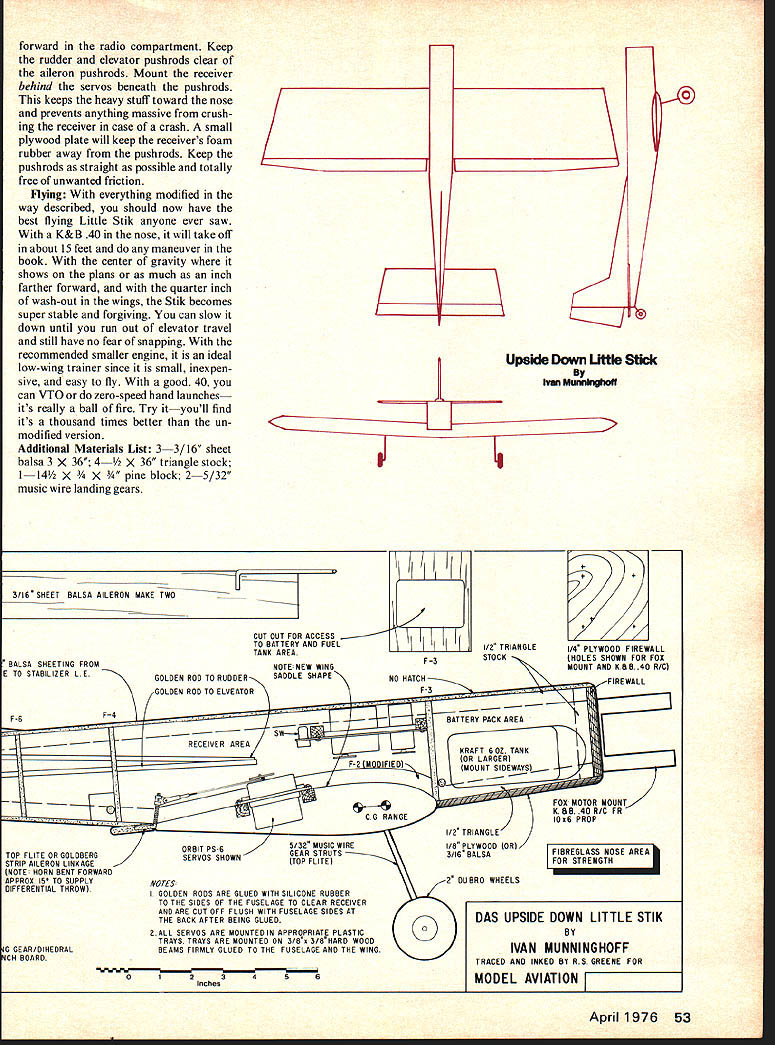
Mount all your equipment. Mount the fuel tank as previously mentioned. I used a 2-3/8 oz. tank to keep the K&B .40 running a long time. Keep the batteries on top of the fuel tank wrapped in plastic and foam rubber. Mount the servos all the way back in the fuselage. With the CG at the position given on the plans (mine was 3-1/4" behind the leading edge at the wing), the plane flew perfect.
Takeoffs are straight and easy. Landings are slow and well controlled. With one tank of fuel it will fly about 10 to 12 minutes. You can fly it as a tail-dragger. If you prefer tricycle gear, it handles on the ground like a winner.
I use Du-Bro mini-clevises on the pushrods and cheap 3/32" music wire with heat-shrink tubing over them for the tailwheel springs. Set up throws and expo as you like. I had about 1/8" up and down on the elevator, 1/4" each way on the ailerons and 3/8" each way on the rudder.
This low-wing conversion turned out to be one of my more pleasing projects. It flies the same as the standard Little Stik and is just as forgiving. It lands like a dream. I have taken off from grass and asphalt and it's no problem. If you have the kit and a deadline, the upside-down Little Stik is a satisfying change.
Additional Materials List:
- 3 — 3/16" sheet balsa, 3" x 36"
- 4 — 1/2" x 36" triangle stock
- 1 — 1-1/4" x 3/4" x 3/4" pine block
- 2 — 5/32" music wire landing gears
Transcribed from original scans by AI. Minor OCR errors may remain.

