

U.S. MAIL cardboard
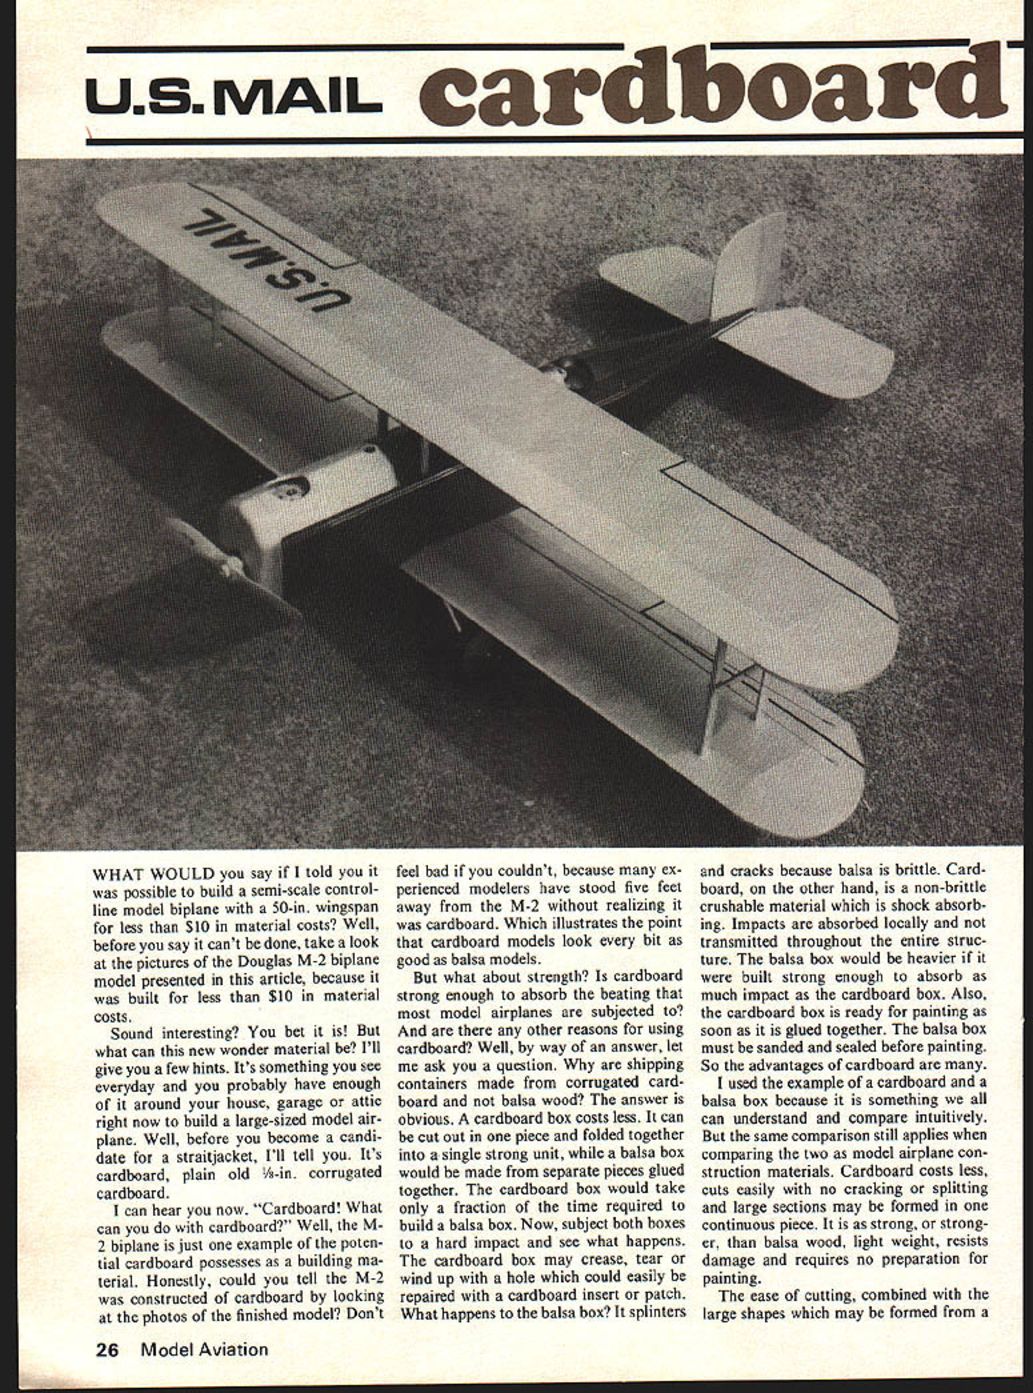
WHAT WOULD you say if I told you it was possible to build a semi-scale controlline model biplane with a 50-in. wingspan for less than $10 in material costs? Well, before you say it can't be done, take a look at the pictures of the Douglas M-2 biplane model presented in this article, because it was built for less than $10 in material costs.
Sound interesting? You bet it is! But what can this new wonder material be? I'll give you a few hints. It's something you see every day and you probably have enough of it around your house, garage or attic right now to build a large-sized model airplane. Well, before you become a candidate for a straitjacket, I'll tell you. It's cardboard, plain old 1/8-in. corrugated cardboard.
I can hear you now. "Cardboard! What can you do with cardboard?" Well, the M-2 biplane is just one example of the potential cardboard possesses as a building material. Honestly, could you tell the M-2 was constructed of cardboard by looking at the photos of the finished model? Don't feel bad if you couldn't, because many experienced modelers have stood five feet away from the M-2 without realizing it was cardboard. Which illustrates the point that cardboard models look every bit as good as balsa models.
But what about strength? Is cardboard strong enough to absorb the beating that most model airplanes are subjected to? And are there any other reasons for using cardboard? Well, by way of an answer, let me ask you a question. Why are shipping containers made from corrugated cardboard and not balsa wood? The answer is obvious. A cardboard box costs less. It can be cut out in one piece and folded together into a single strong unit, while a balsa box would be made from separate pieces glued together. The cardboard box would take only a fraction of the time required to build a balsa box. Now, subject both boxes to a hard impact and see what happens. The cardboard box may crease, tear or wind up with a hole which could easily be repaired with a cardboard insert or patch. What happens to the balsa box? It splinters and cracks because balsa is brittle. Cardboard, on the other hand, is a non-brittle crushable material which is shock absorbing. Impacts are absorbed locally and not transmitted throughout the entire structure. The balsa box would be heavier if it were built strong enough to absorb as much impact as the cardboard box. Also, the cardboard box is ready for painting as soon as it is glued together. The balsa box must be sanded and sealed before painting. So the advantages of cardboard are many.
I used the example of a cardboard and a balsa box because it is something we all can understand and compare intuitively. But the same comparison still applies when comparing the two as model airplane construction materials. Cardboard costs less, cuts easily with no cracking or splitting and large sections may be formed in one continuous piece. It is as strong, or stronger, than balsa wood, light weight, resists damage and requires no preparation for painting.
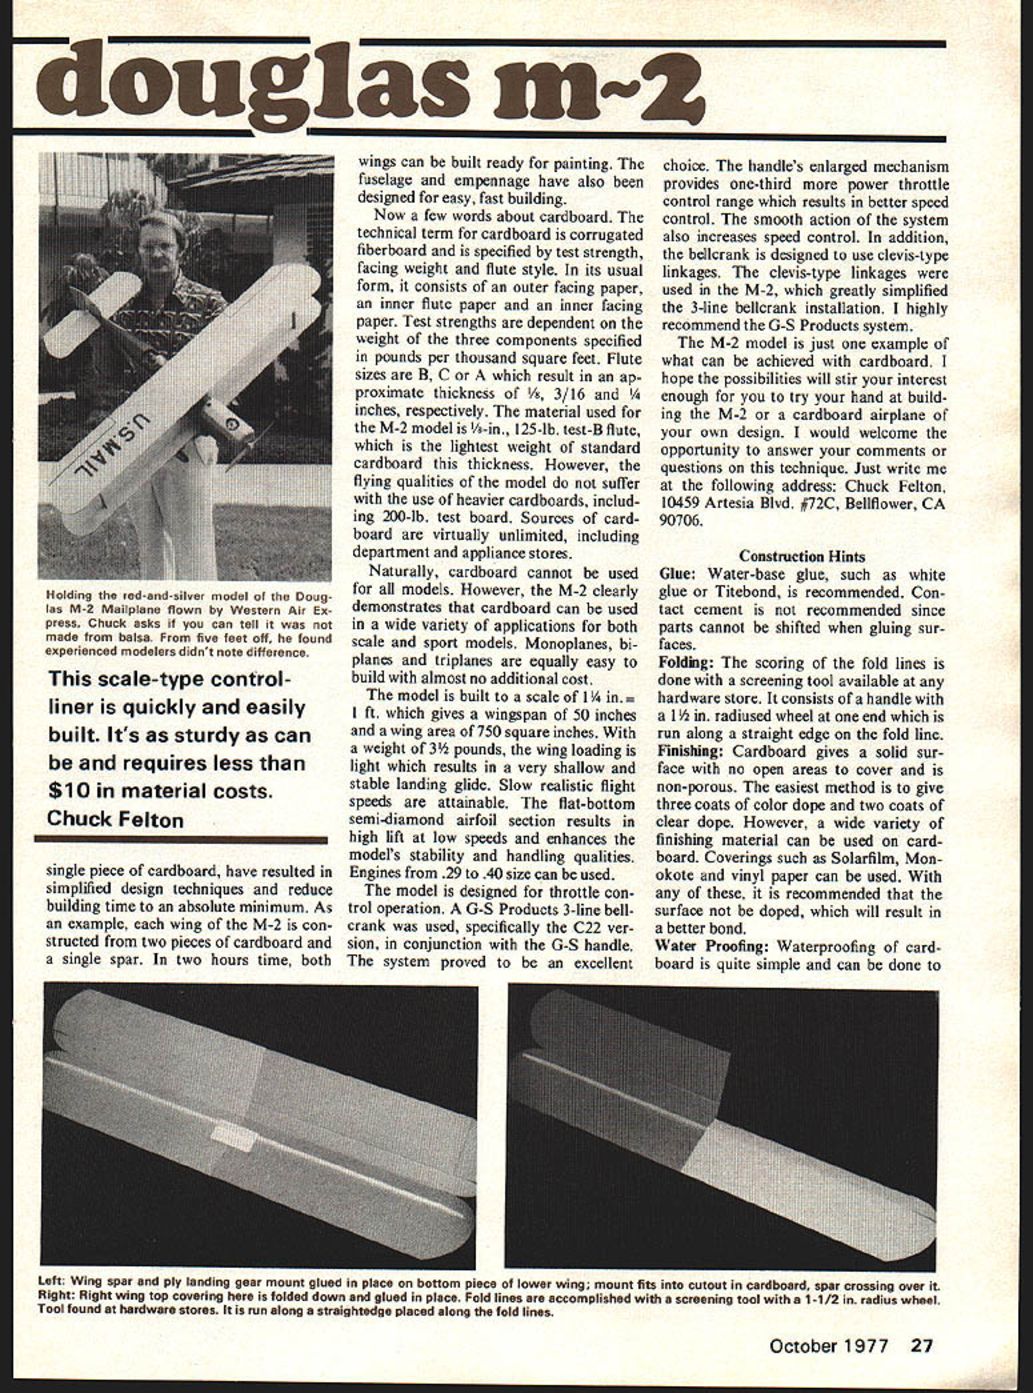
The ease of cutting, combined with the large shapes which may be formed from a single piece of cardboard, have resulted in simplified design techniques and reduced building time to an absolute minimum. As an example, the wing of the M-2 is constructed from two pieces of cardboard with a single spar and requires only two hours' time. Both wings can be built and ready for painting in an afternoon. The fuselage and empennage have also been designed for easy, fast building.
Now a few words about cardboard. The technical term for cardboard is corrugated fiberboard. It is specified by test strength, facing weight and flute style. Its usual form consists of an outer facing paper, inner flute paper and inner facing paper. Test strengths are dependent on the weight of these three components and are specified in pounds per thousand square feet. Flute sizes A, B and C result in approximate thicknesses of 1/4, 1/8 and 3/16 inches respectively. The material used on the M-2 model is 1/8-in., 125-lb. test B-flute, the lightest weight standard cardboard thickness. However, the flying qualities of the model will suffer if heavier cardboards are used, including 200-lb. test board.
Sources of cardboard are virtually unlimited, including department and appliance stores. Naturally, cardboard cannot be used for all models. However, the M-2 clearly demonstrates cardboard can be used for a wide variety of applications, both scale and sport models. Monoplanes, biplanes and triplanes are equally easy to build with almost no additional cost. The model built to scale 1/8 gives a wingspan of 50 inches, wing area of 750 square inches and a weight of 3 pounds. This wing loading is light and results in very shallow, stable landing glide. Slow realistic flight speeds are attainable. A flat-bottom semi-diamond airfoil section results in high lift at low speeds and enhances the model's stability and handling qualities.
Engines .29 to .40 size can be used in the model. It is designed for throttle control operation. G-S Products 3-line bellcrank was used specifically on the C-22 version in conjunction with the G-S handle system. The system proved to be an excellent choice. The handle's enlarged mechanism provides one-third more power throttle control range which results in better speed control. The smooth action of the system also increases speed control. In addition, the bellcrank is designed to use clevis-type linkages. The clevis-type linkages were used in the M-2, which greatly simplified the 3-line bellcrank installation. I highly recommend the G-S Products system.
The M-2 model is just one example of what can be achieved with cardboard. I hope the possibilities will stir your interest enough for you to try your hand at building the M-2 or a cardboard airplane of your own design. I would welcome the opportunity to answer your comments or questions on this technique. Just write me at the following address: Chuck Felton, 10459 Artesia Blvd., #72C, Bellflower, CA 90706.
Construction Hints
Glue: Water-base glue, such as white glue or Titebond, is recommended. Contact cement is not recommended since parts cannot be shifted when gluing surfaces.
Folding: The scoring of the fold lines is done with a screening tool available at any hardware store. It consists of a handle with a 1-1/2 in. radiused wheel at one end which is run along a straight edge on the fold line.
Finishing: Cardboard gives a solid surface with no open areas to cover and is non-porous. The easiest method is to give three coats of color dope and two coats of clear dope. However, a wide variety of finishing material can be used on cardboard. Coverings such as Solarfilm, Monokote and vinyl paper can be used. With any of these, it is recommended that the surface not be doped, which will result in a better bond.
Water Proofing: Waterproofing of cardboard is quite simple and can be done to Left: Spruce strips—glued against the thickness edge of the cardboard at the rudder and elevator hinge lines—brace the cardboard. Right: Shock-absorbing landing gear is held to ply mounting plate by typical metal strap fittings. Note drain tubes under nose.
Left: Fuselage construction is begun by laying pre-cut cardboard on workbench, then attaching edge strips and centersection struts with white glue or Titebond. Right: Firewall, ply motor mount, doublers, lock into an almost indestructible unit. Use blind nuts for engine.
Left: G-S Products 3-line bellcrank (C22 version) is mounted on ply anchored beneath fuselage top rails. A 4-oz. clunk tank is fastened to ply floor with rubber bands over paperclip hooks. Engine compartment is coated with epoxy for fuel-proofing. A compact arrangement. Right: Top pieces fit on fuselage top rails, flush with top edges of the sides. Note one former in place toward rear of fuselage.
Left: Construction of the removable engine compartment hatch is evident here, consisting of floor, formers, and creased top piece. At right is completed ship ready for painting. Three coats of colored dope and two of clear will suffice, but Solarfilm, Monokote or vinyl paper can be used, in which case the surface should not be doped. Before parts are cut, raw material can be waterproofed with a mix of 25% polyurethane and 75% paint thinner. Just brush on and allow to dry for 48 hours. Cardboard then cuts crisply—like wood.
Construction
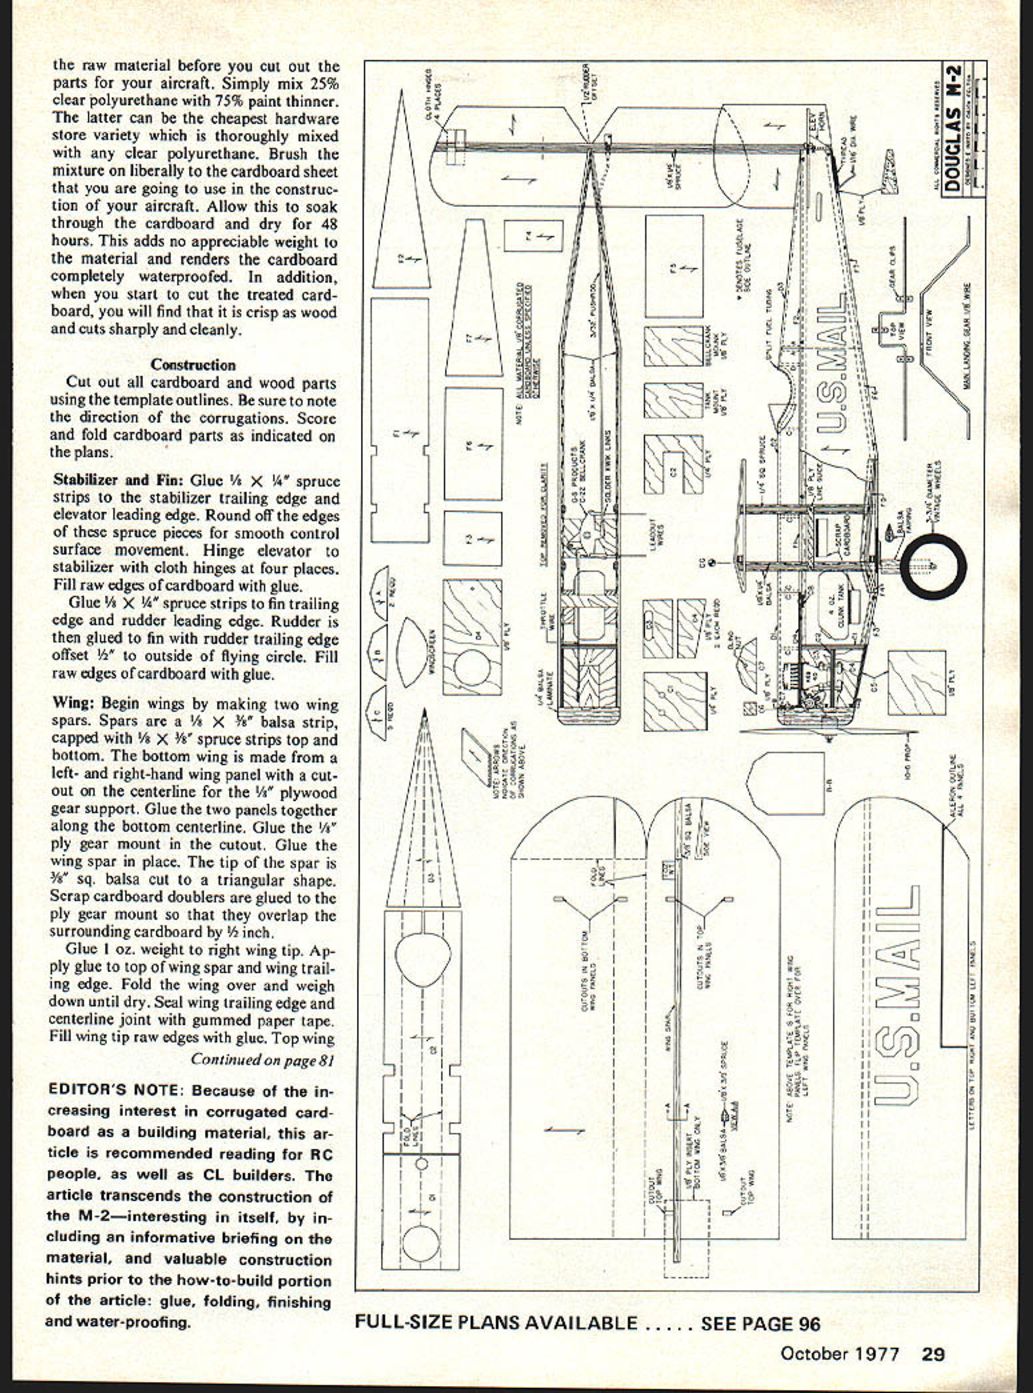
Cut out all cardboard and wood parts using the template outlines. Be sure to note the direction of the corrugations. Score and fold cardboard parts as indicated on the plans.
Stabilizer and Fin
Glue 1/8" x 1/4" spruce strips to the stabilizer trailing edge and elevator leading edge. Round off the edges of these spruce pieces for smooth control surface movement. Hinge elevator to stabilizer with cloth hinges at four places. Fill raw edges of cardboard with glue.
Glue 1/8" x 1/4" spruce strips to fin trailing edge and rudder leading edge. Rudder is then glued to fin with rudder trailing edge offset 1/8" to outside of flying circle. Fill raw edges of cardboard with glue.
Wing
Begin wings by making two wing spars. Spars are a 1/4" x 3/8" balsa strip, capped with 1/8" x 3/8" spruce strips top and bottom. The bottom wing is made from a left- and right-hand wing panel with a cutout on the centerline for the 1/4" plywood gear support. Glue the two panels together along the bottom centerline. Glue the 1/4" ply gear mount in the cutout. Glue the wing spar in place. The tip of the spar is 3/8" sq. balsa cut to a triangular shape. Scrap cardboard doublers are glued to the ply gear mount so that they overlap the surrounding cardboard by 1/2 inch.
Glue 1 oz. weight to right wing tip. Apply glue to top of wing spar and wing trailing edge. Fold the wing over and weigh down until dry. Seal wing trailing edge and centerline joint with gummed paper tape. Fill wing tip raw edges with glue.
EDITOR'S NOTE
Because of the increasing interest in corrugated cardboard as a building material, this article is recommended reading for RC people, as well as CL builders. The article transcends the construction of the M-2—interesting in itself, by including an informative briefing on the material, and valuable construction hints prior to the how-to-build portion of the article: glue, folding, finishing and water-proofing.
Transcribed from original scans by AI. Minor OCR errors may remain.

