
USAF ROG
By Paul McIlrath
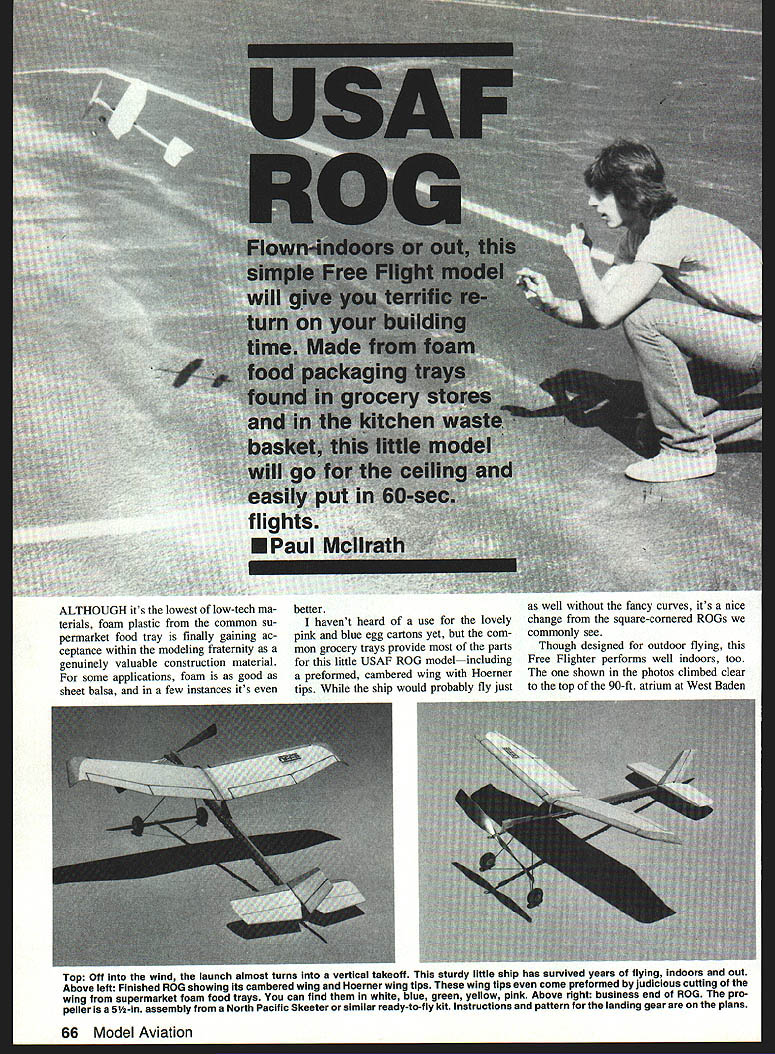
Flown indoors or out, this simple Free Flight model will give you terrific return on your building time. Made from foam food packaging trays found in grocery stores and in the kitchen wastebasket, this little model will go for the ceiling and easily put in 60-second flights.
Although it's the lowest of low-tech materials, foam plastic from the common supermarket food tray is finally gaining acceptance within the modeling fraternity as a genuinely valuable construction material. For some applications, foam is as good as sheet balsa, and in a few instances it's even better.
The common grocery trays provide most of the parts for this little USAF ROG model — including a preformed, cambered wing with Hoerner tips. While the ship would probably fly just as well without the fancy curves, it's a nice change from the square-cornered ROGs we commonly see. Though designed for outdoor flying, this Free Flighter performs well indoors, too; the one shown climbed clear to the top of a 90-ft. atrium.
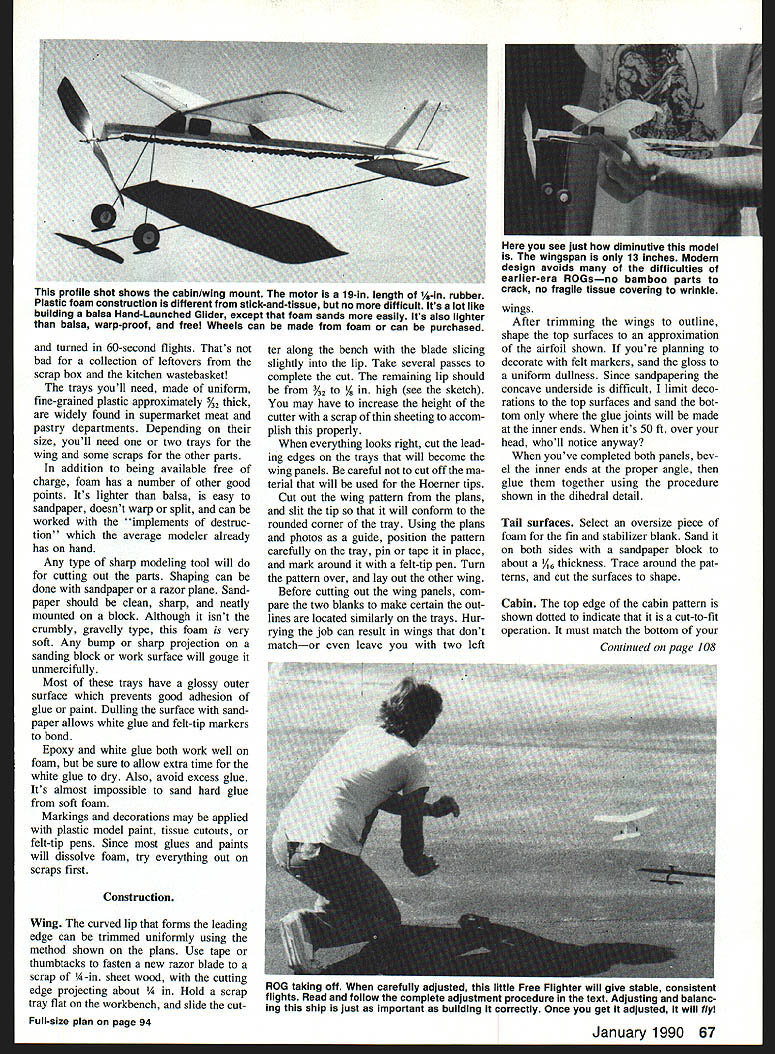
You'll find the ship is a good project from the collection of leftovers in the scrap box or kitchen wastebasket. The trays you'll need are made of uniform, fine-grained plastic approximately 1/32 in. thick and are widely found in supermarket meat and pastry departments. Depending on size, you'll need one or two trays for the wing and some scraps for the other parts.
Foam advantages and working notes:
- Foam is lighter than balsa, easy to sand, and doesn't warp or split.
- It can be worked with ordinary modeling tools: sharp knives, razor planes, sandpaper blocks.
- Sandpaper should be clean, sharp, and neatly mounted on a block. Foam is very soft; any bump on the sanding block or work surface will gouge it unmercifully.
- Most trays have a glossy outer surface which prevents good adhesion of glue or paint. Dulling the surface with sandpaper allows white glue and felt-tip markers to bond.
- Epoxy and white glue both work well on foam; allow extra drying time for white glue. Avoid excess glue — hard glue is almost impossible to sand smooth against soft foam.
- Markings and decorations may be applied with plastic model paint, tissue cutouts, or felt-tip pens. Since some glues and paints will dissolve foam, try everything on scraps first.
Construction
Wing
- The tray's curved lip forms the leading edge and can be trimmed uniformly. Fasten a new razor blade to a scrap 1/8-in. sheet of wood with tape or thumbtacks, the cutting edge projecting about 1/4 in. Hold the scrap and tray flat on the bench and slide the cutter along the bench so the blade slices slightly under the lip. Take several passes to complete the cut.
- The remaining lip should be about 1/32 to 1/8 in. high. You may have to alter the cutter height or add thin sheeting to the scrap to get this right.
- When everything looks right, cut the leading edges on the trays that will become the wing panels. Be careful not to cut off material that will be used for Hoerner tips.
- Cut out the wing pattern from the plans. Slit the tip so it will conform to the rounded corner of the tray. Using the plans and photos as a guide, position the pattern carefully on the tray, pin or tape it in place, and mark around it with a felt-tip pen. Turn the pattern over and lay out the other wing.
- Before cutting, compare the two blanks to be sure the outlines are located similarly on the trays. Hurrying can result in mismatched wings (or two left wings).
- After trimming to outline shape, form the top-surface approximation of the airfoil shown on the plans. If decorating, use felt markers or sand gloss to a uniform dullness. Since sanding the concave underside is difficult, limit decorations to the top surfaces. Sand the bottom; glue joints will be made at the inner ends.
- Bevel the inner ends at the proper angle and glue the panels together using the dihedral procedure shown on the plans.
Tail surfaces
- Select an oversize piece of foam for the fin and stabilizer blanks. Sand both sides with a sandpaper block to about 1/16 in. thickness.
- Trace around the patterns, cut the surfaces, and shape them to final contours.
Cabin
- The top edge of the cabin pattern is shown dotted on the plans to indicate a cut-to-fit operation. The cabin top must match the bottom and the underside of the completed wing at the center joint.
- First sand one edge of an oversize foam blank to fit the underside of your wing. Locate the cabin pattern from that shaped edge, outline the remainder of the pattern, and trim to shape. Sand glossy surfaces later to promote adhesion.
Motor stick assembly
- Cut a medium-hard 1/8 x 3/8-in. balsa stick to an 11-1/4 in. length and shape the tail end per the plans.
- Glue the cabin securely and accurately onto the stick. The foam will be slightly thicker than the balsa. After the joint is dry, lay the assembly flat and sand the sides of the cabin flush with the sides of the stick.
- Mark the balance point on the side of the cabin.
- Make the wire landing gear according to the pattern and instructions in the plans. Cement the gear securely to the motor stick.
- Wheels shown on the plans can be made from foam and cardboard washers (use a hand-held paper punch) or use lightweight commercial wheels.
- Bend a rear rubber hook from a pin or music wire and cement it securely in place.
Assembly
- Glue the stabilizer in place, making sure it is square with the cabin. Align the fin with the fuselage stick, then glue it to the stabilizer. Fine-size pins are useful for alignment.
- Glue the wing onto the cabin.
- Slide a 5-1/2 in. propeller assembly (from a North Pacific Skeeter or similar RTF kit) onto the front of the fuselage stick. It will fit loosely; snug it up by pushing small pieces of thin balsa between the stick and the bearing.
- Tie a 19 in. length of 1/8-in.-wide rubber into a loop and install it on the prop and rear hooks.
Preflight preparations and flight testing
- Perform the preflight inspection shown on the plans. If any surfaces appear crooked, carefully bend them into better alignment.
- Balance: support the model with thumb and forefinger on the bottom side of the wing at the balance point marked on the cabin. Add clay or lead ballast to the nose or tail until the aircraft balances level. Do not attempt flight until the plane hangs horizontally when supported at the indicated point.
Adjustment procedure (follow these two steps in order):
- Adjust the glide by bending the wing and tail surfaces.
- Adjust powered flight (thrust-line adjustment) by changing the direction in which the propeller points. In this model the thrust-line is adjusted by inserting tapered wedges between the prop bearing and the fuselage stick (see plans).
Flight testing:
- Begin with hand glides. Aim at a spot about 20 ft. away and give the ship a smooth toss.
- If it immediately noses into the ground, bend up the rear edges of the stabilizer slightly and try again.
- If it noses up, hesitates (stalls), then drops, you may have launched it too fast or pointed it up too much. Try again with a gentler launch.
- If you believe the model stalls due to trim rather than a poor launch, bend the rear edges of the stabilizer down about 1/32 in.
- If the airplane banks or turns severely in the glide, recheck wing straightness and rebend the panels until they match visually. If it still turns excessively, bend the rear edge of the rudder about 1/32 in.: to correct a right turn, bend the rudder to the left; reverse for a left turn.
- Once the glide is established, begin powered flight with about 50 turns in the motor. If the pattern is steady and smooth, move up to 100 turns.
- After glide is set, make further adjustments only at the propeller bearing. For example:
- If the model circles too sharply to the left, wedge the prop to point slightly more to the right.
- If it zooms up into a stall, point the propeller downward.
- As you increase winds in the motor, the model should gain altitude. If flights are smooth but the model doesn't climb, install a slightly wider rubber band.
- Lubricate the rubber motor and stretch-wind it for longer flights. (Methods for lubricating and stretch-winding are covered in model-building handbooks and Model Aviation articles.)
If you have yet to discover the usefulness of foam plastic, the USAF ROG provides a favorable introduction. As capable as it is small, this model will bring you a lot of flying fun.
Transcribed from original scans by AI. Minor OCR errors may remain.

