
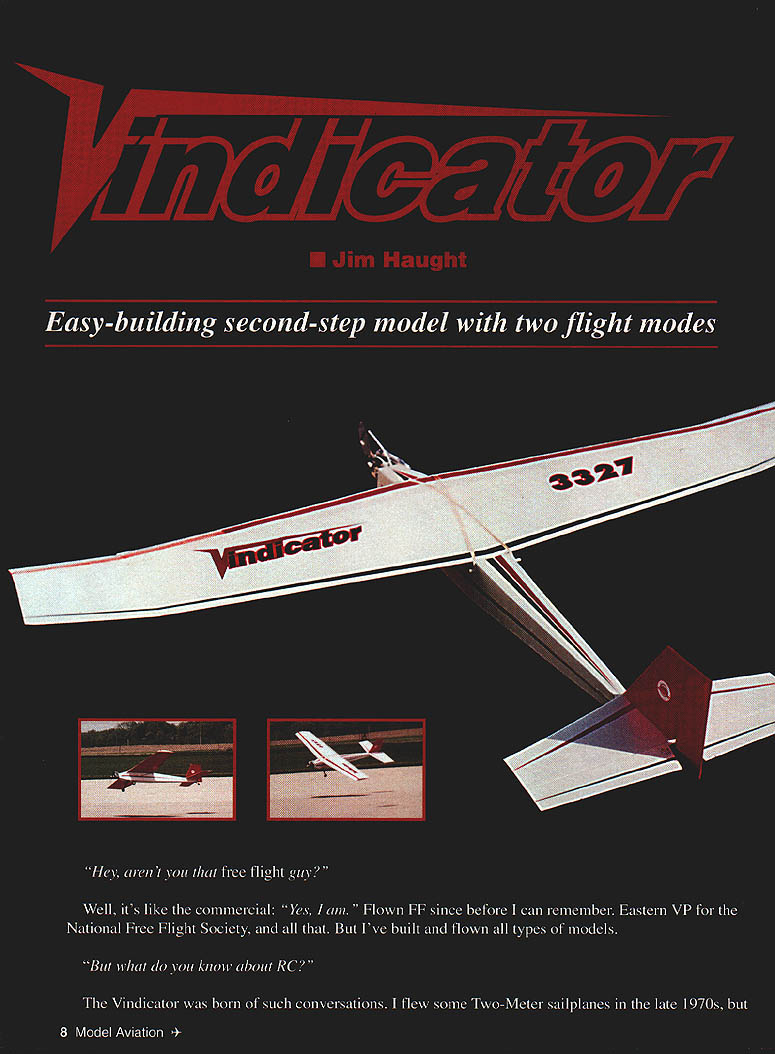

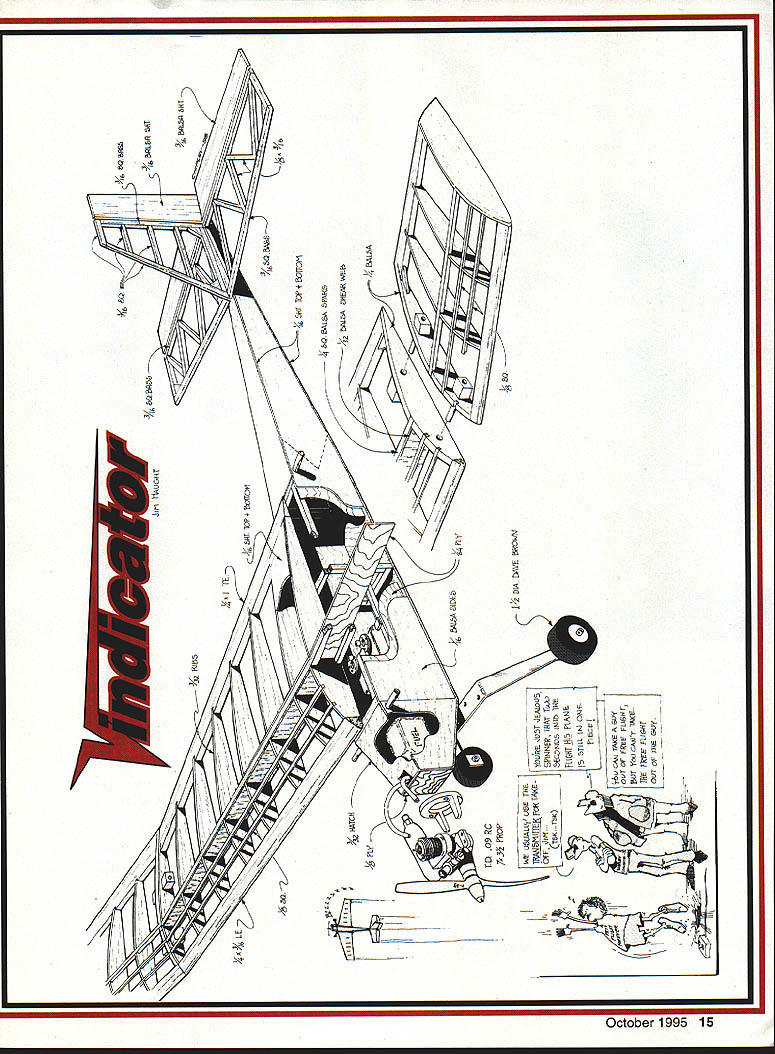
Vindicator
Jim Haught
Easy-building second-step model with two flight modes
"Hey, aren't you that free flight guy?"
Well, it's like the commercial: "Yes, I am." Flown FF since before I can remember. Eastern VP for the National Free Flight Society, and all that. But I've built and flown all types of models.
"But what do you know about RC?"
The Vindicator was born of such conversations. I flew some two-meter sailplanes in the late 1970s, but never a powered RC model of any kind. So naturally I decided to design my own trainer/fun model.
"Everyone has a .40. You should design it for that size, at least."
Maybe... but I'm nothing if not stubborn. I wanted a big, light floater—a model that would glide a bit if I cut the power. And besides, I just don't like "big" engines like .40s and .60s.
So when I heard about the new Cox Tee Dee .09 RC engine, the power plant quickly became a given. I have used Cox engines from the .010 on up since the 1960s, and I have a real fondness for their quality and performance.
Originally I wanted a two-channel model—something nice and simple, akin to my sailplane experience. Then AMA's Competitions Director, Steve Kaluf, spoke up: "If you don't put a throttle on this airplane, people will say it's just a powered free flight. If you want to make your point, put a throttle on it."
Okay, fine—throttle it is. Now it's a "real" RC model. But I didn't want another boxy-looking, ugly-but-functional model. It had to have a bit of a different look. So I double-tapered the wing and used a swept-back stabilizer and rudder design. It had to at least look fast, even if it really wasn't. I also used removable wingtips, to satisfy the guys who want to go faster—who would be bored with a trainer. Built in some tip dihedral for added stability in the long-wing mode, too. The tips use telescoping Du-Bro brass tubing to plug in.
Vindicator won't fly the pattern, or tear 'em up around #1 pylon, but this is a fun model to fly. And the fact that even a .09 can fly it successfully should be encouragement enough for others to try.
CONSTRUCTION
The following construction summary contains brand names of products I used when building Vindicator. I have reached a comfort level with each product mentioned. I get the results I want from them. But brand loyalty is an individual thing; each builder should use the products that will give him/her the same "comfortable" feeling and measurements what I or anyone else may recommend. Results are what matters!
Many corners were cut with the original model in an effort to save weight, mainly due to my paranoia about the .09's power. With a great deal of conscious effort, I got the weight down to 28 ounces ready to fly. Even then I was concerned, despite assurances from Larry Renger at Cox that the .09 was the best Tee Dee in power-to-weight ratio. More on this later.
Materials
- Wood: Sig balsa, plywood, and basswood throughout.
- Adhesives: Duco Household Cement, HobbyPoxy Formula IV epoxy, Satellite City Hot Stuff Super T, Bob Smith Industries Insta-Set accelerator. CA (cyanoacrylate) is used in places for speed and strength, especially for spot gluing and hardening joints.
Hardware
- Du-Bro bolts, nuts, and glow plug driver
- Tatone metal engine mount
- Sullivan two-ounce flex tank
- Sig pushrods, clevises, and horns
Radio
- Hitec microservos (original), later replaced with standard-size servos
- JR Max 4 FM transmitter
- NER-226X receiver
- 600 mAh battery pack
Wing
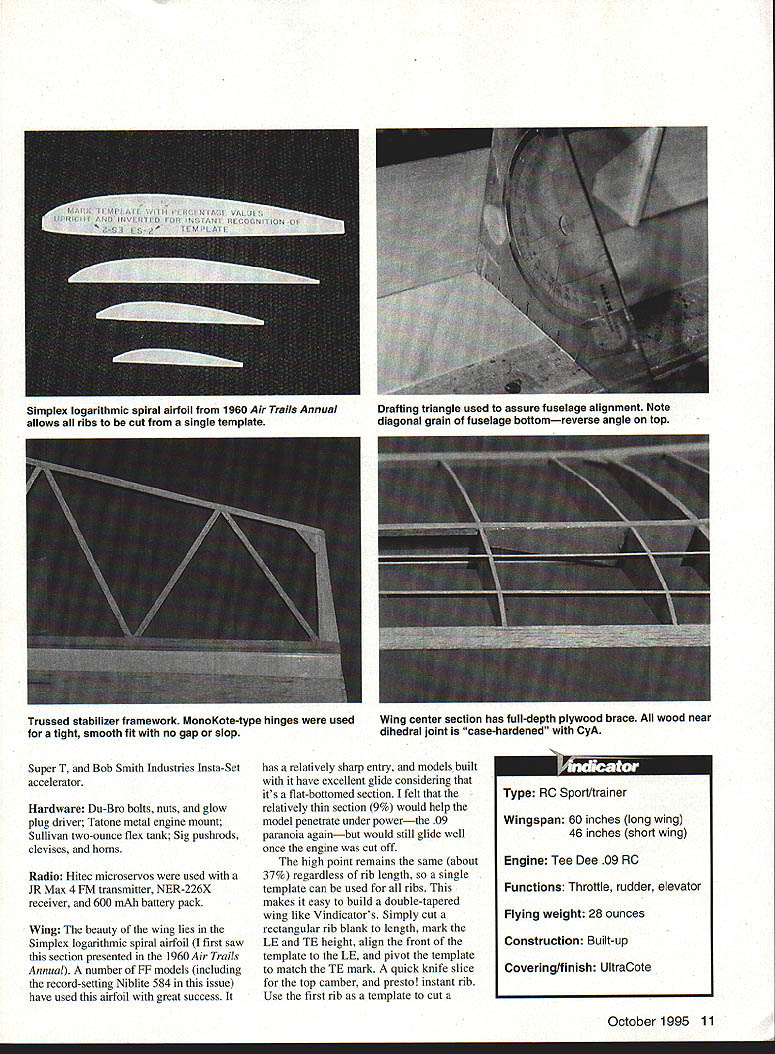
The beauty of the wing lies in the Simplex logarithmic spiral airfoil (first presented in the 1960 Air Trails Annual). Several free-flight models have used this airfoil with great success. It has a relatively sharp entry and, despite being a flat-bottomed section, provides excellent glide. I felt the relatively thin section (9%) would help the model penetrate under power (the .09 paranoia again) but still glide well with the engine cut.
Important notes on the wing:
- The high point of the airfoil remains the same (about 37% chord) regardless of rib length, so a single template can be used for all ribs. This makes it easy to build a double-tapered wing like Vindicator's.
- To cut ribs: cut a rectangular rib blank to length, mark the leading-edge (LE) and trailing-edge (TE) heights, align the front of the template to the LE, pivot to match the TE mark, and slice the top camber. Use the first rib as a template to cut the rest.
- Cut main spar notches into the ribs before assembly, but don't cut other spar notches until the framework has been assembled. Mark spar locations on the ribs with a soft-lead pencil and use a sharp razor blade to cut the notches.
- A simple notching tool can be made from a couple of thin razor blade pieces CA-glued on each side of a piece of wood slightly smaller in thickness than the desired notch. Add a depth spacer for uniform depth and width.
- Vindicator's wing derives much strength from vertical-grained shear webs, so a snug fit (no gaps) is important.
- The full-depth 1/32" plywood center brace has proven adequate. If you intend to really "horse" the model around, consider using 3/32" plywood for added peace of mind.
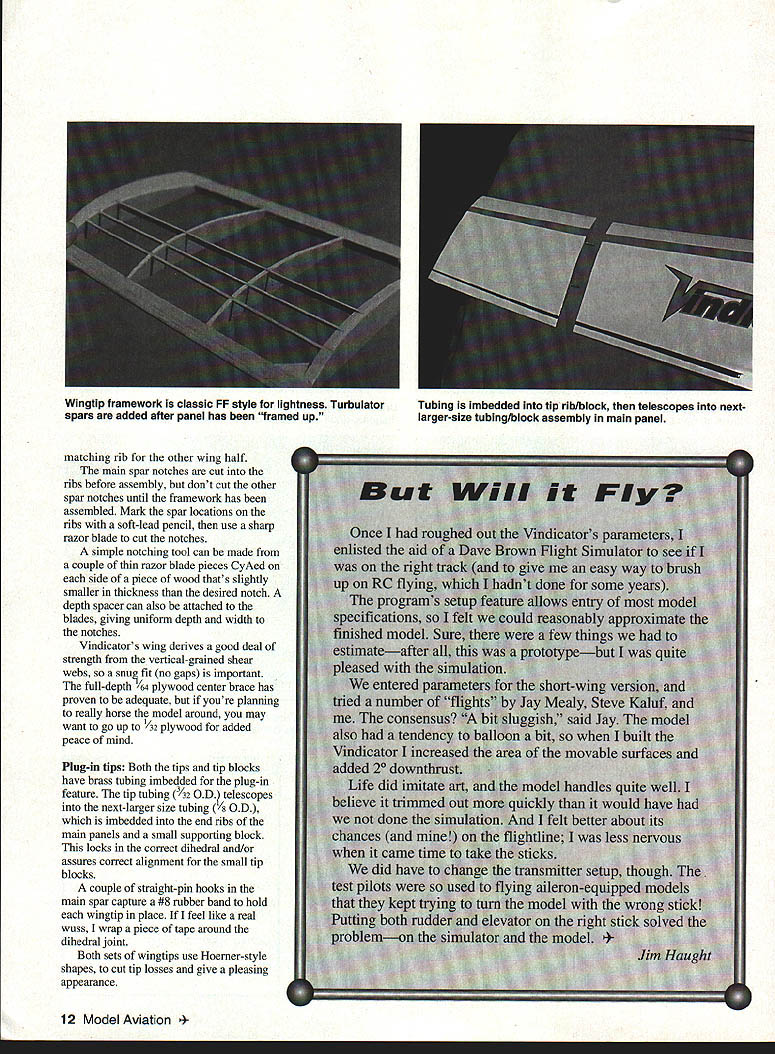
Plug-in tips:
- Both tips and tip blocks have brass tubing embedded for the plug-in feature. The tip tubing (3/32" O.D.) telescopes into the next-larger size (1/8" O.D.) embedded into the end ribs of the main panels and a small supporting block. This locks in the correct dihedral and assures alignment.
- A couple of straight-pin hooks in the main spar capture a #8 rubber band to hold each wingtip in place. You can add a piece of tape around the dihedral joint if desired.
- Both sets of wingtips use Hoerner-style shapes to cut tip losses and give a pleasing appearance.
Specifications
- Type: R/C sport/trainer
- Wingspan: 60 inches (long wing), 46 inches (short wing)
- Engine: Cox Tee Dee .09 RC
- Functions: Throttle, rudder, elevator
- Flying weight: 28 ounces
- Construction: Built-up
- Covering/finish: UltraCote
But Will it Fly?
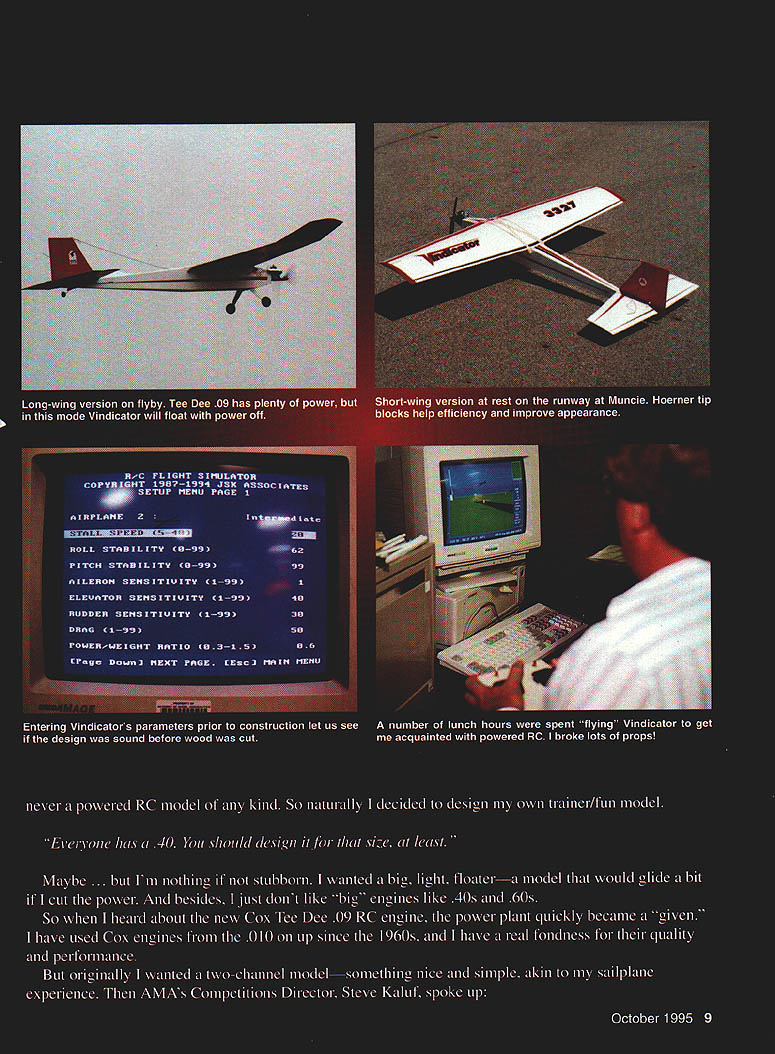
Once I had roughed out Vindicator's parameters, I used a Dave Brown Flight Simulator to check the design and brush up on RC flying (I hadn't done much for years). The program allows entry of most model specifications, so we reasonably approximated the finished model and ran a number of simulated flights.
We entered parameters for the short-wing version and tried flights flown by Jay Mealy, Steve Kaluf, and me. The consensus? "A bit sluggish," said Jay. The model also had a tendency to balloon, so when I built Vindicator I increased the area of the movable surfaces and added 2° downthrust.
Life imitated art: the physical model handled quite well and trimmed out more quickly than it might have without the simulation. We also changed the transmitter setup because test pilots were used to flying aileron-equipped models and kept trying to turn with the wrong stick. Putting both rudder and elevator on the right stick solved the problem on the simulator and the model.
— Jim Haught
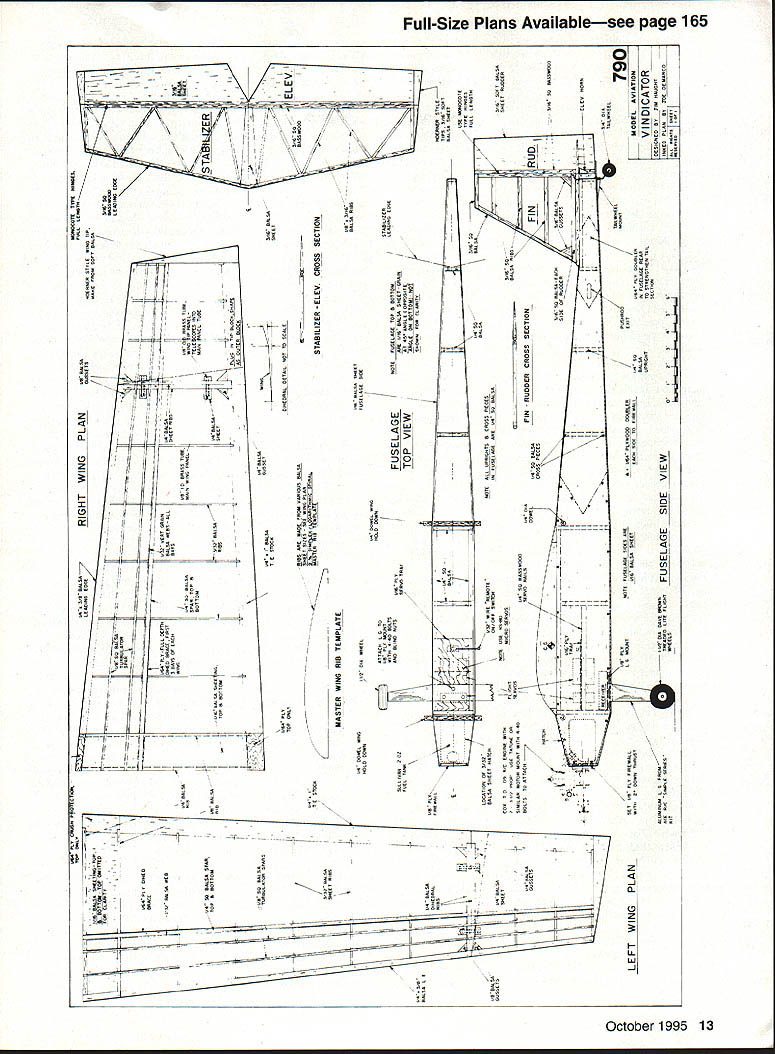
Plans and Diagrams
(Plans and cross sections referred to in the original article)
- Right wing plan
- Left wing plan
- Master wing rib template
- Stabilizer — elevator cross section
- Stabilizer — elevator plan
- Fuselage top view
- Fuselage side view
- Fin / rudder cross section
- Fin
- Rudder
- Stabilizer
- Elevator
Stabilizer and rudder
- Framework: medium-weight strip balsa, with basswood or spruce at high-stress areas.
- Use CA or epoxy provided joints are well made.
- Hinges: MonoKote-type hinges allow a tight, clean hinge line and are easily repaired or replaced. Hinge surfaces prior to covering the framework.
- Cover the mating surfaces with a thin strip of the same color material you will use on the rest of the part before applying hinges to avoid off-color hinge gaps.
Fuselage
- Construction: diagonal cross-grained top and bottom planking (opposite grain directions) is an effective way to make a light fuselage with adequate stiffness. Otherwise, it's a basic box with liberal use of 1/16" plywood doublers.
- Sheet thickness: 1/64" may not seem like enough, but it is surprisingly tough and leaves ample room for radio equipment.
- Servo mounting: servos mounted on a 1/16" plywood tray for easy removal.
- Building tip: cut bottom sheet pieces oversize and glue them together on the building board, draw a centerline and bottom view directly on this sheet, and work from the bottom up to attach sides and other fuselage pieces. Attach top pieces individually after the fuselage box is complete and hardware installed.
- CG and component placement: Vindicator's short nose makes it imperative to save weight behind the CG. My model balanced correctly with the Sullivan flex tank pushed as far forward as possible and the foam-wrapped battery pack beneath it. The receiver fits below the servo tray, which is positioned as far forward as possible.
- Switch: a remote on-off switch (see Ivan Munninghoff's how-to) was arranged so that pushing the switch wire is in the on position.
- Landing gear: used hardware from an ACE R/C 1/2A Simple Series kit; any similar gear will work. I wanted a relatively wide stance to aid inexperienced pilots in ground handling. Dave Brown treaded Lite Flite wheels were used to save weight.
- Throttle control: intended to use cable, but used a solid rod when cable was backordered—this has worked fine.
- Wing attachment: drilled the fuselage for two hold-down dowels and used #64 rubber bands for classic rubber-band attachment; dowels are removable for tank access.
- Pushrods: trapped between pieces of 1/4" square balsa at former locations.
Covering
- Color scheme: red-white-black (the author uses this on all models).
- Covering materials tried: Goldberg UltraCote and UltraCote Plus.
- UltraCote Plus (white) is self-adhesive; placement must be accurate with no sliding for alignment.
- Standard red UltraCote is heat-activated.
- Both shrank and set very well.
- Trim: MonoKote trim sheets used for logo, stripes, and numbers; red trim does not exactly match UltraCote red but is acceptable.
- Iron: Coverite 21st Century iron recommended for covering—lightweight, shaped shoe, excellent temperature control.
Setup and preflight
- Balance: approximately 33% of the Mean Aerodynamic Chord (MAC). With the short nose, weight savings behind the CG are critical. If you beef up the structure, consider extending the nose an inch.
- Preflight checklist: free movement of control surfaces, tightened bolts, proper wheel tracking, range check, and standard checks.
Flying
- First flight conditions: cold (39° windchill) and 15 mph wind. First flights flown in short-wing (faster/less inherently stable) mode.
- Initial impressions: short straight takeoff roll, climbed steadily. Engine quit two minutes into the first flight (cold engine and minimal break-in), providing an immediate dead-stick test. The model tracked well and made a safe dead-stick landing.
- Subsequent flights: after refueling and warming the engine, flew full flights with no engine problems. The model tended to turn left more easily than right due to a misaligned engine mount causing left thrust; this was fixed.
- Performance: plenty of power for good speed and penetration. In 15-mph winds it handled well. With wingtips installed (floater/trainer mode) it tracked better and responded to thermals even under power.
- Fuel and idle: using 10% nitro K&B fuel, the engine ran very well but had trouble achieving a low idle for landing—the model tended to keep flying even with the throttle at idle. Cox indicated higher nitro (about 25%) may make a low idle more reliable. Idle may improve with additional break-in.
- Power expectations: on the recommended 7 x 3.5 prop and 10% nitro K&B fuel, Vindicator climbs steadily on as little as 1/4 throttle. The model can handle additional weight if desired. It has even been postulated it would fly on a Tee Dee .049/.051, though this was not tried.
Vindicator has come close to the goal: a second-step fun/trainer model. It's a bit faster than a trainer and requires more "rail piloting," but is suitable for pilots with some RC experience. If you're contemplating a first scratch-built effort, consider that this model can be built with a straightedge; the only curve is in the airfoil.
Special thanks to test pilots Jay Mealy and Steve Kaluf for their critique and help throughout the project.
Notes and construction reminders:
- The Simplex logarithmic spiral airfoil has a high point at about 37% chord regardless of rib length—use a single rib template.
- Main spar: vertical-grained shear webs are important; ensure a snug fit with no gaps.
- Wood near dihedral joint should be case-hardened with CA for durability.
Transcribed from original scans by AI. Minor OCR errors may remain.

