
Virus
Alex McLeod
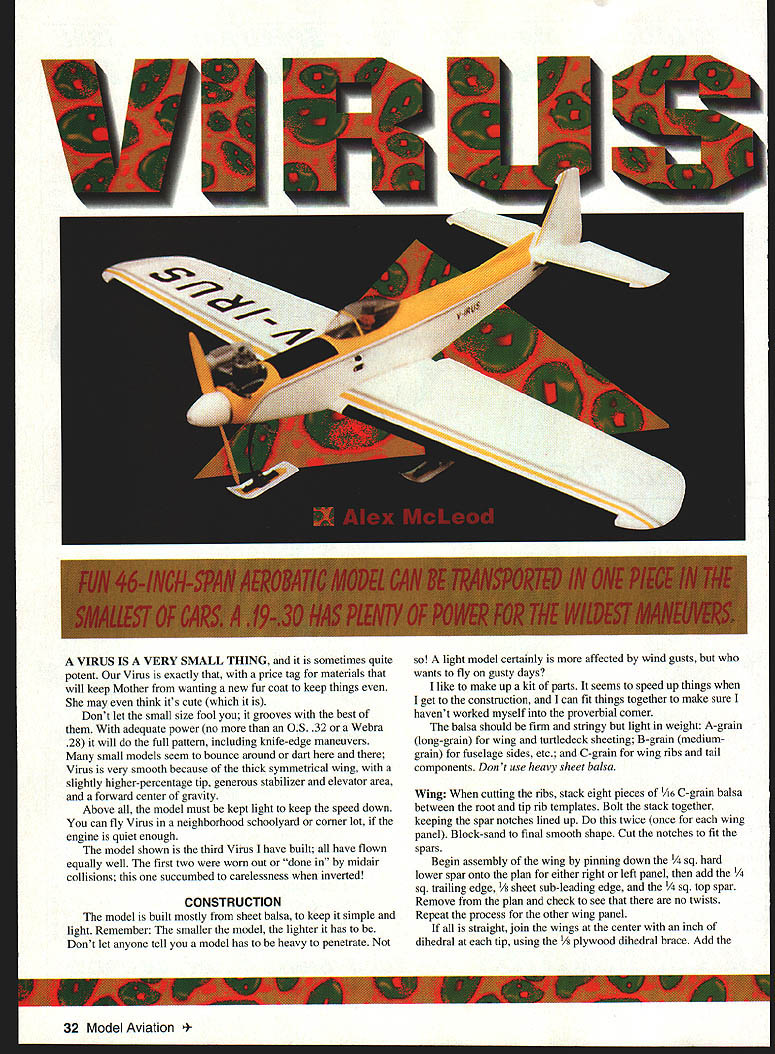
FUN 46-INCH-SPAN AEROBATIC MODEL CAN BE TRANSPORTED IN ONE PIECE IN THE SMALLEST OF CARS. A .19–.30 HAS PLENTY OF POWER FOR THE WILDEST MANEUVERS.
A virus is a very small thing, and it is sometimes quite potent. Our Virus is exactly that, with a price tag for materials that will keep Mother from wanting a new fur coat to keep things even. She may even think it's cute (which it is).
Don't let the small size fool you; it grooves with the best of them. With adequate power (no more than an O.S. .32 or a Webra .28) it will do the full pattern, including knife-edge maneuvers. Many small models seem to bounce around or dart here and there; Virus is very smooth because of the thick symmetrical wing, with a slightly higher-percentage tip, generous stabilizer and elevator area, and a forward center of gravity.
Above all, the model must be kept light to keep the speed down. You can fly Virus in a neighborhood schoolyard or corner lot, if the engine is quiet enough.
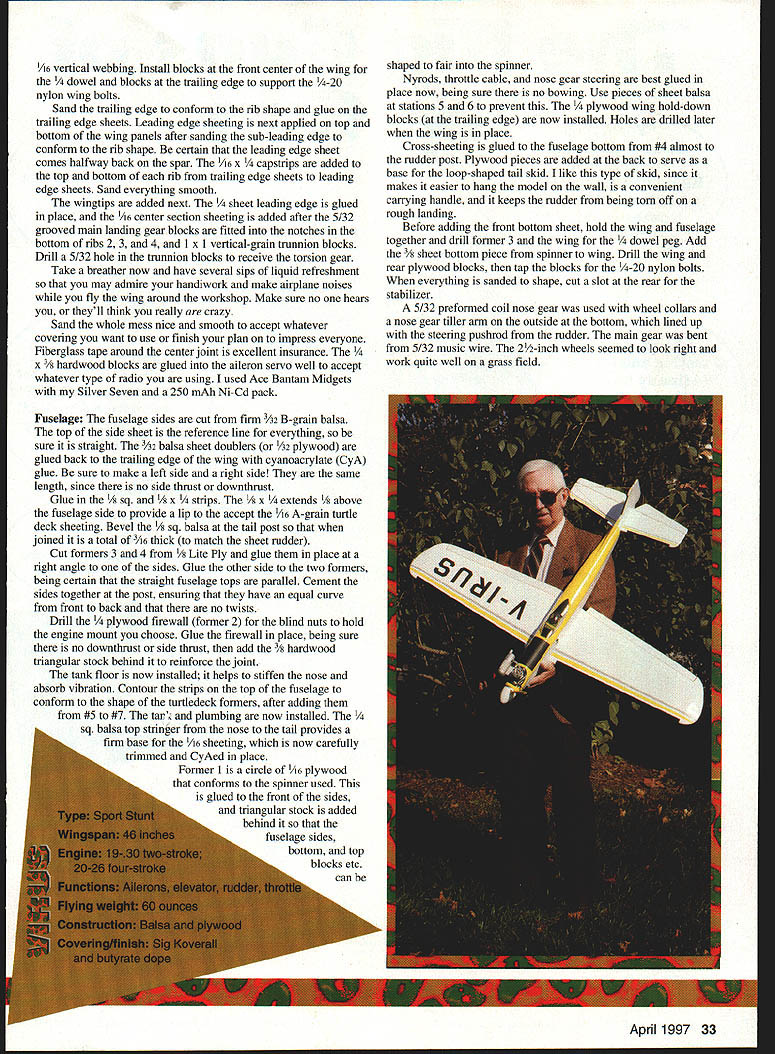
The model shown is the third Virus I have built; all have flown equally well. The first two were worn out or "done in" by midair collisions; this one succumbed to carelessness when inverted.
Construction
The model is built mostly from sheet balsa, to keep it simple and light. Remember: the smaller the model, the lighter it has to be. Don't let anyone tell you a model has to be heavy to penetrate. Not so! A light model certainly is more affected by wind gusts, but who wants to fly on gusty days?
I like to make up a kit of parts. It seems to speed things up when I get to the construction, and I can fit things together to make sure I haven't worked myself into the proverbial corner.
Use firm, stringy but light balsa:
- A-grain (long-grain) for wing and turtledeck sheeting
- B-grain (medium-grain) for fuselage sides
- C-grain for wing ribs and tail components
Don't use heavy sheet balsa.
Wing
- Ribs: Stack eight pieces of 1/16" C-grain balsa between the root and tip rib templates. Bolt the stack together, keeping spar notches aligned. Do this once for each wing panel. Block-sand to final smooth shape and cut the notches to fit the spars.
- Spars and assembly: Pin down the 1/4" sq. hard lower spar onto the plan for either right or left panel, then add the 1/4" sq. trailing edge, 1/16" sheet sub-leading edge, and the 1/4" sq. top spar. Remove from the plan and check for twists. Repeat for the other wing panel.
- Join panels: If straight, join the wings at the center with an inch of dihedral at each tip, using the 1/8" plywood dihedral brace. Add the 3/32" vertical webbing. Install blocks at the front center wing and blocks to support the trailing edge. Use 5/32" nylon wing bolts.
- Sheeting and shaping: Sand the trailing edge to conform to the rib shape and glue the trailing edge sheets. Apply leading edge sheeting to top and bottom after sanding the sub-leading edge; be certain the leading-edge sheet comes halfway back to the spar. Add top and bottom rib and trailing-edge sheets and capstrips. Sand everything smooth.
- Center section and gear blocks: Add wingtips, gluing the leading edge in place. Add center-section sheeting after fitting the 5/32" grooved main landing gear blocks into notches in bottom ribs 2, 3, and 4. Use 1/4" x 1" vertical-grain trunnion blocks. Drill a 5/32" hole in the trunnion blocks to receive the torsion gear.
- Details: Fiberglass tape around the center joint is excellent insurance. Glue 3/8" x 3/4" hardwood blocks in place for the aileron servo. The wing will accept most radios; I used Ace Bantam Midgets, Silver Seven, and a 250 mAh Ni-Cd pack.
Take a breather now; have several sips of liquid refreshment, admire your handiwork, and make airplane noises while you fly the wing around the workshop. Make sure no one hears — they'll think you're really crazy.
Fuselage
- Sides: Cut fuselage sides from firm 3/32" B-grain balsa. Mark the top-side sheet reference line and make sure everything is straight. Glue 3/32" balsa sheet doublers and 1/32" plywood to the back trailing-edge of the wing using cyanoacrylate (CyA) glue. Make sure left and right sides are the same length since there is no built-in side or downthrust.
- Stringers and turtledeck: Glue 1/8" sq. balsa strips about 3/8" above the fuselage side to provide a lip for 1/16" A-grain turtledeck sheeting. Bevel the 1/8" sq. balsa tail post so that when joined it is a total of 3/32" thick to match the sheet rudder.
- Formers: Cut formers from 3/16" and 1/8" lite-ply and glue in place at right angles to the sides. Glue the other side, making sure the fuselage tops are parallel. Cement the sides together at the post, ensuring an equal curve front to back and no twists.
- Firewall and reinforcement: Drill out the firewall/former for blind nuts to hold the engine mount. Glue the firewall in place, allowing for any downthrust or side thrust required. Add 3/16" hardwood triangular stock behind it to reinforce the joint.
- Tank floor and nose: Install the tank floor to help stiffen the nose and absorb vibration. Contour strips on the top fuselage to conform to the turtledeck formers. Add tank plumbing.
- Top stringer and sheeting: Glue a 1/4" sq. balsa top stringer from nose to tail to provide a firm base. Carefully trim and CyA the 1/16" A-grain sheeting in place.
- Spinner former: Former 1 is a circle of 1/16" plywood that conforms to the spinner used. Glue it to the front of the sides and add triangular stock behind it so fuselage sides, bottom, and top blocks can be shaped to fair into the spinner.
- Wing hold-downs and bottom: Install the 1/4" plywood wing hold-down blocks at the trailing edge; holes are drilled later when the wing is in place. Cross-sheet the fuselage bottom from former #4 almost to the rudder post. Add plywood pieces at the back as a base for the loop-shaped rail skid, which doubles as a hanging hook and carrying handle and protects the rudder on rough landings.
- Dowel and bolts: Before adding the front bottom sheet, hold the wing and fuselage together and drill former 3 and the wing for the 1/4" dowel peg. Add the 3/8" bottom sheet from spinner to wing. Drill the wing and rear plywood blocks, then tap the blocks for 1/4-20 nylon bolts. When sanded to shape, cut a slot at the rear for the stabilizer.
- Gear: A 5/32" preformed coil nose gear was used with wheel collars and a nose gear tiller arm on the outside at the bottom, lined up with the steering pushrod from the rudder. The main gear was bent from 5/32" music wire. 2-1/2" wheels work well on a grass field.
Glue in the 1/8" sq. and 1/4" x 1/4" strips. Install nylon rods (pushrods), throttle cable, and nose-gear steering now, being sure there is no bowing; use pieces of sheet balsa at stations 5 and 6 to prevent that.
Tail and Ailerons
- Cut the stab, fin, rudder, and elevators from firm light 3/16" balsa. Sand to shape with a block and paper.
- The elevator halves are joined with a 3/32" wire piece made from coat-hanger wire. I like this so I can twist them easily to line them up or cure an unwanted roll when the ailerons are level.
- The ailerons are 1/4" x 1" aileron stock cut to length and sanded well. Be sure both are of the same weight and strength.
Finish
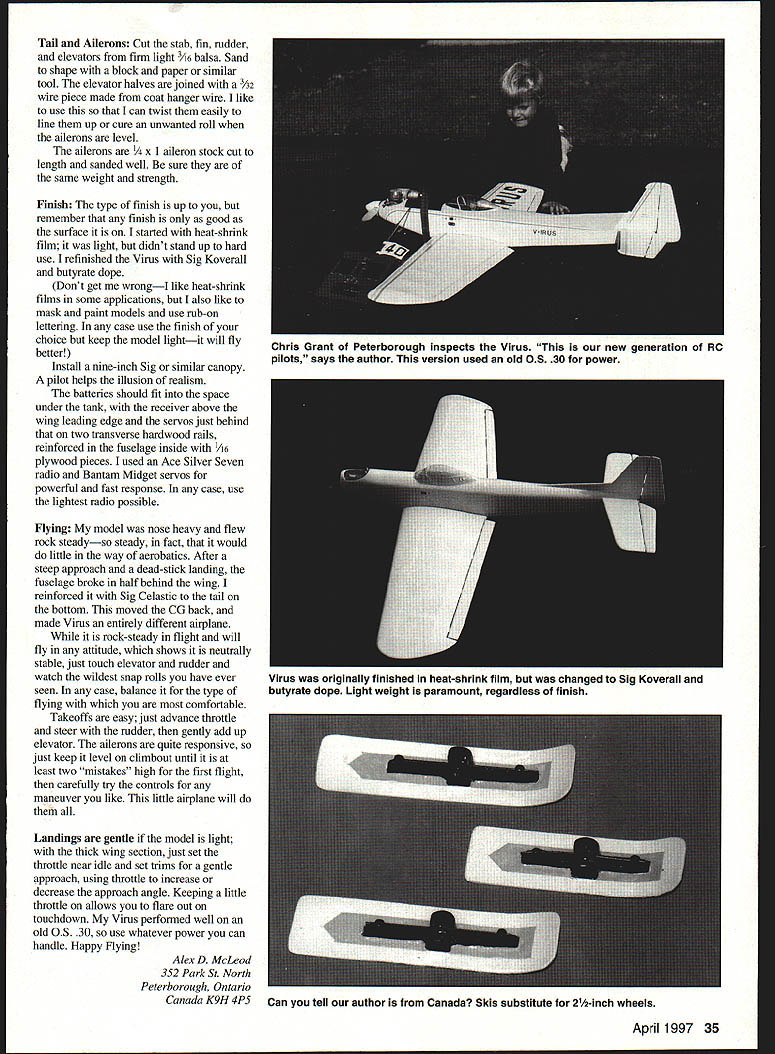
The type of finish is up to you, but remember that any finish is only as good as the surface it is on. I started with heat-shrink film; it was light but didn't stand up to hard use. I refinished the Virus with Sig Koverall and butyrate dope.
(Don't get me wrong — I like heat-shrink films in some applications, but I also like to mask and paint models and use rub-on lettering. In any case use the finish of your choice but keep the model light — it will fly better!)
Install a nine-inch Sig or similar canopy. A pilot helps the illusion of realism.
Radio, Batteries, and Equipment
- Batteries should fit under the tank, with the receiver above the wing leading edge and the servos just behind that on two transverse hardwood rails, reinforced with 1/16" plywood pieces inside the fuselage.
- I used an Ace Silver Seven radio and Bantam Midget servos for powerful, fast response. Use the lightest radio possible.
Flying
My model was nose-heavy and flew rock steady — so steady, in fact, that it would do little in the way of aerobatics. After a steep approach and a dead-stick landing, the fuselage broke in half behind the wing. I reinforced it with Sig Celastic to the tail on the bottom. This moved the CG back and made Virus an entirely different airplane.
While it is rock-steady in flight and will fly in any attitude (which shows it is neutrally stable), just touch elevator and rudder and watch the wildest snap rolls you have ever seen. Balance it for the type of flying with which you are most comfortable.
Takeoffs are easy: advance throttle and steer with the rudder, then gently add up elevator. The ailerons are quite responsive, so keep it level on climbout until it is at least two "mistakes" high for the first flight, then carefully try the controls for any maneuver you like. This little airplane will do them all.
Landings
Landings are gentle if the model is light. With the thick wing section, set the throttle near idle and use trims for a gentle approach, using throttle to increase or decrease the approach angle. Keeping a little throttle on allows you to flare out on touchdown. My Virus performed well on an old O.S. .30, so use whatever power you can handle.
Happy flying!
Specifications
- Type: Sport Stunt
- Wingspan: 46 inches
- Engine: .19–.30 two-stroke; .20–.26 four-stroke
- Functions: Ailerons, elevator, rudder, throttle
- Flying weight: 60 ounces
- Construction: Balsa and plywood
- Covering/finish: Sig Koverall and butyrate dope
Alex D. McLeod 352 Park St. North Peterborough, Ontario Canada K9H 4P5
Transcribed from original scans by AI. Minor OCR errors may remain.

