


WATER FLYING
There are two basic floatplane design concepts: 1) a converted land model and 2) a model designed from the start for water flying. Because it’s easier, most of us convert existing designs. Very little weight reduction can be achieved when building a land model for exclusive water use without redesigning the entire structure. Designing a floatplane from scratch allows you to minimize excess weight that is usually added for crash resistance and come in at or close to the desired wing loading.
The key is to select the right model to begin with and then adjust its characteristics and configuration for water operation. Below are the mandatory and optional modifications required to turn a land model into a successful floatplane, plus notes on waterproofing, performance, and candidate models.
Mandatory modifications
- Push-through switch
- Install a push-through (waterproof) switch. If water gets to the switch, it’s over. Both Du-Bro and Ernst offer push-through switches. The solid-shaft model is preferred.
- Water rudder
- Install at least one water rudder. Williams Brothers makes a commercial unit (too small for anything over .15-powered ships).
- A reliable home-built approach: 5/32" brass tubes held in nylon nose-wheel steering blocks, with a collar on the bottom and a steering arm on top. Brass or steel sheet rudders are crimped to accept the tubes and sweat-soldered in place.
- These rudders may bend if they hit something; they’re easy to straighten or replace. This is preferable to making a complicated, draggy kick-up type.
- Secure the rudder control cable to the fuselage using colored tape or small aluminum tabs screwed to the lower longeron. Route the cable aft, secure it to the aft float strut, and fasten the sheath to the float with two nylon gear straps. Put a small rubber band under the strap before tightening so the sheath can be slipped for alignment between the water rudder and the air rudder.
- Seal the wing-attachment area (especially for low-wing models)
- Low-wing planes will generally get internally soaked if they take a dunk. Seal the wing attachment area. An exception is some single-float types where spray is deflected away from the wing-attachment area.
- A high-wing model has the advantage of keeping critical areas drier if the plane flips; low-wing fuselages are harder to waterproof.
- Seal control surfaces and hinges
- Make hinges and control surfaces water-tight. Iron-on covering materials such as ColorTex can be used to form hinges, but any reliable sealing method is acceptable.
- Note: cyanoacrylate adhesive (CyA) is not waterproof — don’t rely on it for sealing.
- Seal pushrod exits
- Epoxy the outer plastic sheaths of pushrods in place to prevent water wicking into the servo area.
Waterproofing and maintenance
- Internal waterproofing is necessary mainly for salt-water operation. Flying from salt water without internal waterproofing is possible, but risky and anxiety-producing.
- For fresh water, internal waterproofing is less critical. After a soaking dunk, open and dry the receiver, servos, switch, and battery compartment. Blow out internals and swab servo pots with alcohol if necessary. Check foam packing for dampness.
- In summary: for fresh water, routine inspection and drying after a session is usually sufficient; for salt water, consider internal waterproofing precautions.
Optional modifications
- Increased tail area
- Converting a landplane to floats often reduces yaw and pitch stability (yaw is the harder to correct).
- If vertical and horizontal stabilizer areas are already abundant (roughly at least 10% vertical and 20% horizontal of wing area), changes may not be required.
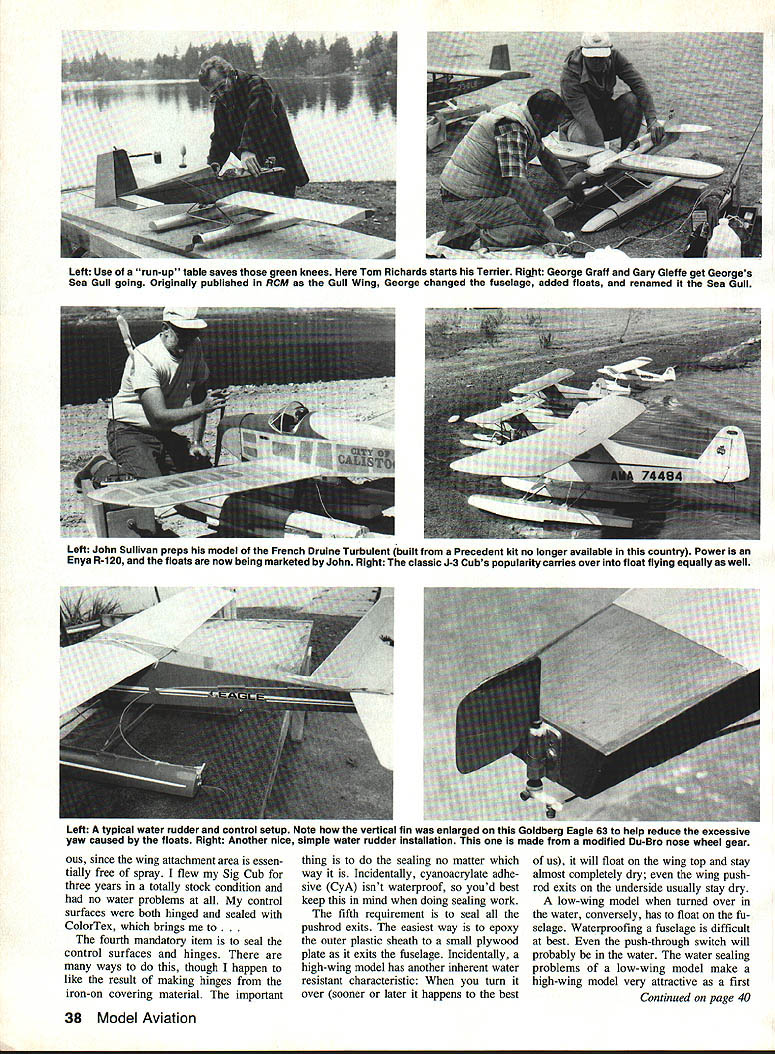
- If your converted model yaws when an aileron is applied, the vertical fin is likely undersized. Analysis of twin-float models suggests 28%–34% additional vertical stabilizer area is required to match yaw stability of the landplane counterpart.
- For new builds intended as floatplanes, enlarge the fin slightly. For completed models, adding a ventral fin or sub-fin is often the most practical fix.
- Pitch (horizontal) stability fixes
- If insufficient pitch stability shows up on landing flare (nose pitching down before touchdown), try:
- Moving the center of gravity (CG) aft.
- Sealing the elevator hinge line.
- Adding stabilizer tip plates (which also increase vertical area).
- Power and propeller
- Expect a 20%–25% weight increase when you add floats to an average trainer. That reduces thrust-to-weight by the same amount.
- You may pick up some performance by using a lower-pitch prop, but if wing loading is high (about 22 oz./sq. ft. or more), a larger engine is likely needed.
- Rule of thumb: go to the next size engine; some models may require an increase of a couple of sizes.
Performance, wing loading, and model selection
- Typical effect of floats
- Most trainer models (wing loading ~18 oz./sq. ft.) will rise to about 23 oz./sq. ft. after floats — roughly a 25% increase.
- Recommended starting wing loading: the "20/20" machine
- Aim for about 20 oz./sq. ft. wing loading. This corresponds to a stall speed of roughly 20 mph assuming a maximum lift coefficient (Clmax) of about 1.2 (realistic at our Reynolds numbers).
- A 20/20 model with average power will typically get off the water in less than 100 ft., often around 50 ft. Add some headwind and liftoff will occur right when the plane comes up on the step.
- Before buying
- At the hobby shop, mentally add 25% to the stated flying weight then compute the wing loading to see if a model is a good float candidate.
- Candidate models
- Four models that commonly make good conversions: Sig Cub, Kadet Senior, Eagle 63, and Telemaster 48.
- Note: the Sig Cub and Eagle 63 both typically need about 30% more vertical fin area when converted to floats. The Kadet Senior and Telemaster 48 will usually work well with minimal changes.
Hopefully this gives you enough guidance to get down to the water with a machine that will fly well, win fun-fly events, and get you hooked on float flying. With a water site and a boat you’ll find it easier than land flying—and cleaner, too. Let’s go!
Transcribed from original scans by AI. Minor OCR errors may remain.

