
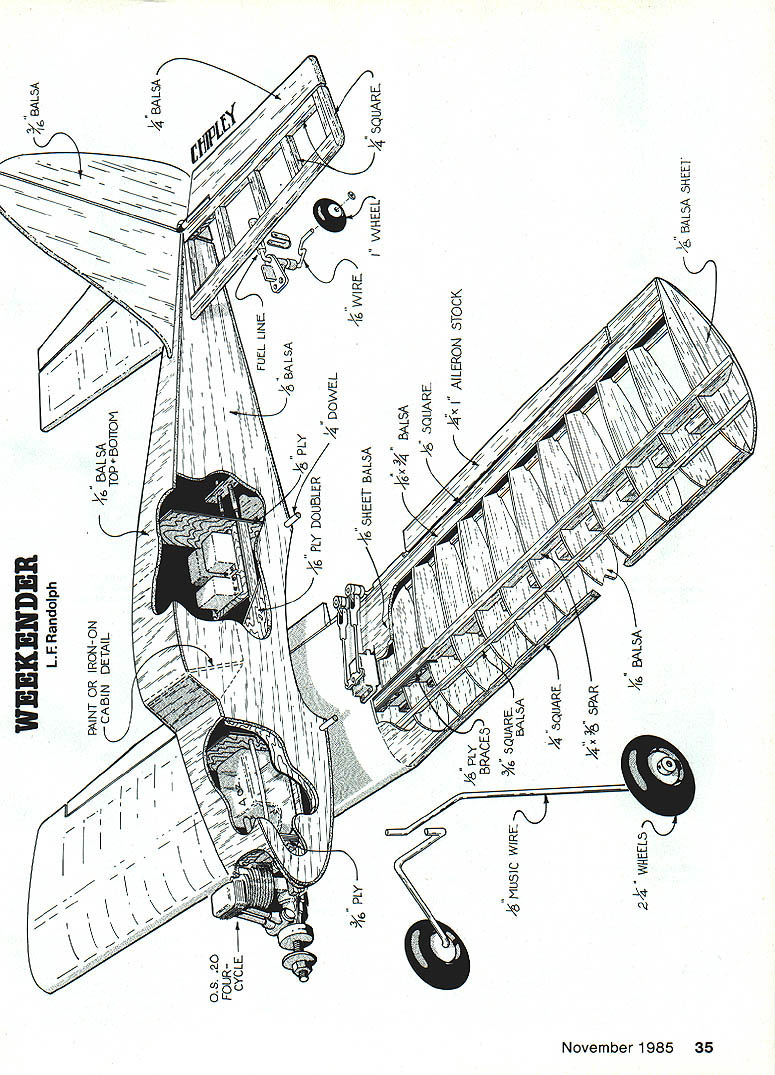
Weekender
L. F. Randolph
Overview
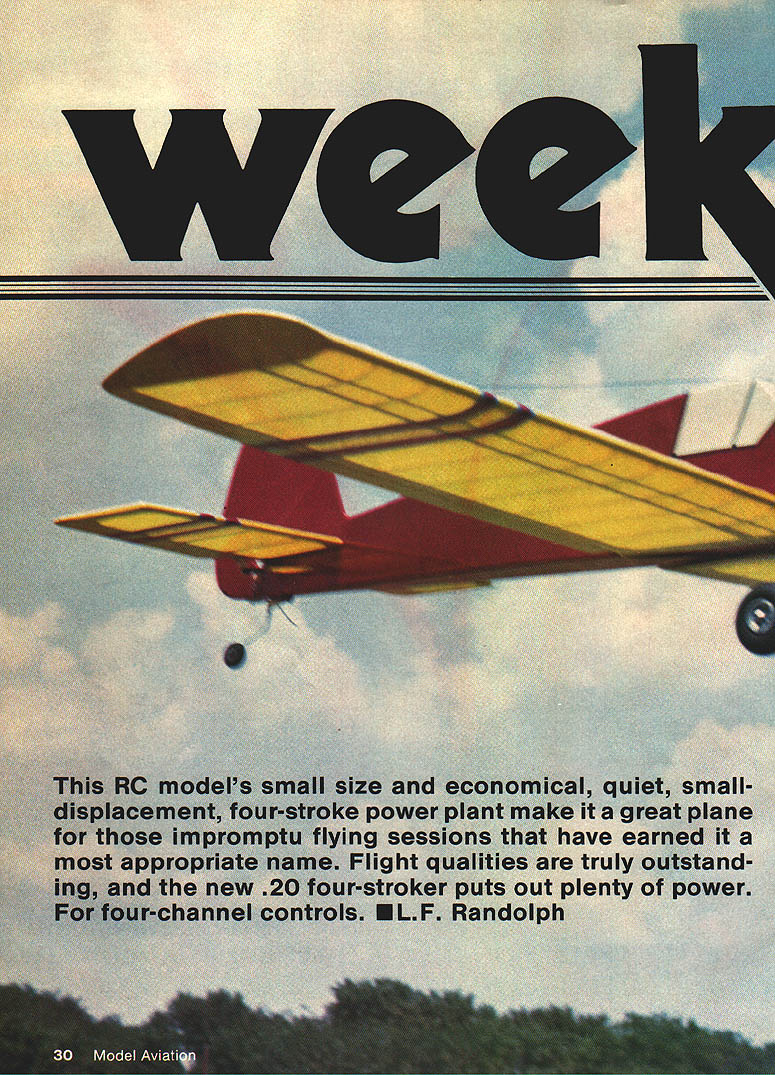
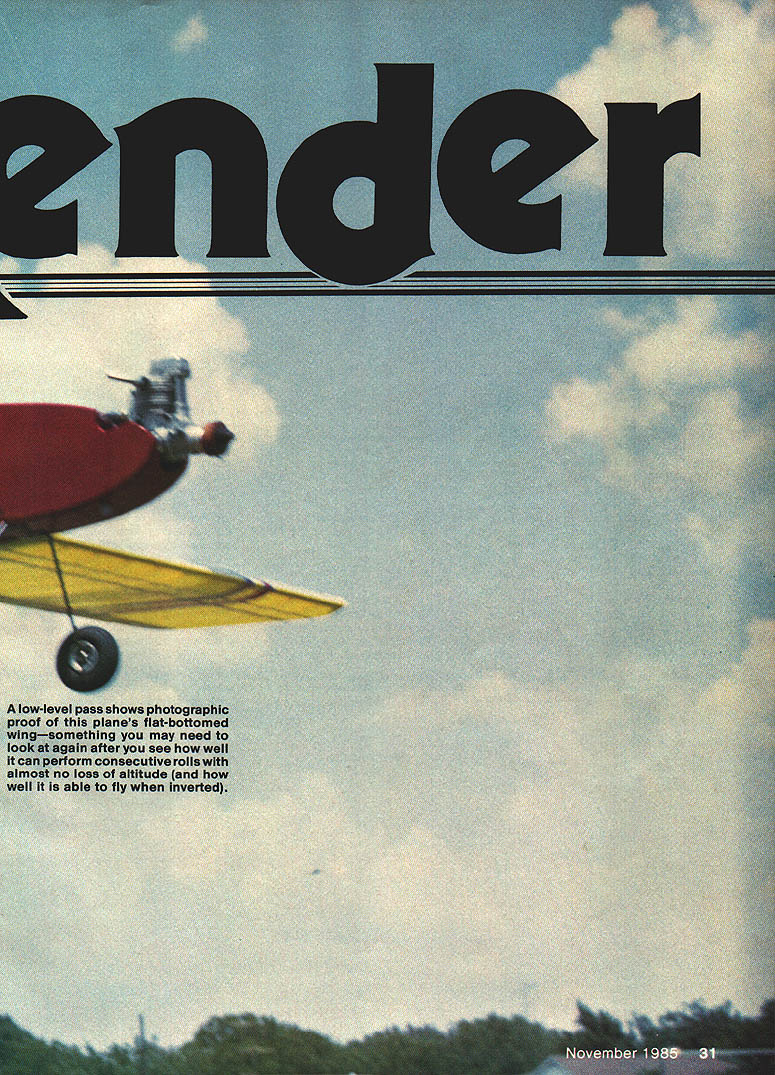
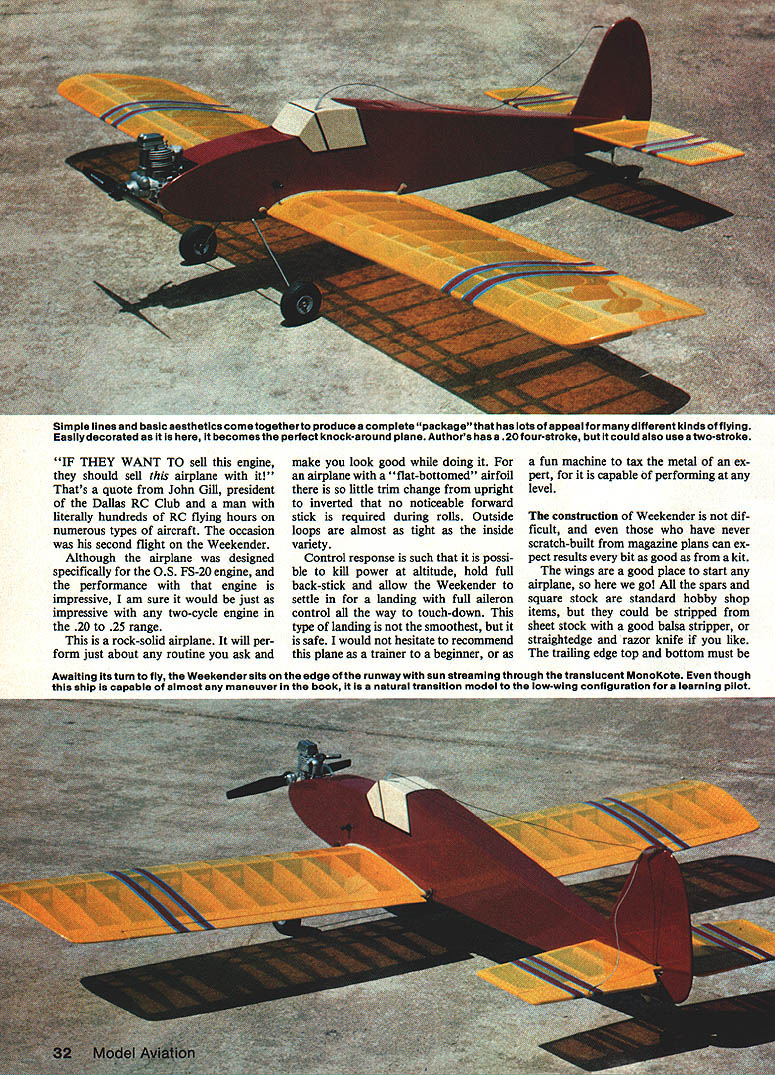
The Weekender is a small RC model with economical, quiet small-displacement power — the original used an O.S. FS-20 four-stroke — making it an ideal plane for impromptu flying sessions. Flight qualities are outstanding: the Weekender is rock-solid, capable of nearly any routine, and forgiving enough that it can be recommended to pilots moving from trainers to low-wing ships. Its flat-bottomed airfoil requires very little trim change between upright and inverted flight, and control response is positive enough to allow full aileron control right to touchdown.
Although designed for the O.S. FS-20 four-stroke, the Weekender will perform well with any two-stroke engine in the .20–.25 range.
Materials and general notes
- Use standard hobby-shop materials: balsa sheet and square stock, vertical-grain balsa for webs, and plywood for dihedral braces and doublers.
- Useful tools: balsa stripper, straightedge and razor knife, band saw (optional), sanding block.
- Wing and stabilizer sheeting typically use 1/16-in. and 1/8-in. balsa as noted in the construction sections below.
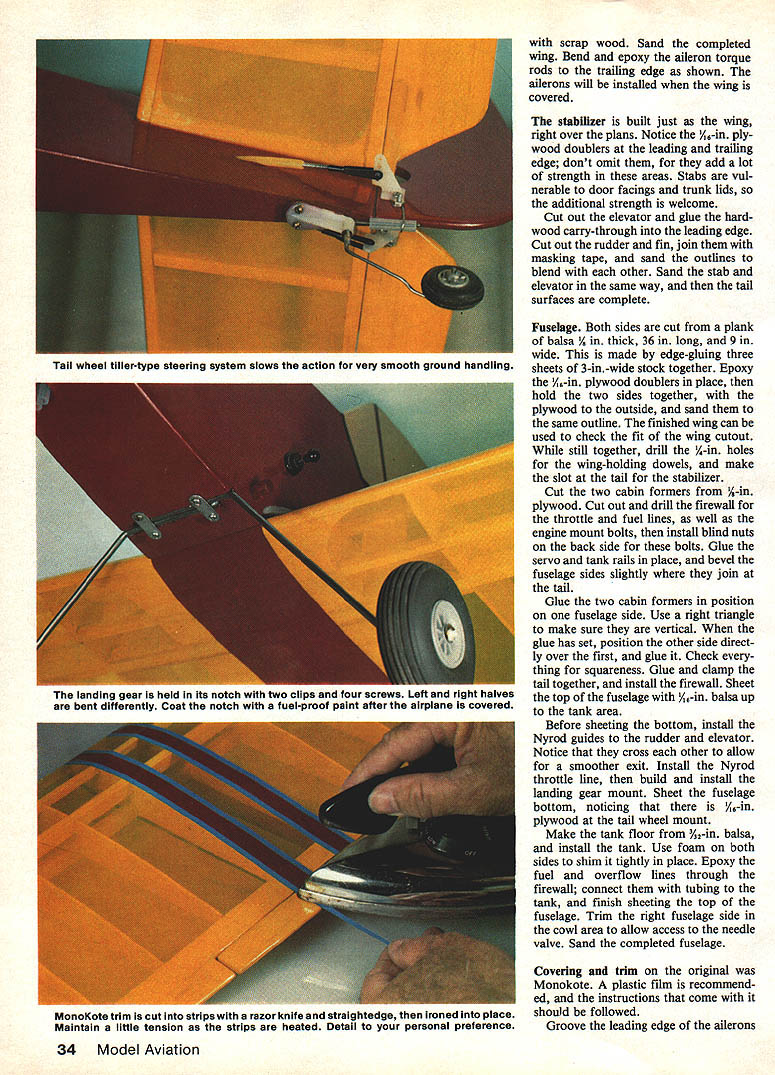
- Covering: MonoKote or similar plastic film is recommended; follow the manufacturer's instructions.
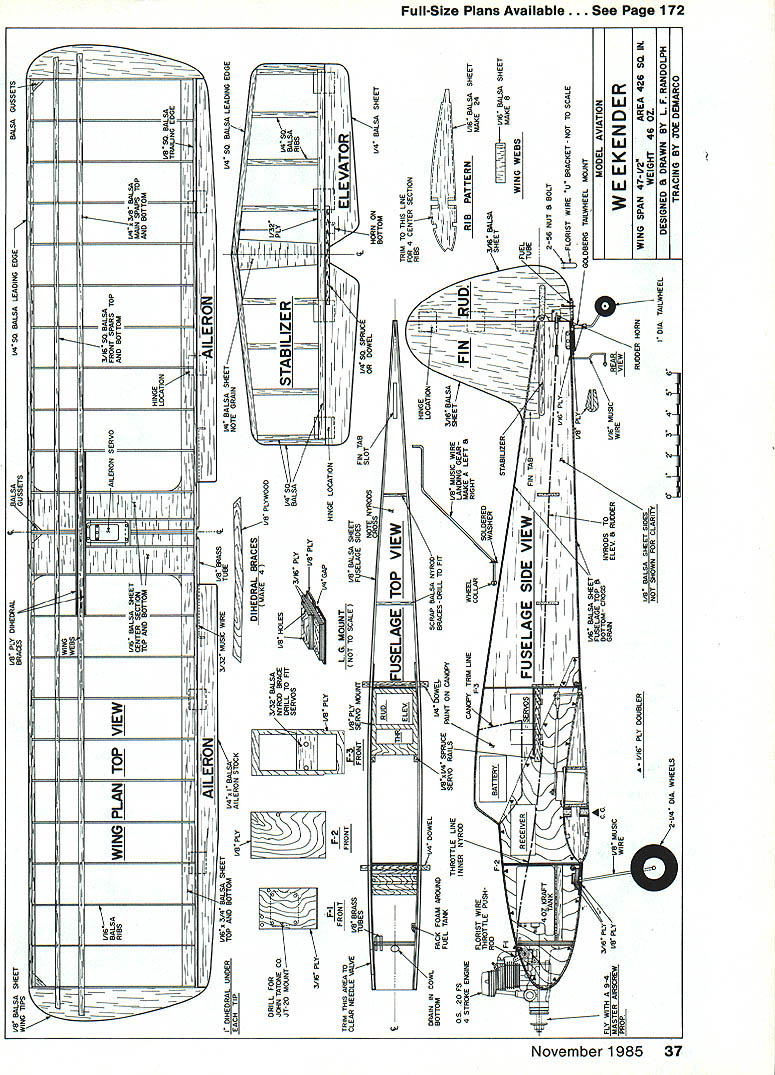
Wing construction
The wing is built in two halves over the plan. Key points:
- Prepare parts
- All spars and square stock are standard shop items (or can be stripped from sheet stock).
- Trailing-edge top and bottom sheets: 1/16-in. balsa.
- Dihedral braces: plywood.
- Webs: vertical-grain balsa.
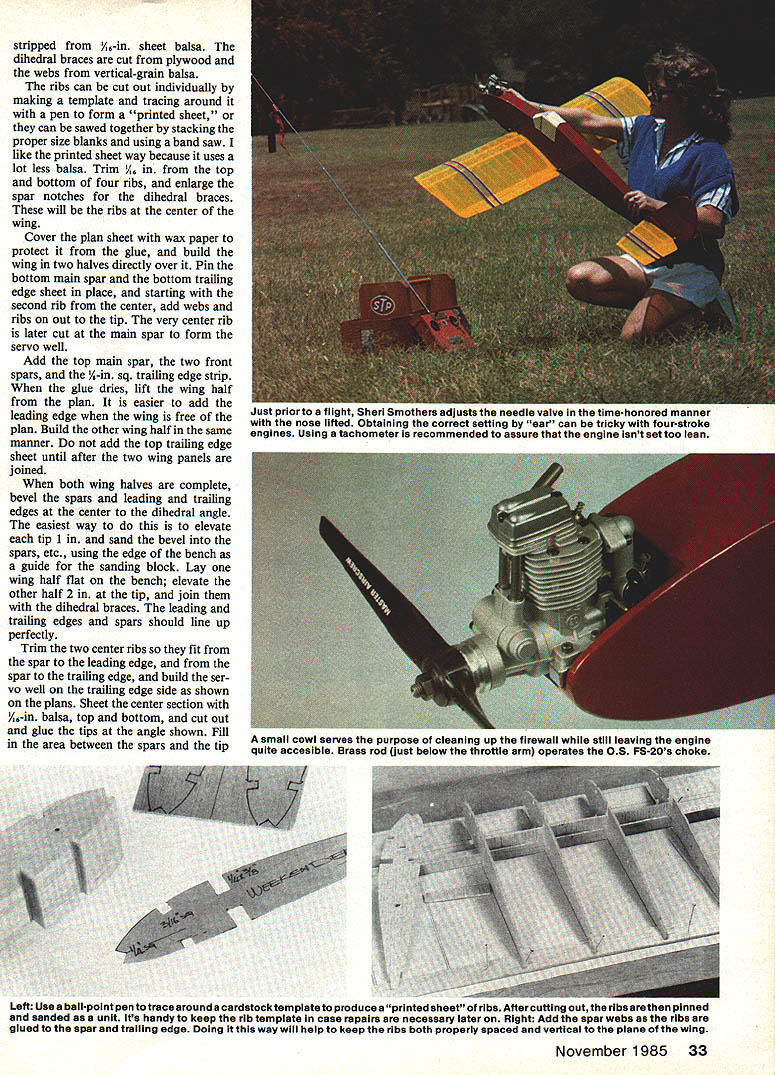
- Ribs: either cut individually using a cardstock template (trace with a ballpoint pen to make a printed sheet), or sawed together by stacking blanks on a band saw. The printed-sheet method uses less balsa.
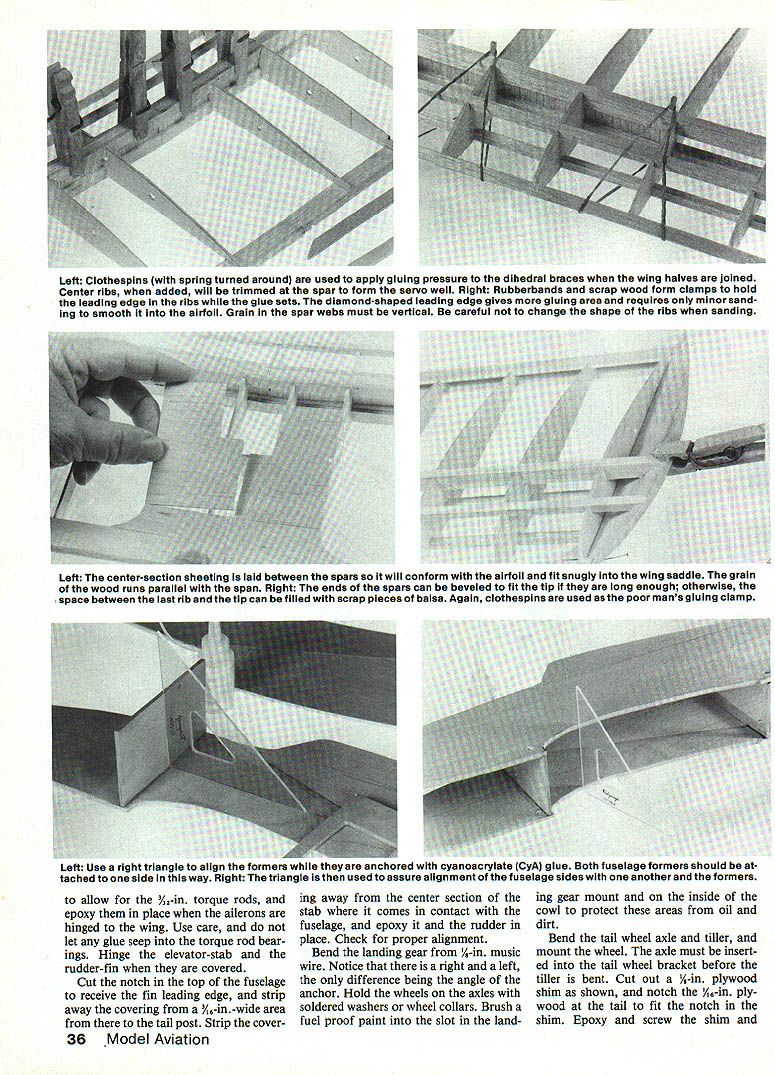
- Build each half
- Cover the plan sheet with wax paper to protect it from glue.
- Pin the bottom main spar and bottom trailing-edge sheet in place.
- Starting with the second rib from the center, add webs and ribs out to the tip. Leave the very center rib for later so the main spar can be cut to form the servo well.
- Add the top main spar, the two front spars, and the 1/8-in. sq. trailing-edge strip.
- When glue dries, lift the wing half from the plan and add the leading edge more easily with the wing free of the plan.
- Build the other wing half in the same manner.
- Do not add the top trailing-edge sheet until after joining both wing panels.
- Join halves and finish
- Bevel the spars and the leading and trailing edges at the center for the dihedral. The easiest method is to sand the bevel using the bench edge as a guide.
- Lay one wing half flat and elevate the other half at the tip to the required dihedral, then join with the dihedral braces; spars and edges should line up.
- Trim the two center ribs to fit from the spar to the leading edge and to the trailing edge. Build the servo well on the trailing-edge side as shown on the plans.
- Sheet the center section (top and bottom) with 1/8-in. balsa; cut out and glue in the tip pieces at the angles shown and fill the area between spars at the tip with scrap wood.
- Sand the completed wing.
- Bend and epoxy the aileron torque rods to the trailing edge as shown. Groove the leading edge of the ailerons to allow for the 3/8-in. torque rods and epoxy them in place when the ailerons are hinged to the wing. Take care not to let glue seep into the torque-rod bearings.
- Ailerons will be installed after covering.
Stabilizer and tail surfaces
- Build the stabilizer over the plans similarly to the wing.
- Include 1/16-in. plywood doublers at the leading and trailing edges for added strength.
- Cut out the elevator and glue the hardwood carry-through into the leading edge.
- Cut out the rudder and fin, join them with masking tape, and sand the outlines so the fin and rudder blend together.
- Sand and finish the tail surfaces; hinge the elevator-stab and rudder-fin after covering.
Fuselage
- Sides and basic structure
- Cut both fuselage sides from a plank of 3/8-in. balsa (36 in. long, 9 in. wide) made by edge-gluing three 3-in.-wide sheets.
- Epoxy 1/16-in. plywood doublers in place.
- Hold the two sides together (plywood to the outside) and sand them to the same outline. Use the finished wing to check the fit of the wing cutout.
- While still together, drill 1/4-in. holes for the wing-holding dowels and make the slot at the tail for the stabilizer.
- Formers, firewall, and internals
- Cut two cabin formers from 1/8-in. plywood.
- Cut and drill the firewall for throttle and fuel lines and engine mount bolts; install blind nuts on the back side for the engine bolts.
- Glue servo and tank rails in place; bevel fuselage sides slightly where they join at the tail.
- Glue the two cabin formers to one fuselage side (use a right triangle to ensure they are vertical). When set, position and glue the other side over them. Check for squareness.
- Glue and clamp the tail together and install the firewall.
- Sheeting and controls
- Sheet the top of the fuselage with 1/16-in. balsa up to the tank area.
- Before sheeting the bottom, install the Nyrod guides to the rudder and elevator; note that they cross to allow a smoother exit. Install the Nyrod throttle line.
- Build and install the landing gear mount, then sheet the fuselage bottom. Include 1/16-in. plywood at the tail-wheel mount.
- Make the tank floor from 3/32-in. balsa and install the tank using foam on both sides for a tight fit. Epoxy fuel and overflow lines through the firewall and connect them with tubing to the tank.
- Finish sheeting the top of the fuselage and trim the right fuselage side in the cowl area to allow access to the needle valve. Sand the completed fuselage.
Landing gear and tailwheel
- Bend the landing gear from 1/8-in. music wire; there is a right and a left — the difference is the angle of the anchor.
- Hold the wheels on the axles with soldered washers or wheel collars.
- Brush a coat of proof paint into the slot in the landing gear mount and on the inside of the cowl to protect these areas from oil and crud.
- Bend the tail-wheel axle and tiller and mount the wheel. Insert the axle into the tail-wheel bracket before bending the tiller.
- Cut a 1/8-in. plywood shim and notch the 3/16-in. plywood at the tail to fit the shim. Epoxy and screw the shim and tail-wheel bracket to the fuselage.
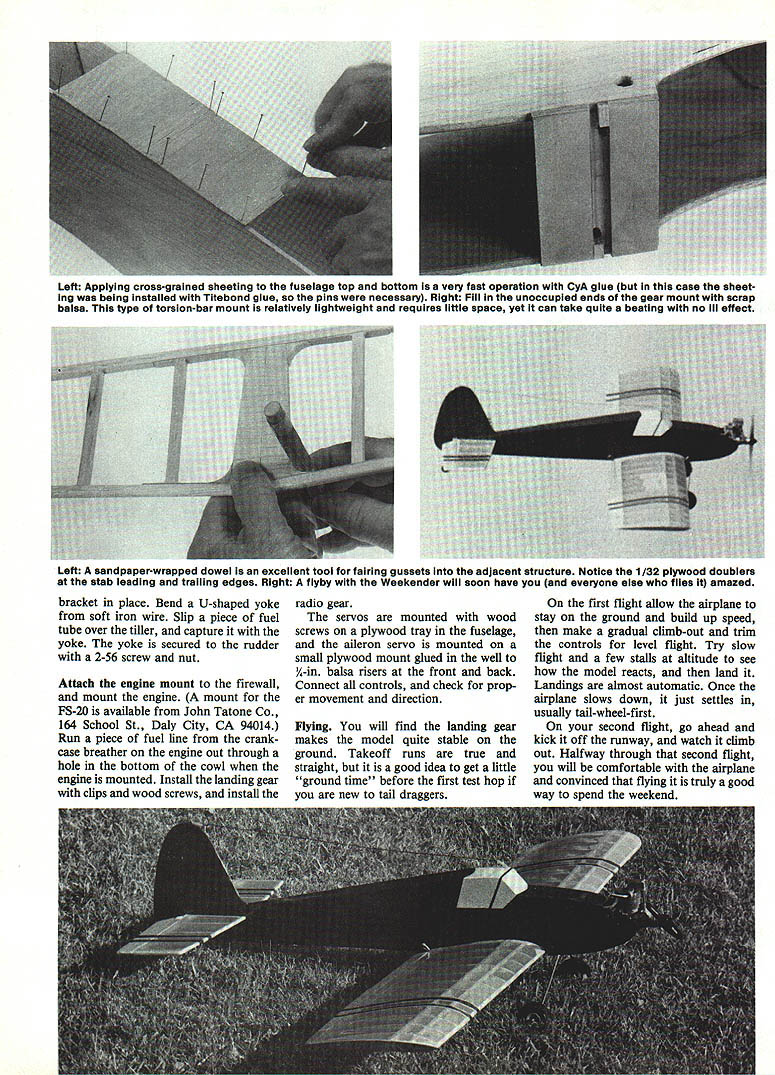
- Bend a U-shaped yoke from soft iron wire, slip a piece of fuel tube over the tiller, capture it with the yoke, and secure the yoke to the rudder with a 2-56 screw and nut.
Engine, radio, and hardware
- Attach the engine mount to the firewall and mount the engine. (A mount for the FS-20 is/was available from John Tatone Co., 164 School St., Daly City, CA 94014.)
- Run a piece of fuel line from the engine crankcase breather out through a hole in the bottom of the cowl.
- Install the landing gear with clips and wood screws and install the radio gear.
- Mount the servos on a plywood tray in the fuselage with wood screws. The aileron servo is mounted on a small plywood mount glued in the wing well to 1/4-in. balsa risers at the front and back.
- Connect all controls and check movement and direction.
Covering and trim
- Cover the model with MonoKote or similar plastic film; follow the film manufacturer's instructions.
- Strip the covering from:
- a 3/16-in.-wide area from the fin leading edge to the tail post,
- the center section of the stab where it contacts the fuselage.
- Epoxy the fin, rudder, and stab in place and check for proper alignment.
- Hinge control surfaces after they are covered.
- Finish any small details and sanding before final assembly.
Flying
- Ground handling is stable with the landing gear; takeoff runs are straight. If you are new to tail-draggers, spend some time taxiing on the ground before the first hop.
- First flight: allow the model to build speed on the ground, make a gradual climb-out, and trim for level flight. Try slow flight and a few stalls at altitude to observe the behavior, then land.
- Landing: once slowed, the Weekender tends to settle in, usually tail-wheel-first.
- Second flight: you can be more aggressive — the Weekender climbs out well and will quickly build your confidence. Halfway through the second flight most pilots are comfortable with its handling and agree it makes a fine weekend flyer.
The Weekender's simple lines and basic aesthetics also make it attractive and easy to decorate; it is a perfect knock-around plane for fun flying at any skill level.
Transcribed from original scans by AI. Minor OCR errors may remain.

