
What's the Pitch?
By Norman Jensen
For many of us the proper use of a tap is a fuzzy matter. Here's a valuable briefing by an expert machinist.
I suppose that when you start to read this article you will say to yourself, "Well, here's another article full of technical jargon that I could do without." You probably just want me to tell what I know about drilling and tapping and leave it at that. I can relate to that attitude, inasmuch as I think that about some of the technical articles I read. Nevertheless, I feel that if a person wants to develop a certain skill, he or she should know the basics first. Therefore we are going to talk about threads, tap drill sizes, number screws, clearance drills, etc.
About the author
I've been a machinist for about ten years and recently started teaching Machine Tool Technology at Hayward Regional Occupational Center, Hayward, California. I also teach part-time at Chabot College in Hayward. I've been a modeler for five years and have had great success in modeling, which is, I think, related to my experience as a machinist.
Thread basics
Let's start with that wing hold-down bolt that we use, which is usually a 1/4-20. The first part of that sign, "1/4" or .250, refers to the major diameter, or the largest part of the thread. The second part refers to the number of threads per inch (T.P.I.). Now we have a thread that is .250 major diameter and 20 T.P.I.
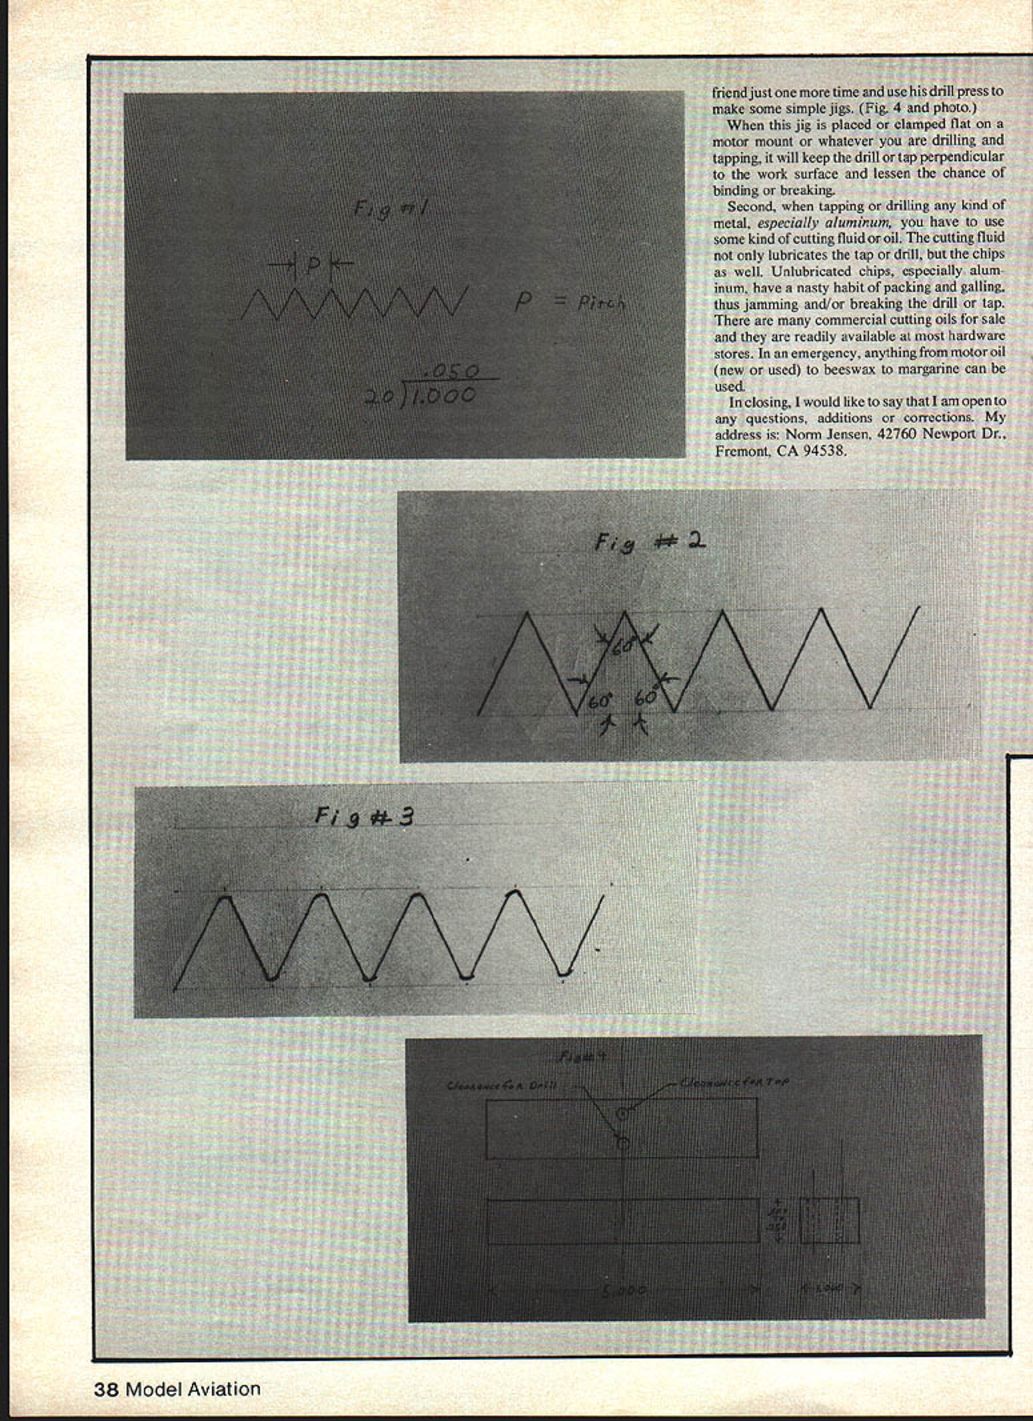
To be able to find the tap drill size when you don't have a tap drill chart you have to find the pitch. The pitch of a thread refers to the distance from crest to crest or point to point. The pitch is computed by dividing the number of threads per inch into 1 (one) inch. (See Fig. 1.) As you can see, the pitch for 20 threads per inch works out to .050.
With the knowledge of what the pitch is and the constant factor of .649, we can compute the tap drill size (the size the hole should be before it is tapped). This can be done if you don't have a tap drill chart (pictured) or if you run across a thread that is not standard, such as a 3/8-32. You can also compute the tap drill size for metric threads. Metric threads are not anything to be afraid of. In fact, with a metric thread the pitch is already indicated, as in an 8 x 1.25 thread (8 mm major diameter × 1.25 mm pitch).
Thread form
Basically, a thread, be it Unified National or metric, is made up of a series of equilateral triangles (having equal angles and equal sides). (See Fig. 2.) The angle is 60° and the sides are the pitch of whatever thread you are using. The thread form pictured in Fig. 2 is what we call a sharp V thread. It looks very nice and functional, but is not very practical by industry standards because the tap or tool used to cut the thread wears, especially on the point. Therefore, every time you would take a cut with a tap or tool you would have to replace or sharpen it. Obviously, that is not very economical so the industry has come up with the modified V thread. (See Fig. 3.) With this thread form, tool wear is kept to a minimum.
Reading this, you might say that when you have tapped a hole, the flat on the crest of the thread looks too wide and the thread looks too shallow. You might think to yourself, "I'll just drill the hole a little smaller and get a deeper thread." Do not do this. It is not necessary to go to a smaller tap drill. All tap drills are based on making a hole sized so that the tap cuts only 75% of full thread depth. It has been found by the industry that 95% of full thread depth is only 5% stronger than 75% of full thread depth.
Calculating tap drill size (general method)
To find the depth of a thread we take the constant factor .649, multiply it by the pitch (distance between thread crests) and double it (there are threads on both sides of the screw). Then multiply again by .75 and subtract that from the major diameter — the result is the correct tap drill size.
Worked example for 1/4-20:
- Major diameter = .250
- Threads per inch = 20
- Pitch = 1 / 20 = .050
- Depth of thread = .649 × pitch (.050) = .032
- Double depth of thread = .032 × 2 = .064
- 75% of double depth = .75 × .064 = .048
- Tap drill size = major diameter − .048 = .250 − .048 = .202
If you have a tap drill chart you will note that a 1/4-20 thread calls for a #7 tap drill, which is .201. This formula works for virtually every thread if you don't have a chart handy.
This method also applies to metric threads (use mm values; metric pitch is given directly, e.g., 8 × 1.25).
Numbered screw sizes (e.g., 2-56, 6-32)
Now, all of this information is well and good and works fine for threads like 1/4-20, 5/16-18 or 5/16-16, because the major diameter is clear and defined by a fraction. But what about the threads that we use for motor mounts, wheel collars, clevises, etc.? Threads like 2-56, 3-48, 4-40, 6-32, 8-32 or 10-32. We know that the second number represents the threads per inch, but what does that other number mean?
When the screw sizes are indicated by a whole number such as 6, 8, or 10, we use two constants — .060 and .013 — to find the major diameter of the screw. The major diameter is computed by multiplying .013 by the screw number and adding .060 to the result.
Examples:
- (6 × .013) + .060 = .138 major diameter
- (8 × .013) + .060 = .164 major diameter
- (10 × .013) + .060 = .190 major diameter
Drilling and tapping: practical tips
Many times I have been asked about what can be done when a drill or tap gets stuck and/or breaks off in an aluminum motor mount. My stock answer is to throw it away and start over again. Now some of you might have some real good ways to remove a broken drill or tap, but hopefully, after reading this you won't have to use them.
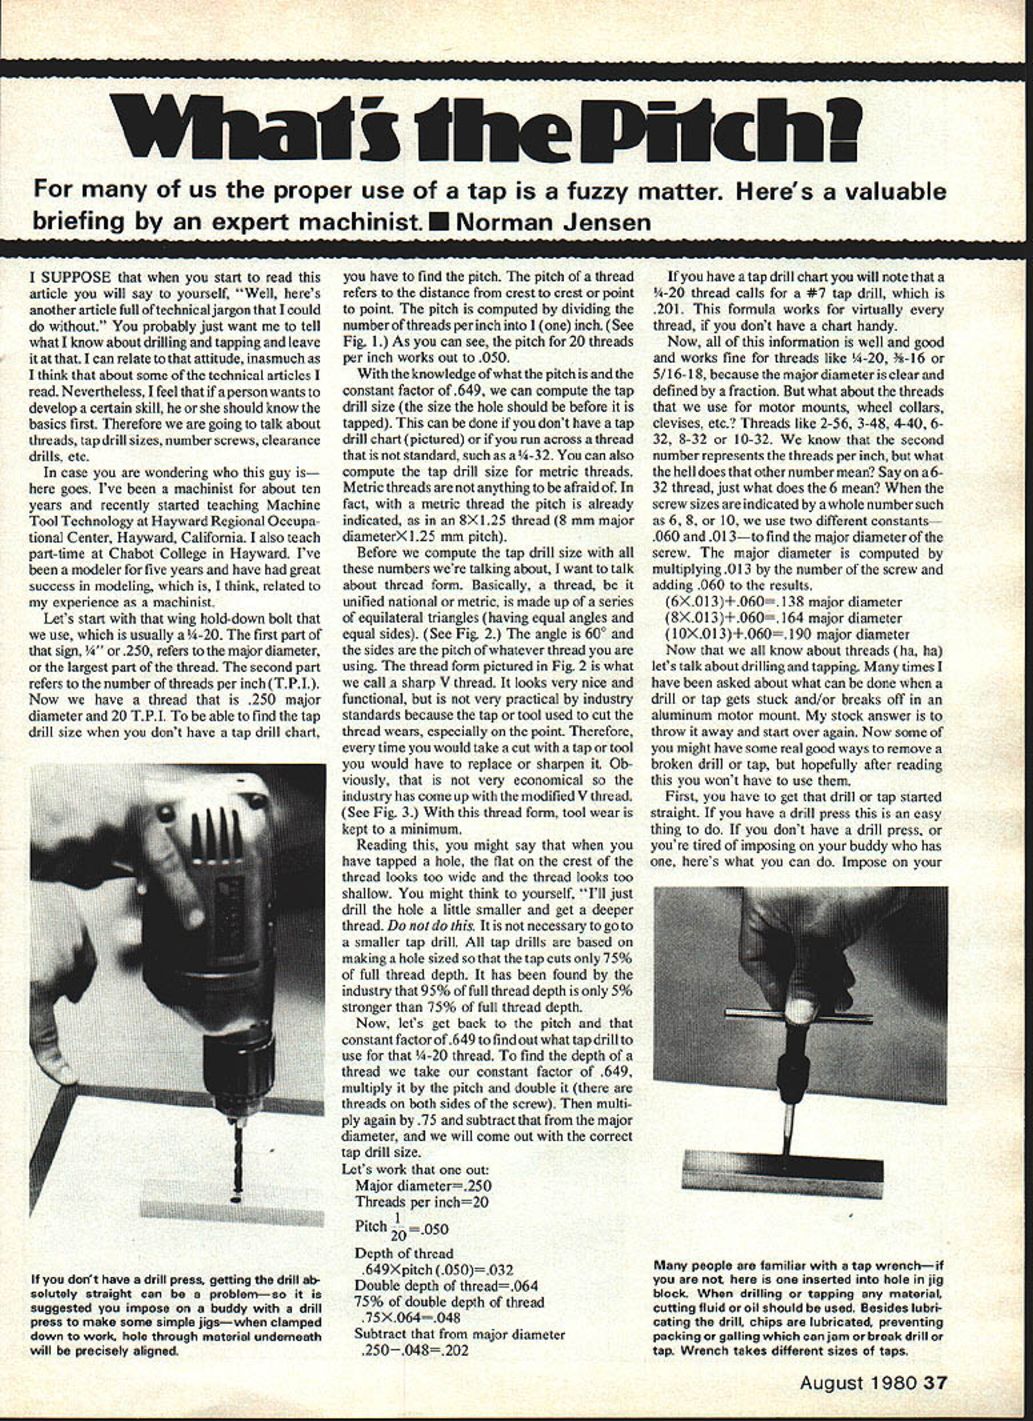
- Start straight:
- Make sure the drill or tap starts straight. If you have a drill press this is easy. If you don't, you can make a simple jig on a drill press to keep the drill or tap perpendicular to the work surface, which lessens the chance of binding or breaking. (See Fig. 4 and photo.)
- Use cutting fluid:
- When tapping or drilling any kind of metal, especially aluminum, use some kind of cutting fluid or oil. The cutting fluid not only lubricates the tap or drill, but the chips as well. Unlubricated chips, especially aluminum, have a nasty habit of packing and galling, thus jamming and/or breaking the drill or tap.
- There are many commercial cutting oils available at hardware stores. In an emergency, anything from motor oil (new or used) to beeswax to margarine can be used.
Closing
I am open to any questions, additions or corrections. My address is:
Norm Jensen 42760 Newport Dr. Fremont, CA 94538
Transcribed from original scans by AI. Minor OCR errors may remain.

