
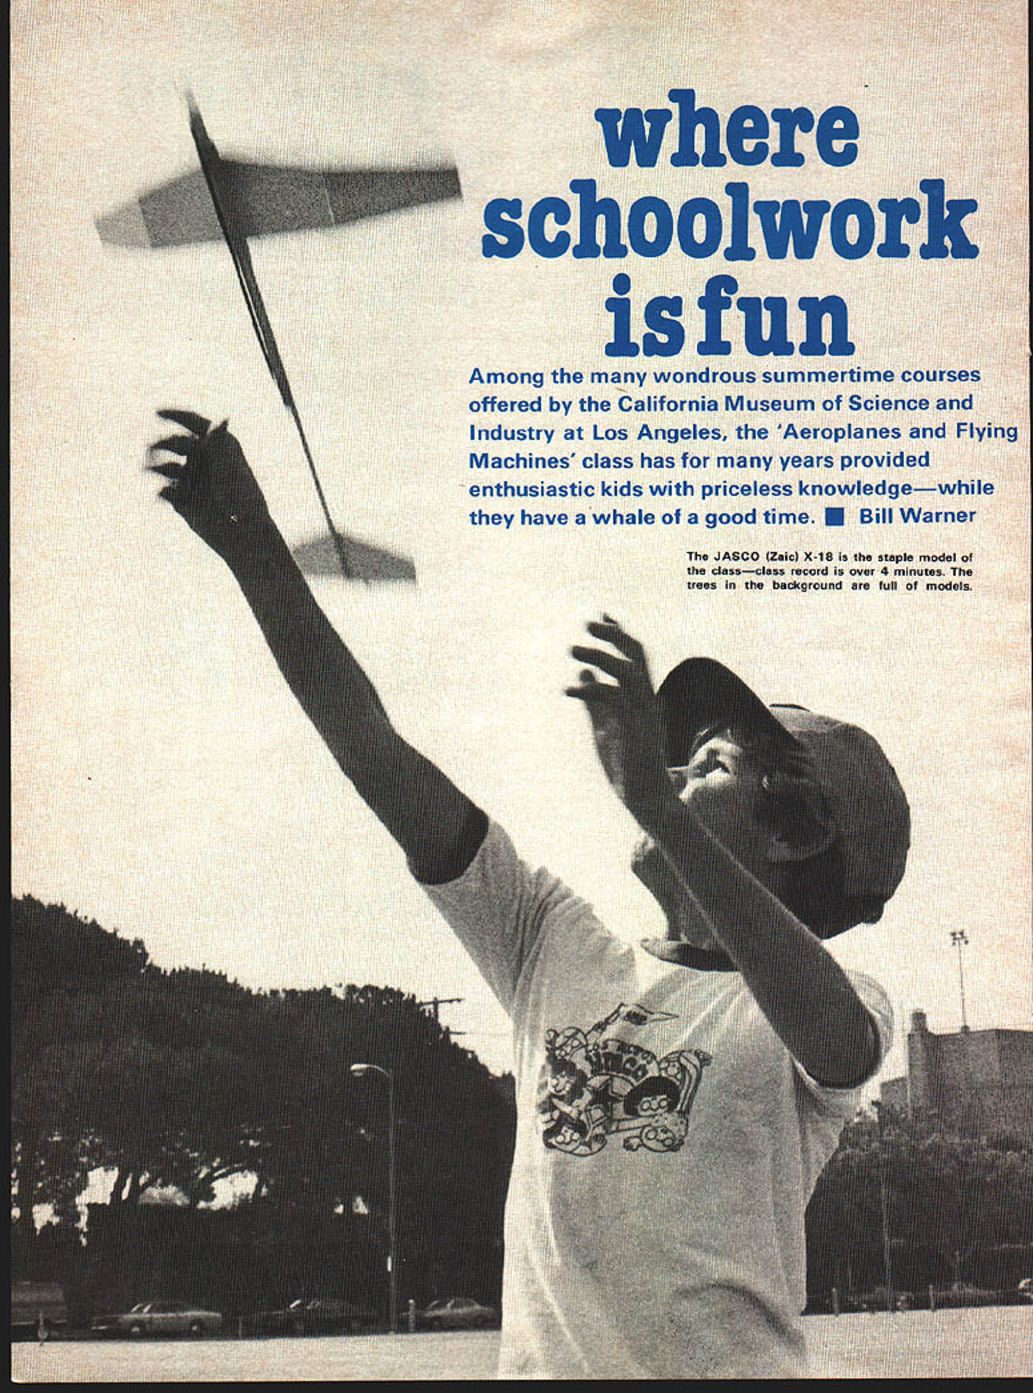
where schoolwork is fun
Among the many wondrous summertime courses offered by the California Museum of Science and Industry at Los Angeles, the 'Aeroplanes and Flying Machines' class has for many years provided enthusiastic kids with priceless knowledge—while they have a whale of a good time. ■ Bill Warner Some classes are one-week sessions, some are two. The standard period is two hours long, so a student can take two different classes such as Animal Behavior in the morning and Rocketry in the afternoon. At present we operate for eight weeks, starting a week after L.A. city schools get out. Tuition is about $30 for a two-week class such as the Aeroplanes workshop. Although many classes are for young children, kindergarten and up, I take only kids fifth grade to twelfth grade. The general character of the groups I teach would probably fall into the category of "gifted," with many parents wishing to offer enrichment without pressure to their offspring.
With 20 hours at my disposal, the trick is to divide up the time between the theory, the building of models, and the flying sessions. The name of the game is organization, as you can well imagine. Well, after almost ten years at it, I'm getting there. What makes the class fun, other than just learning new and interesting things, is having success in flying something that one has built with one's own two hands. Many of the kids, hard as it may be to believe, have never used a knife (other than for cutting up supper). So, the program has to appeal to the students who know zilch about planes and are all thumbs, and also to the boy or girl genius who starts out asking you to help them compute the Reynolds Number for the new pattern ship they're designing. How to do this?
We start out with a slide presentation, which I've made up from taking slides of good airplane pictures wherever I can get my hands on them. It traces the history of aviation from the tower jumpers, through de Rozier, Ader, Whitehead, etc., ending with the Space Shuttle. I keep adding to it as I get better photos, and I always enjoy seeing it, too! When something bores me, I know it's going to be deadly to the kids. I use many slides to illustrate everything from parts of flying craft (it's easier to show a slide of vortex generators on a 707 that way rather than to take a field trip to the airport!) to odd and unusual flying machines.
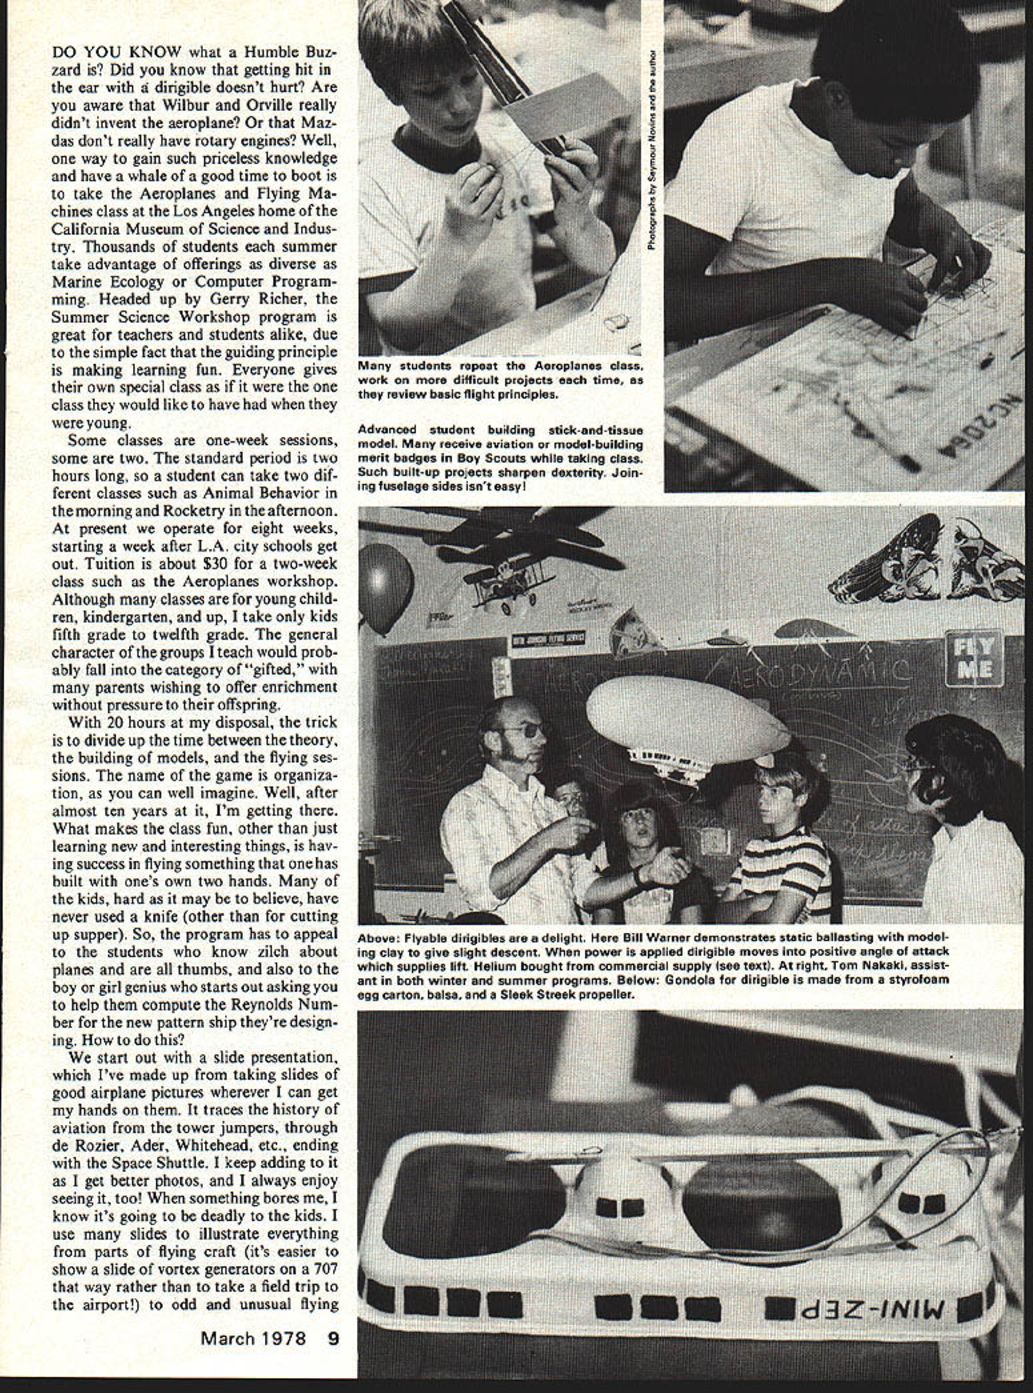
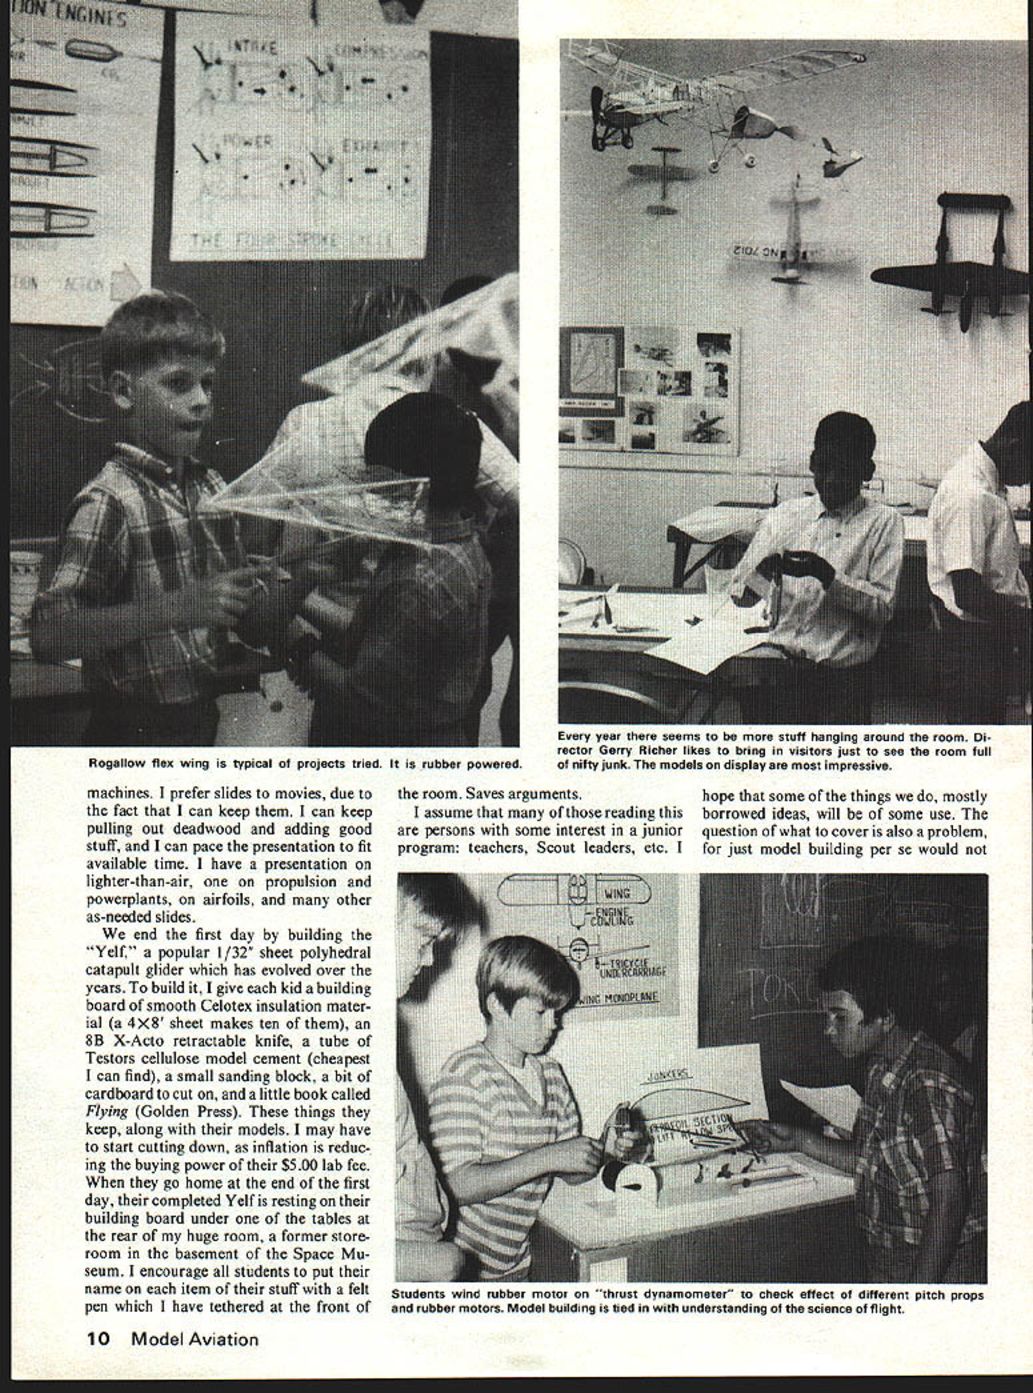
I prefer slides and movies due to the fact I can keep pulling out deadwood and adding good stuff and can pace the presentation to fit available time. I have presentations on lighter‑than‑air, propulsion, powerplants, airfoils and other as‑needed slides and end the first day building the popular 1/32‑sheet polyhedral catapult glider, which has evolved over the years. A building board — a smooth Celotex insulation material 4x8 sheet — makes ten. An X‑Acto retractable knife, a tube of Testors cellulose model cement (cheapest I can find), a small sanding block, a bit of cardboard, and a little book called Flying (Golden Press) are things to keep along.
I encourage students to put their name on an item with a felt pen and to have tethered things in the front room. That saves arguments.
I assume the reading persons have some interest—junior program teachers, Scout leaders, etc. I hope some things, mostly borrowed ideas, will be of some use. The question of what to cover is also a problem, for just model building per se would not hold them. support the program. I stress nomenclature, each of the four forces acting on an airplane in flight, stability, and control. The class is divided into aerostatics and aerodynamics, with the emphasis on dynamic flight and heavier‑than‑air.
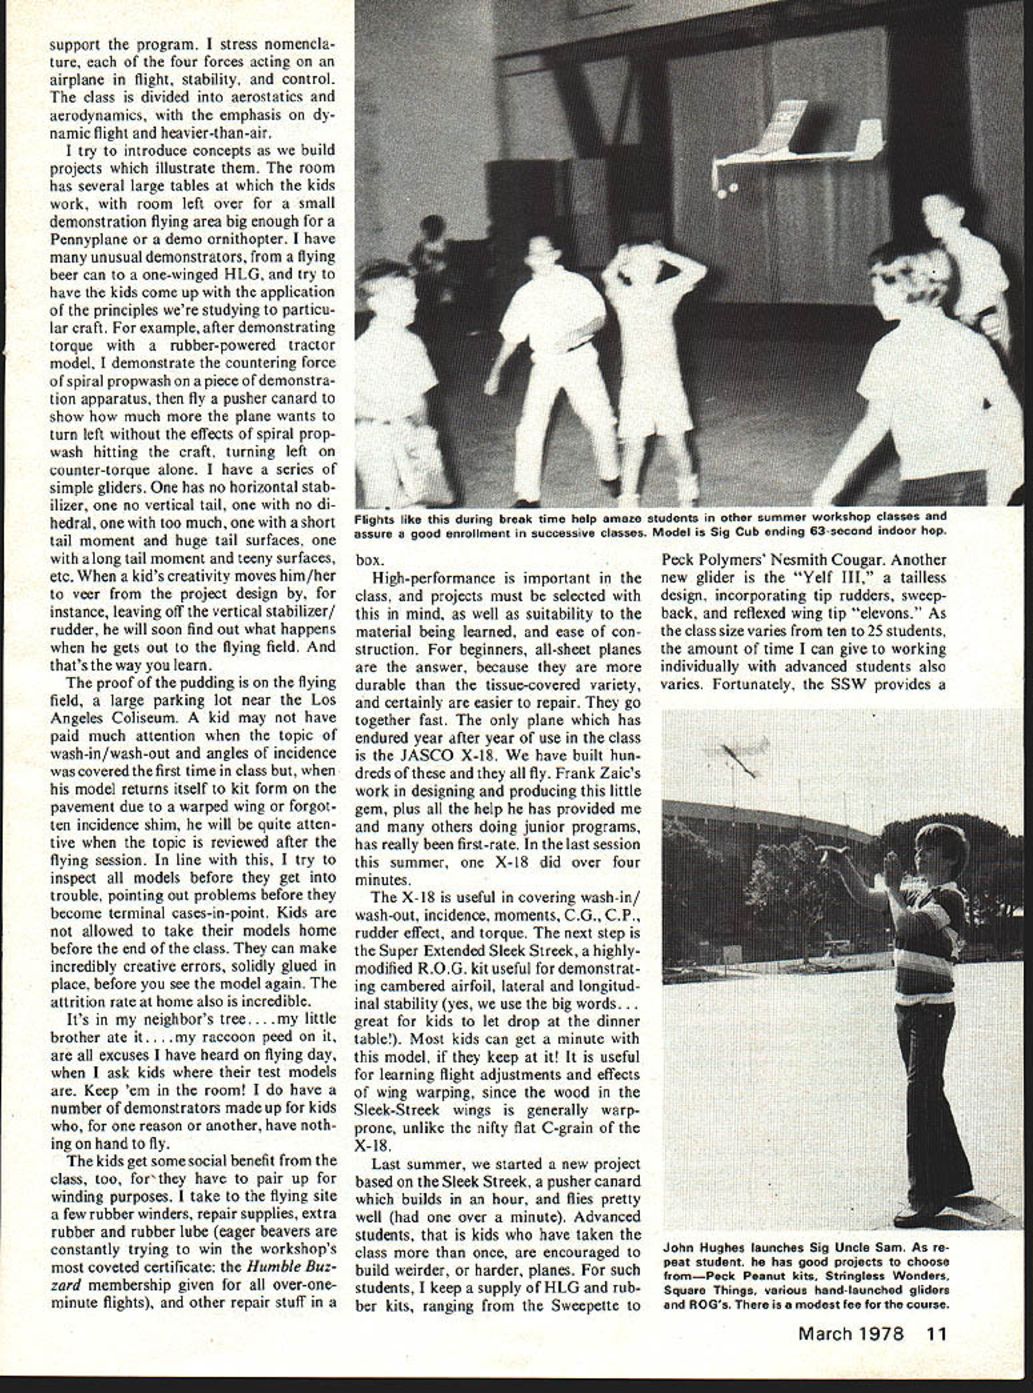
I try to introduce concepts as we build projects which illustrate them. The room has several large tables at which the kids work, with room left over for a small demonstration flying area big enough for a Pennplane or a demo ornithopter. I have many unusual demonstrators, from a flying beer can to a one‑winged HLG, and try to have the kids come up with the application of the principles we're studying to particular craft. For example, after demonstrating torque with a rubber‑powered tractor model, I demonstrate the countering force of spiral propwash on a piece of demonstration apparatus, then fly a pusher canard to show how much more the plane wants to turn left without the effects of spiral propwash hitting the craft, turning left on counter‑torque alone. I have a series of simple gliders. One has no horizontal stabilizer, one no vertical tail, one with no dihedral, one with too much, one with a short tail moment and huge tail surfaces, one with a long tail moment and teeny surfaces, etc. When a kid's creativity moves him/her to veer from the project design by, for instance, leaving off the vertical stabilizer/rudder, he will soon find out what happens when he gets out to the flying field. And that's the way you learn.
The proof of the pudding is on the flying field, a large parking lot near the Los Angeles Coliseum. A kid may not have paid much attention when the topic of wash‑in/wash‑out and angles of incidence was covered the first time in class but, when his model returns itself to kit form on the pavement due to a warped wing or forgotten incidence shim, he will be quite attentive when the topic is reviewed after the flying session. In line with this, I try to inspect all models before they get into trouble, pointing out problems before they become terminal cases‑in‑point. Kids are not allowed to take their models home before the end of the class. They can make incredibly creative errors, solidly glued in place, before you see the model again. The attrition rate at home also is incredible.
"It's in my neighbor's tree... my little brother ate it... my raccoon peed on it," are all excuses I have heard on flying day, when I ask kids where their test models are. Keep 'em in the room! I do have a number of demonstrators made up for kids who, for one reason or another, have nothing on hand to fly.
The kids get some social benefit from the class, too, for they have to pair up for winding purposes. I take to the flying site a few rubber winders, repair supplies, extra rubber and rubber lube (eager beavers are constantly trying to win the workshop's most coveted certificate: the Humble Buzzard membership given for all over‑one‑minute flights), and other repair stuff in a box.
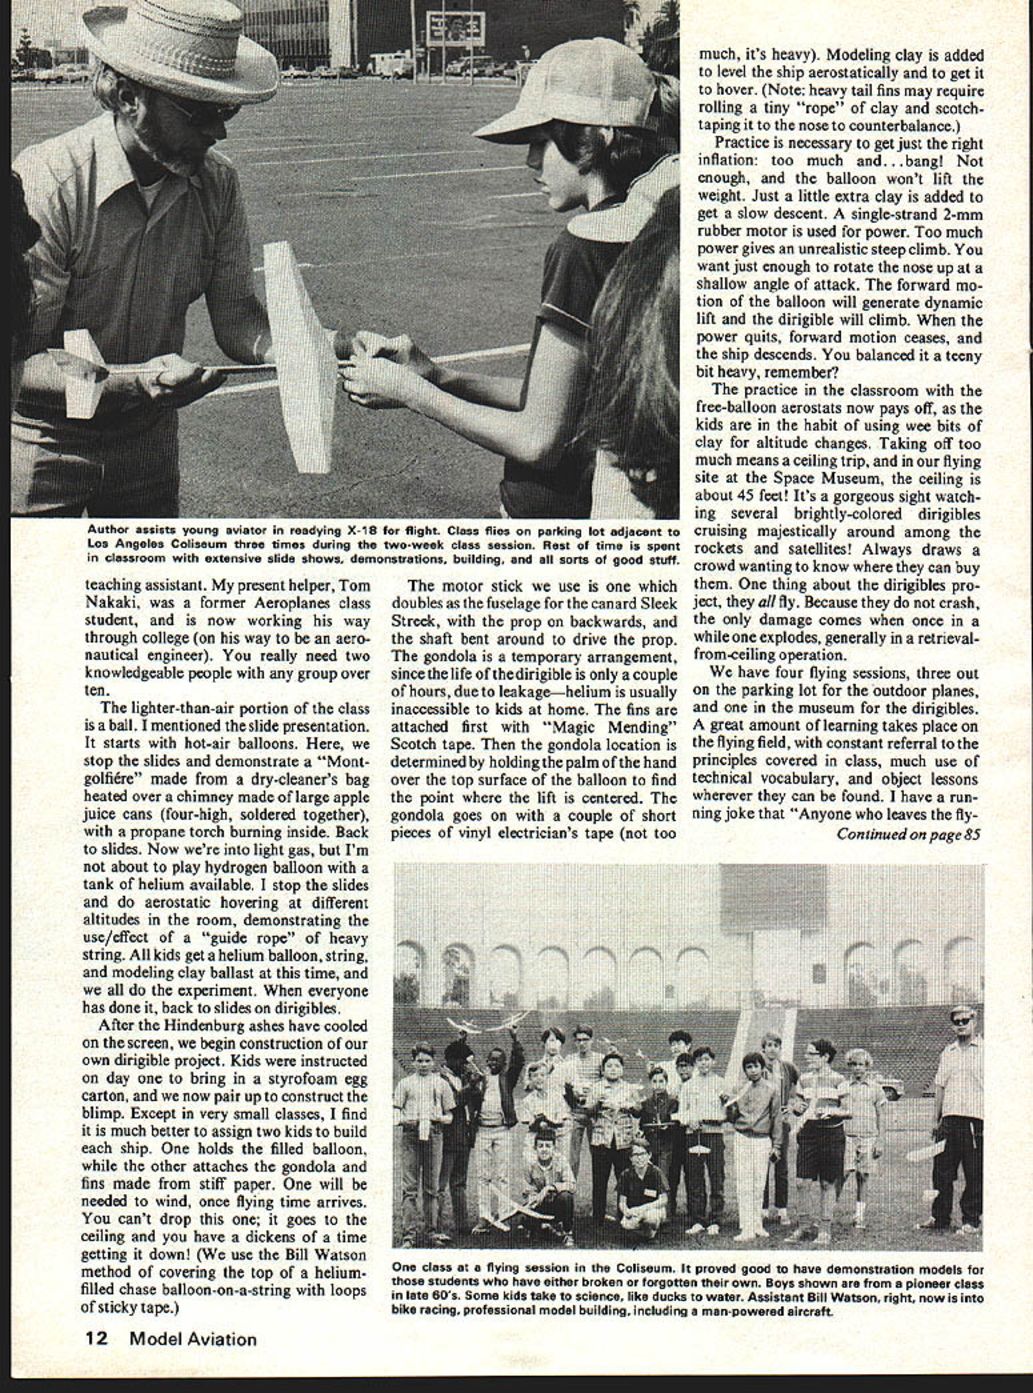
High‑performance is important in the class, and projects must be selected with this in mind, as well as suitability to the material being learned, and ease of construction. For beginners, all‑sheet planes are the answer, because they are more durable than the tissue‑covered variety, and certainly are easier to repair. They go together fast. The only plane which has endured year after year of use in the class is the JASCO X‑18. We have built hundreds of these and they all fly. Frank Zaic's work in designing and producing this little gem, plus all the help he has provided me and many others doing junior programs, has really been first‑rate. In the last session this summer, one X‑18 did over four minutes.
The X‑18 is useful in covering wash‑in/wash‑out, incidence, moments, C.G., C.P., rudder effect, and torque. The next step is the Super Extended Sleek Streek, a highly‑modified R.O.G. kit useful for demonstrating cambered airfoil, lateral and longitudinal stability (yes, we use the big words... great for kids to let drop at the dinner table!). Most kids can get a minute with this model, if they keep at it! It is useful for learning flight adjustments and effects of wing warping, since the wood in the Sleek‑Streek wings is generally warp‑prone, unlike the nifty flat C‑grain of the X‑18.
Last summer, we started a new project based on the Sleek Streek, a pusher canard which builds in an hour, and flies pretty well (had one over a minute). Advanced students, that is kids who have taken the class more than once, are encouraged to build weirder, or harder, planes. For such students, I keep a supply of HLG and rubber kits, ranging from the Sweepette to Peck Polymers' Nesmith Cougar. Another new glider is the "Yelf III," a tailless design, incorporating tip rudders, sweepback, and reflexed wing tip "elevons." As the class size varies from ten to 25 students, the amount of time I can give to working individually with advanced students also varies. Fortunately, the SSW provides a teaching assistant. My present helper, Tom Nakaki, was a former Aeroplanes class student, and is now working his way through college (on his way to be an aeronautical engineer). You really need two knowledgeable people with any group over ten.
The lighter-than-air portion of the class is a ball. I mentioned the slide presentation. It starts with hot-air balloons. Here, we stop the slides and demonstrate a "Montgolfiere" made from a dry-cleaner's bag heated over a chimney made of large apple juice cans (four-high, soldered together), with a propane torch burning inside. Back to slides. Now we're into light gas, but I'm not about to play hydrogen balloon with a tank of helium available. I stop the slides and do aerostatic hovering at different altitudes in the room, demonstrating the use/effect of a "guide rope" of heavy string. All kids get a helium balloon, string, and modeling clay ballast at this time, and we all do the experiment. When everyone has done it, back to slides on dirigibles.
After the Hindenburg ashes have cooled on the screen, we begin construction of our own dirigible project. Kids were instructed on day one to bring in a styrofoam egg carton, and we now pair up to construct the blimp. Except in very small classes, I find it is much better to assign two kids to build each ship. One holds the filled balloon, while the other attaches the gondola and fins made from stiff paper. One will be needed to wind, once flying time arrives. You can't drop this one; it goes to the ceiling and you have a dickens of a time getting it down! (We use the Bill Watson method of covering the top of a helium-filled chase balloon-on-a-string with loops of sticky tape.)
The motor stick we use is one which doubles as the fuselage for the canard Sleek Streek, with the prop on backwards, and the shaft bent around to drive the prop. The gondola is a temporary arrangement, since the life of the dirigible is only a couple of hours, due to leakage—helium is usually inaccessible to kids at home. The fins are attached first with "Magic Mending" Scotch tape. Then the gondola location is determined by holding the palm of the hand over the top surface of the balloon to find the point where the lift is centered. The gondola goes on with a couple of short pieces of vinyl electrician's tape (not too much, it's heavy). Modeling clay is added to level the ship aerostatically and to get it to hover. (Note: heavy tail fins may require rolling a tiny "rope" of clay and scotch-taping it to the nose to counterbalance.)
Practice is necessary to get just the right inflation: too much and... bang! Not enough, and the balloon won't lift the weight. Just a little extra clay is added to get a slow descent. A single-strand 2-mm rubber motor is used for power. Too much power gives an unrealistic steep climb. You want just enough to rotate the nose up at a shallow angle of attack. The forward motion of the balloon will generate dynamic lift and the dirigible will climb. When the power quits, forward motion ceases, and the ship descends. You balanced it a teeny bit heavy, remember?
The practice in the classroom with the free-balloon aerostats now pays off, as the kids are in the habit of using wee bits of clay for altitude changes. Taking off too much means a ceiling trip, and in our flying site at the Space Museum, the ceiling is about 45 feet! It's a gorgeous sight watching several brightly-colored dirigibles cruising majestically around among the rockets and satellites! Always draws a crowd wanting to know where they can buy them. One thing about the dirigibles project, they all fly. Because they do not crash, the only damage comes when once in a while one explodes, generally in a retrieval-from-ceiling operation.
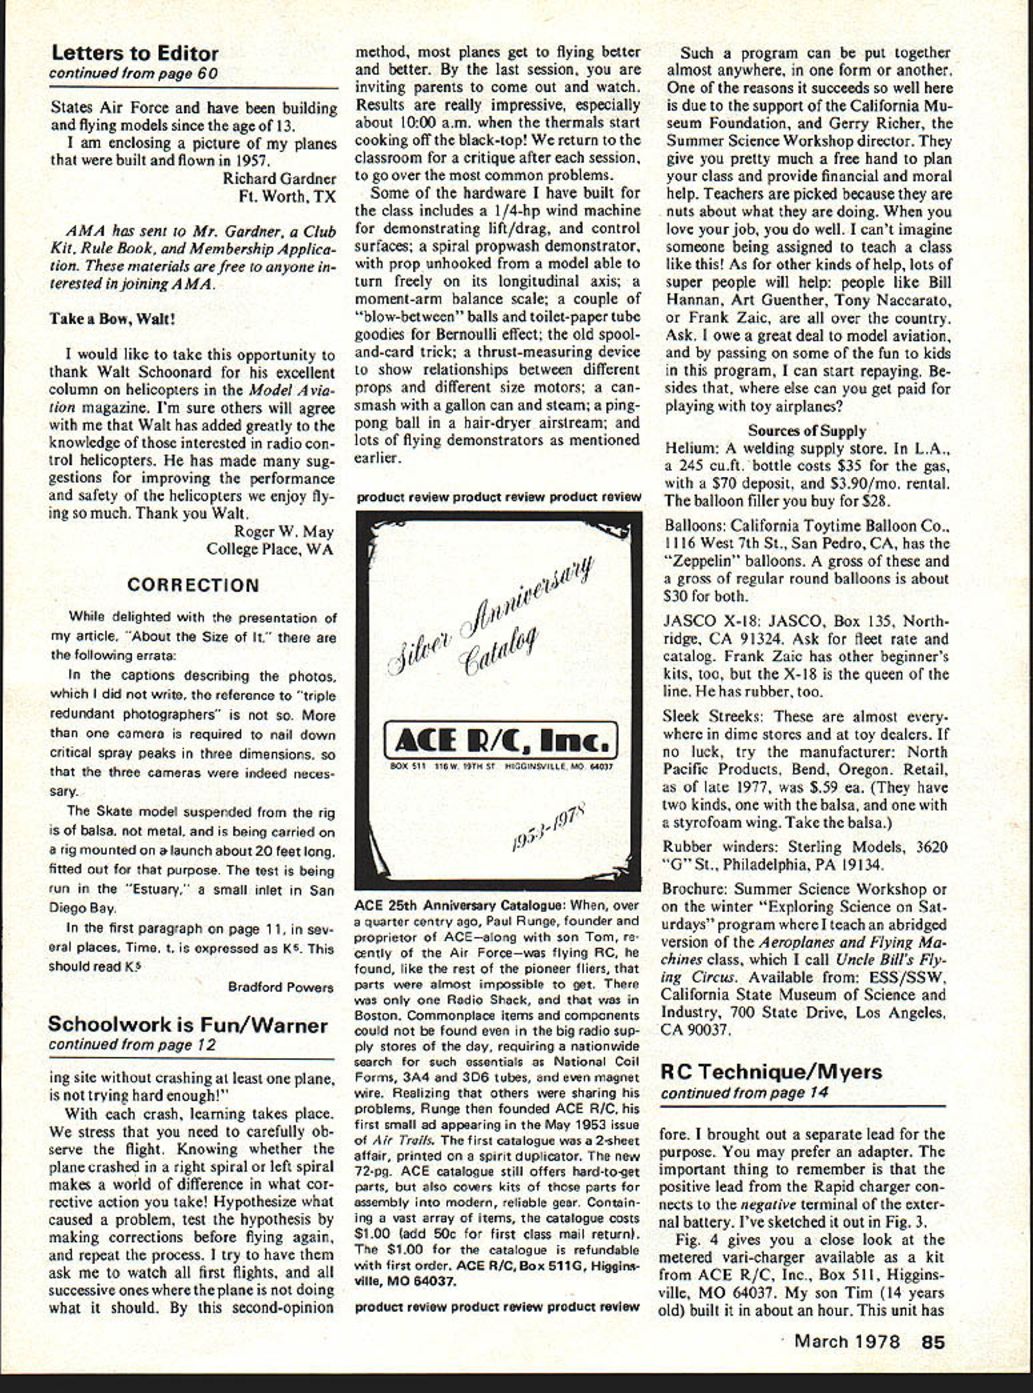
We have four flying sessions, three out on the parking lot for the outdoor planes, and one in the museum for the dirigibles. A great amount of learning takes place on the flying field, with constant referral to the principles covered in class, much use of technical vocabulary, and object lessons wherever they can be found. I have a running joke that "Anyone who leaves the fly- ing site without crashing at least one plane, is not trying hard enough!
With each crash, learning takes place. We stress that you need to carefully observe the flight. Knowing whether the plane crashed in a right spiral or left spiral makes a world of difference in what corrective action you take! Hypothesize what caused a problem, test the hypothesis by making corrections before flying again, and repeat the process. I try to have them ask me to watch all first flights, and all successive ones where the plane is not doing what it should. By this second-opinion method, most planes get to flying better and better. By the last session, you are inviting parents to come out and watch. Results are really impressive, especially about 10:00 a.m., when the thermals start cooking off the black-top! We return to the classroom for a critique after each session, to go over the most common problems.
Some of the hardware I have built for the class includes a 1/4-hp wind machine for demonstrating lift/drag, and control surfaces; a spiral propwash demonstrator, with prop unhooked from a model able to turn freely on its longitudinal axis; a moment-arm balance scale; a couple of "blow-between" balls and toilet-paper tube goodies for Bernoulli effect; the old spool-and-card trick; a thrust-measuring device to show relationships between different props and different size motors; a can-smash with a gallon can and steam; a ping-pong ball in a hair-dryer airstream; and lots of flying demonstrators as mentioned earlier.
Such a program can be put together almost anywhere, in one form or another. One of the reasons it succeeds so well here is due to the support of the California Museum Foundation, and Gerry Richer, the Summer Science Workshop director. They give you pretty much a free hand to plan your class and provide financial and moral help. Teachers are picked because they are nuts about what they are doing. When you love your job, you do well. I can't imagine someone being assigned to teach a class like this! As for other kinds of help, lots of super people will help; people like Bill Hannan, Art Guenther, Tony Naccarato, or Frank Zaic, are all over the country. Ask. I owe a great deal to model aviation, and by passing on some of the fun to kids in this program, I can start repaying. Besides that, where else can you get paid for playing with toy airplanes?
Sources of Supply
Helium: A welding supply store. In L.A., a 245 cu. ft. bottle costs $35 for the gas, with a $70 deposit, and $3.90/mo. rental. The balloon filler you buy for $28.
Balloons: California Toytime Balloon Co., 1116 West 7th St., San Pedro, CA, has the "Zeppelin" balloons. A gross of these and a gross of regular round balloons is about $30 for both.
JASCO X-18: JASCO, Box 135, Northridge, CA 91324. Ask for fleet rate and catalog. Frank Zaic has other beginner's kits, too, but the X-18 is the queen of the line. He has rubber, too.
Sleek Streaks: These are almost everywhere in dime stores and at toy dealers. If no luck, try the manufacturer: North Pacific Products, Bend, Oregon. Retail, as of late 1977, was $.59 ea. (They have two kinds, one with the balsa, and one with a styrofoam wing. Take the balsa.)
Rubber winders: Sterling Models, 3620 "G" St., Philadelphia, PA 19134.
Brochure: Summer Science Workshop or on the winter "Exploring Science on Saturdays" program where I teach an abridged version of the Aeroplanes and Flying Machines class, which I call Uncle Bill's Flying Circus. Available from: ESS/SSW, California State Museum of Science and Industry, 700 State Drive, Los Angeles, CA 90037.
Transcribed from original scans by AI. Minor OCR errors may remain.

