

WILDCAT PROFILE
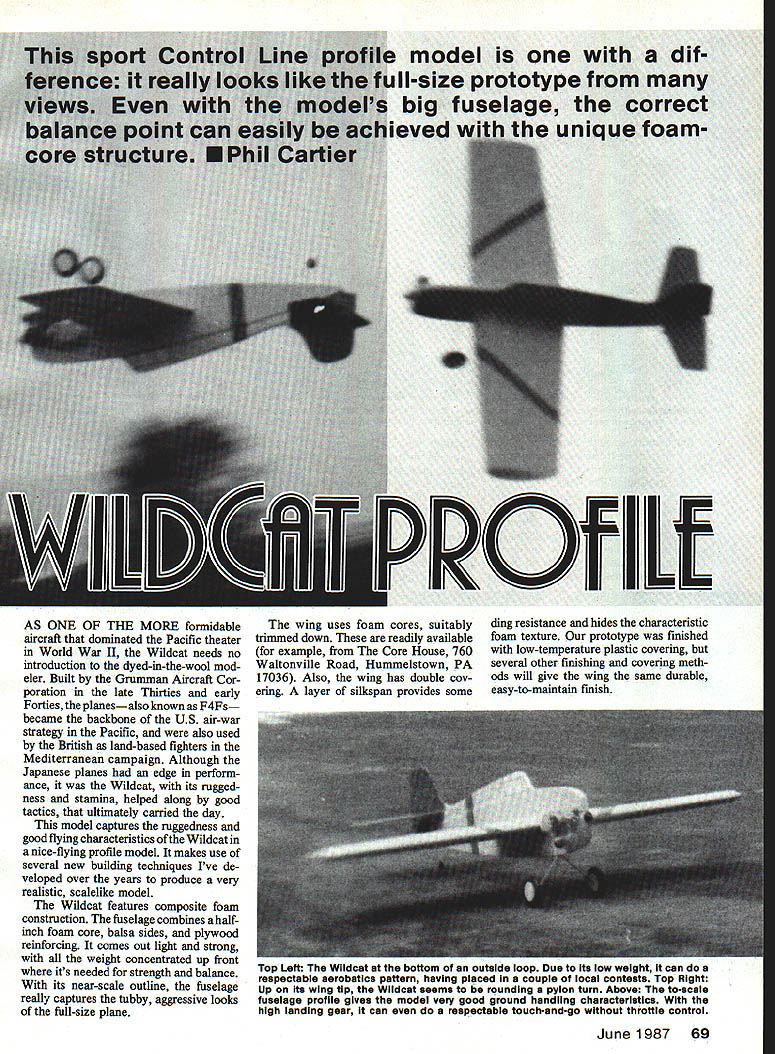
As one of the more formidable aircraft that dominated the Pacific theater in World War II, the Wildcat needs no introduction to the dyed-in-the-wool modeler. Built by the Grumman Aircraft Corporation in the late Thirties and early Forties, the planes—also known as F4Fs—became the backbone of the U.S. air-war strategy in the Pacific, and were also used by the British as land-based fighters in the Mediterranean campaign. Although the Japanese planes had an edge in performance, it was the Wildcat, with its ruggedness and stamina, helped along by good tactics, that ultimately carried the day.
This model captures the ruggedness and good flying characteristics of the Wildcat in a nice-flying profile model. It makes use of several building techniques to produce a realistic, scale-like model. The Wildcat features composite foam construction: the fuselage combines a half-inch foam core, balsa sides, and plywood reinforcing. The result is light and strong, with weight concentrated up front where it’s needed for strength and balance. With its near-scale outline, the fuselage captures the tubby, aggressive looks of the full-size plane.
The wing uses foam cores, suitably trimmed down. These cores are readily available (for example, from The Core House, 760 Waltonville Road, Hummelstown, PA 17036). The wing has double covering: a layer of silkspan provides ding resistance and hides the characteristic foam texture. The prototype was finished with low-temperature plastic covering, but several other finishing and covering methods will give the same durable, easy-to-maintain finish.
MATERIALS AND GLUES
Recommended adhesives
- Rule out old-fashioned model cements and dopes; they can attack foam.
- Avoid instant (cyanoacrylate) glues on bare foam—they’ll dissolve it.
- Use medium- to slow-cure epoxy (15–45 minute pot life) on closed joints and high-stress areas: front fuselage, wing/spar joint, landing gear mount.
- Use water-based aliphatic glue (TiteBond / Picas Glueall) on wood-to-foam joints.
- For large-area foam-to-wood joints, use contact cement (3M-77) or a mixture of epoxy and microballoon filler.
WING CONSTRUCTION
Preparing the cores and trailing edge
Begin construction with the wing. After cutting or obtaining cores, trim to shape using a sharp knife or hot-wire cutter. Use a slicing, sawing motion with the knife to prevent tearing. Use a flexible straightedge to mark and trim the tip around the core.
Glue the trailing edge in place and hold with masking tape while it dries. Plane the trailing edge to a rough triangular section before gluing. Leave a little excess length at the root to overlap the root rib; trim the trailing edge flush at the tip. Add the tip rib at the wingtip and use masking tape to hold until the glue dries. Masking tape is very useful for holding foam parts while glue dries.
Center rib, bellcrank, and spars
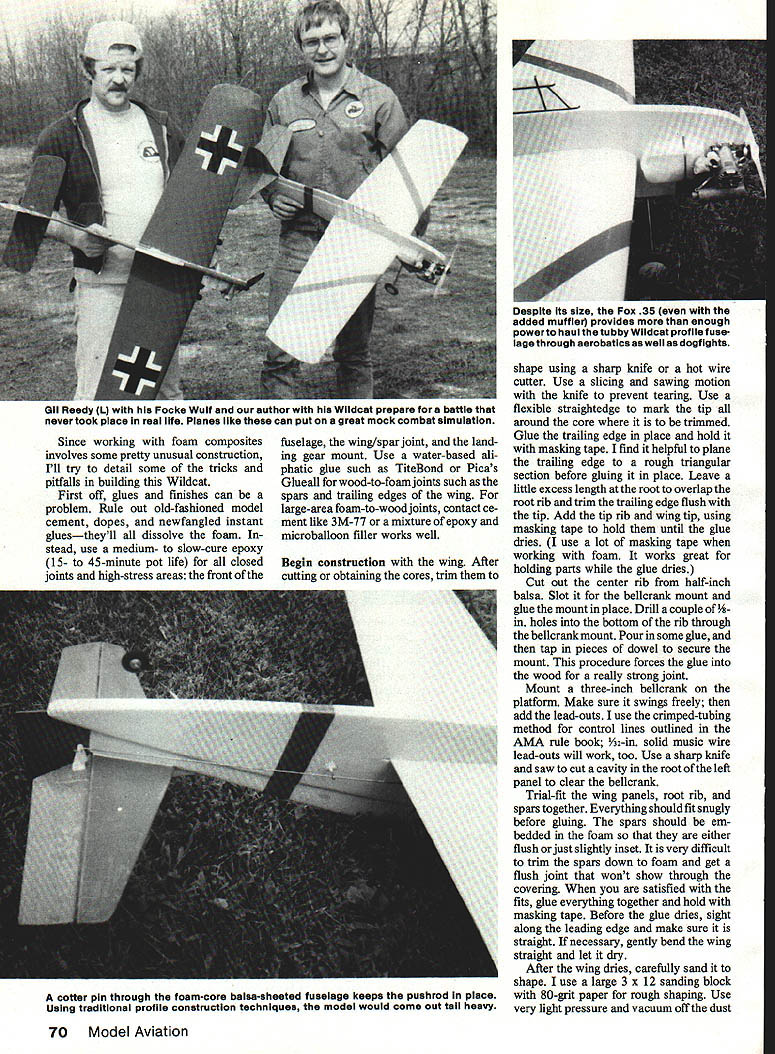
Cut out the center rib from half-inch balsa. Slot and glue the bellcrank mount in place. Drill a couple of holes in the bottom rib through the bellcrank mount, pour glue into the holes, tap pieces in and dowel them to secure the mount — this forces glue into the wood and creates a very strong joint.
Mount a three-inch bellcrank platform. Make sure it swings freely; add lead-outs. Use the crimped-tubing method for control lines as outlined in the AMA rule book — 1/32-in. solid music wire lead-outs will work too.
Cut a cavity in the root panel to clear the bellcrank. Trial-fit the wing panels, root rib, and spars together. Everything should fit snugly before gluing. Spars should be embedded in the foam either flush or just slightly inset — it’s difficult to trim spars down in foam to get a flush joint, and any mismatch won’t show through the covering.
Dry-fit parts as much as possible before gluing them to the foam. The better the parts fit before assembly, the better the final finish will be.
Gluing, straightening and sanding
When satisfied with the fits, glue everything together and hold with masking tape. Before the glue dries, sight along the leading edge to make sure it is straight; if necessary, gently bend the wing straight and let dry. After the wing dries, carefully sand the shape using a large 3 x 12 sanding block and 80-grit paper for rough shaping. Use very light pressure and vacuum off the dust frequently to prevent tearing out pieces of the foam.
The foam cores themselves should require little sanding. Most sanding is shaping the balsa pieces to the foam. Sand again with 120 paper, and finally with 240 paper for a smooth finish.
WING FINISHING
Sealing and covering
Seal all bare wood with a coat of polyurethane varnish. Urethane varnish is good for composite construction because it doesn’t attack foam. Sand the varnished areas to knock down the grain, then cover the wing with medium silkspan. Wallpaper paste works best for this.
Procedure:
- Mix up a cup or so of paste.
- Cut the silkspan to shape with a half-inch of excess all around.
- Dampen it lightly so it expands.
- Apply a thick, even coat of paste on the wing and smooth the silkspan in place. Let it overlap the leading edge for extra reinforcement.
- Hang the wing by its lead-outs to dry. After a day or so, sand smooth and trim rough edges with a razor blade.
Final finishing options
- Method A: Apply a second layer of silkspan, seal with varnish, then paint final colors (Pactra Formula U or similar). This finish almost equals sheeting the wing with wood for sturdiness.
- Method B: Cover the wing with Solarfilm or other low-temperature plastic covering. This is fast, durable, and practical for sport or combat flying. The silkspan hides foam texture and provides a sturdy base for the plastic film.
After the first layer of silkspan, use spackling compound to fill any dents or unevenness. The filler will be hidden by the second layer of silkspan or the plastic covering.
Sanding tips
Foam is relatively soft and flexible, so go easy when sanding. It is much easier to sand some excess off than to fill an area sanded too deep. Use light pressure, particularly when sanding wood down to match foam. Too much pressure from the sanding block presses the wood into the foam, causing the sandpaper to cut away foam on either side of the wood. Let the paper do the cutting, and vacuum the dust frequently.
FUSELAGE CONSTRUCTION
Overview and alternatives
The fuselage uses a foam core composite design as shown in the plans. A standard profile fuselage built entirely from half-inch balsa won’t work — it will be too heavy with most weight in the tail. If preferred, you can use half-inch-wide strip formers instead of foam to build up the aft section, or make a laminated outline. Both methods can produce a big, light, strong, scale-like fuselage similar to the foam core.
The foam core fuselage has three basic parts: the composite balsa/foam core and the two sides.
Building the core and outline
- Cut the forward section from half-inch balsa and install engine mounts. Cut the slot for the landing gear.
- Cut the foam part to the outline with a sharp knife, saw, or hot wire. Glue it to the balsa piece and add the tail block.
- When dry, add the laminated outline: three layers of 1/16 x 1/2-in. bass. Use masking tape to hold the outline pieces while the glue dries. The outline should be a little wider than the foam so it can be sanded down.
While the core is drying, assemble the fuselage sides. Glue the forward piece of 1/16-in. ply to the balsa sides. The balsa sides can be pieced using one piece of standard 3 x 36 balsa per side.
When the core is dry, use a large sanding block to smooth the sides and bring the laminated outline down to a uniform thickness.
Laminating the fuselage sides
The simplest method of assembling the fuselage is to use slow-drying epoxy mixed with microballoon filler (two parts glue to one part microballoon filler). Spread an even coat on the sides (right and left) and then laminate the fuselage. Use masking tape to hold the sides aligned and lay the assembly on a flat floor or board. To provide uniform pressure over the whole fuselage, lay books, magazines, or concrete blocks on the assembly.
An alternative approach used on the prototype combined three different glues: epoxy, aliphatic, and spray contact cement. Mask off the forward fuselage and about a quarter-inch around the outline on both the core and the fuselage sides. Both the foam and the matching section on the sides get a coat of contact cement. The balsa part of the core and the ply part of the sides get a coat of epoxy/microballoon mixture, and the laminated outline gets a bead of aliphatic glue. Substituting contact cement for epoxy saves weight but is trickier to manage.
Finishing the fuselage
When the fuselage is dry, trim any excess wood off the outline. Add the turtledeck from 3/16-in. balsa, then sand and round to shape. Locate the wing position on the fuselage and saw it out. Trial-fit the wing and trim as necessary to get a good fit.
LANDING GEAR
The landing gear plugs into the slot in the forward fuselage. Sandwich the wire between two pieces of 1/8-in. ply and glue the assembly in place with epoxy. This mount is sturdy for normal landings — and even some pretty ferocious bounces. You can substitute bolt-on gear or another preferred mount.
The prototype was flown initially without any gear. It flew well, but the bottom of the fuselage got too beat-up from landings, so gear was added.
TAIL SURFACES AND CONTROLS
The rest of the plane is standard construction. Tail surfaces are simple sheet balsa. Elevators are joined with a piece of birch dowel, which is easier than drilling and fitting a wire joiner.
Hook up the controls after assembling the plane:
- Working from the plans, locate and cut out a 3/8-in. slot for access to the bellcrank.
- Put a Z-bend in the end of the pushrod and snap it into the bellcrank.
- Cut the pushrod to length and add a clevis for connecting to the control horn.
- Support the pushrod by snapping a small cotter pin over it and gluing the cotter pin into the fuselage midway between the wing and stab. The plans show a small circular plywood patch to support the cotter pin and prevent it from working loose.
FLYING, BALANCE, AND PERFORMANCE
Before going to the field, carefully check your Wildcat for warps. Small warps can be eliminated by twisting the wing and re-ironing the covering. For larger warps, saw partway through the trailing edge on the scale aileron outline and bend in a small trim tab.
Engine recommendations:
- A Fox .35 (even with an added muffler) provides more than enough power to haul the tubby Wildcat through aerobatics and dogfights.
- An OS Max Stunt engine is another suitable choice.
- Use a muffler — they aren’t expensive, and the plane may need the nose weight.
Balance: The Wildcat should balance just ahead of the spar, as shown on the plans. Adjust with nose or tail weight if necessary.
Flight behavior: The large tail and relatively long fuselage make the Wildcat very steady. It is responsive to control inputs — haul on the controls and you get immediate response. On a breezy day, the big fuselage will tend to be pushed upwind and the plane may slide sideways a bit on the upwind side of the circle. This is manageable and a small price to pay for the chunky, authentic looks.
HINTS AND TROUBLESHOOTING
- Dry-fit everything as much as possible before final gluing.
- Be especially careful fitting spars so they are flush with the foam.
- When sanding, use light pressure and vacuum dust frequently to avoid tearing foam.
- After the first layer of silkspan, use spackling compound to fill dents and unevenness; the filler will be hidden by the second layer or plastic covering.
- Go easy when sanding foam; it’s easier to remove a little more later than to repair an over-sanded area.
Enjoy flying the Wildcat — it’s an excellent flier with steady handling and lively response when you want it.
Transcribed from original scans by AI. Minor OCR errors may remain.

