
WING JIG
Walt Seaborg
Background
Over the years I've built maybe a dozen polyhedral wings—for Rubber jobs, Gassie Free Flights, and lately for RC sailplanes. During the building of each wing there has always come that time when I would get out the blocks, pins, protractor, and ruler to help establish the proper angle on that outer panel.
My building techniques have included squatting next to the workbench to get an eye in line with the benchtop and standing on a chair to get my head upside down on the far side of the bench. I have frequently stood motionless for periods of 15 minutes with fingers squeezing a trailing edge, thumb pressing on a spar, and little finger of the other hand bracing a leading edge while I maneuvered the tube of glue with the thumb and remaining free fingers.
My wing-building results have been presentable and flyable enough, and my models always pass the calibrated eyeball-squint testing of our club's New Airplane Inspectors who gather and consult solemnly at the appearance of each new plane. However, down deep in my secret heart I've always known that each of my polyhedral wings was just a little bit off.
Sometimes the angles of the outer spar joints weren't identical. Other times, things didn't line up front-to-back on the separate panels. I've struggled with teakettles and heat guns, straightening and unstraightening the wing.
When the plans have called for "a quarter of an inch of washout," I have given the tip a twist and hoped for the best. How could I possibly know for sure if I was putting in exactly 1/4 in.?
Building the jig
Last month I changed my wing-building habits and built a truly proper wing. The polyhedral angles were identical. The panels all matched accurately from the front to the back. Down deep in my secret heart, I knew they were right.
Best of all, building the wing was a breeze—mainly because I got some unusually good advice in a set of kit instructions. At the beginning of the instructions for my Craft-Aire Golden Eagle, Tom Williams, the sailplane's designer, went beyond the usual "glue Part A to Part B" and urged the modeler, as a first step before chopping any balsa, to construct a wing jig. My first reaction was, "Big deal, I'll just build the panels separately, as usual, sand the angles in the spar and leading and trailing edges, get out the pins, glue, etc., and have at it."
Then I read more of the fine print and noted how, because of the convex shape of the airfoil bottom, you should first pin down the trailing edge, glue the ribs to it, and later tilt and block up this assembly, and only then glue the ribs to the spar and leading edge. Lining up and gluing those round-bottom, flexible panels without the aid of a jig surely would have set off the cuss-word alarm in my basement.
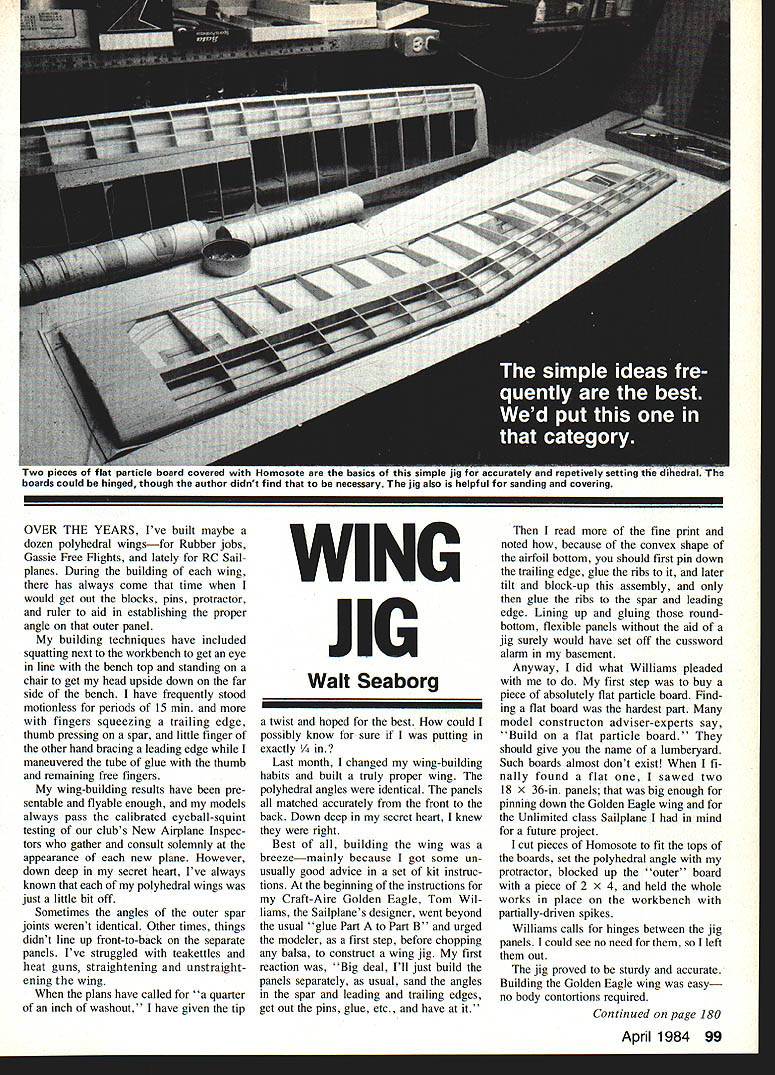
Anyway, I did what Williams pleaded me to do. My first step was to buy a piece of absolutely flat particle board. Finding a flat board was the hardest part. Many model construction adviser-experts say, "Build on a flat particle board." They should give you the name of a lumberyard—such boards almost don't exist! When I finally found a flat one, I sawed two 18 x 36 in. panels; that was big enough for pinning down the Golden Eagle wing and for the Unlimited-class sailplane I had in mind for a future project.
I cut pieces of Homosote to fit the tops of the boards, set the polyhedral angle with my protractor, blocked up the "outer" board with a piece of 2 x 4, and held the whole works in place on the workbench with partially driven spikes. Williams calls for hinges between the jig panels. I could see no need for them, so I left them out.
The jig proved to be sturdy and accurate.
Building the wing
Building the Golden Eagle wing was easy—no body contortions required. Besides the newfound ease of construction and the improved accuracy, there was an added benefit: the jig served as a cradle when working on the wing after it was unpinned from the wax paper and plans.
Sanding was far easier with the limp panels cradled firmly in the jig. I got perfect leading and trailing edge profiles with no wavy contours in the plan view, thanks to the jig and one of those long aluminum T-bar sanding blocks.
The cradle also helped with MonoKoting, at least for covering the inner panels. With a couple of pins here and there I didn't need to enlist my elbows and chin for holding things down or for bracing things up. (I still need five hands plus elbows and chin for covering the bottom sides.)
My Golden Eagle plans didn't call for washout, so I didn't try to rig the jig for that critical procedure. However, the jig helped me make sure there was no washout or warping.
Benefits
- Eliminates guesswork when setting polyhedral angles.
- Ensures identical outer panel angles and correct front-to-back alignment.
- Provides a sturdy cradle for sanding and finishing limp panels.
- Makes covering (MonoKoting) easier for inner panels.
- Reduces body contortions and the need for awkward holding/bracing.
Maybe, when assembling my new Unlimited sailplane, I'll be able to pin down the inner panel of the wing and twist in exactly 3/4 in. washout, or whatever the plans call for. Building polyhedral wings with a jig takes the guesswork out of every step.
Transcribed from original scans by AI. Minor OCR errors may remain.

