
Wire Wheels for Antique Aeroplanes
Alex Morton
Graphic Design by Jill Ann Cavanaugh
I love building models of antique aeroplanes (airplanes were not invented until about 1920). The nostalgia and stories connected with these oldies is quite fascinating. Nothing looks more graceful than a vintage model flying about at the local field, with spectators watching as if in a time warp.
I'm in my 65th year of building models, and for some reason, when I built a JN4-D2, I just naturally bought the wire wheels for it, because they looked so overwhelming to make.
I recently completed a scratch-built 1/6-scale Handley-Page E circa 1910, and a 1/6-scale 1912 Albatros Warpwing Taube Biplane. Since I'm a perfectionist, this mandated scratch-built wire-wheels — two for the HP and four for the Warpwing. Several companies offer wire wheels, but my "scratch-built mentality" overruled.
One day I made up my mind that I was going to conquer the problem; here are the results.
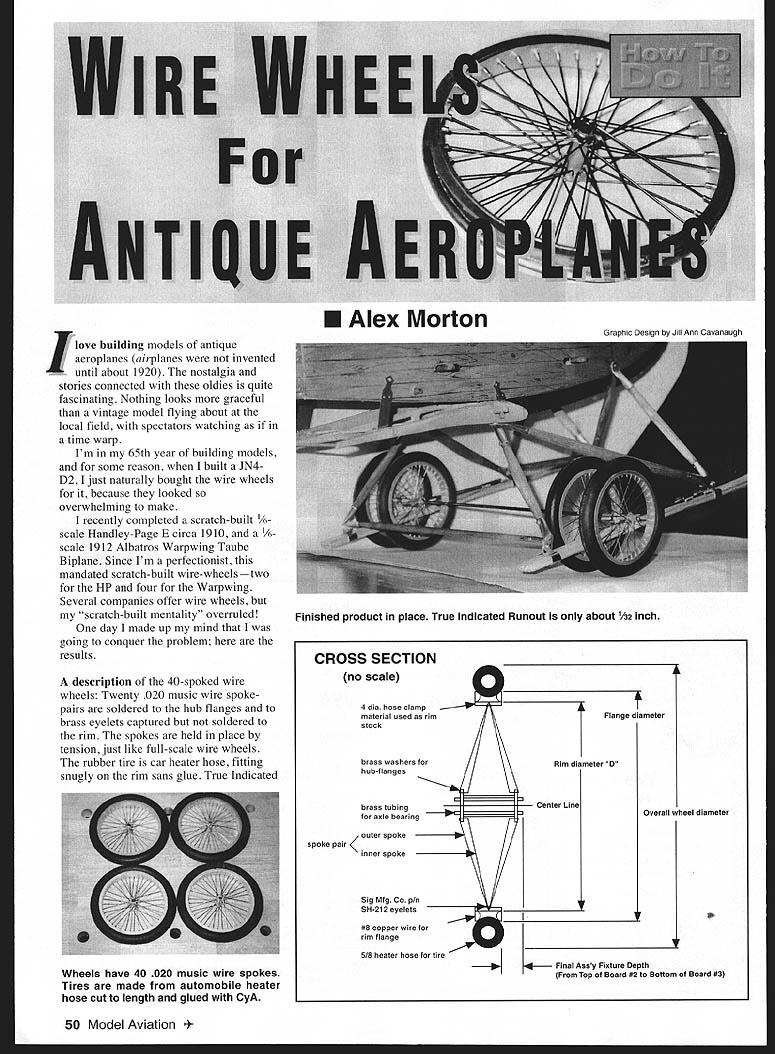
A description of the 40-spoked wire wheels: twenty .020 music wire spoke-pairs are soldered to the hub flanges and to brass eyelets captured (but not soldered) to the rim. The spokes are held in place by tension, just like full-scale wire wheels. The rubber tire is car heater hose, fitting snugly on the rim sans glue. Runout (TIR) of the wheel, when constructed as I suggest, will be about .032 inch — not too bad for a home-brew wire wheel!
If you choose to build, limit the size of wheels from about three inches to 15 inches in diameter.
Not much is required in the way of sophisticated tools. If you possess a coping saw or band saw or saber saw, needle-nose pliers, wire cutters, various-size drill bits, a drill motor (or hand drill), a soldering iron, a propane torch, rule, pencil, compass, and a protractor, you're in business. The fixtures for this project are easily made from common lumber.
A drawing shows the concept of the design; design your wheel similarly. Using a 3/4-inch-thick board about two inches larger than the finished wheel, draw lines with a ball-point pen from the center of the board outward to the edge at nine-degree increments, using a protractor, until 40 lines have been drawn in a full circle (for a 40-spoke wheel). For other even-numbered spoked wheels, divide 360° by the number of spokes.
Rim Construction
Using this board, measure the rim diameter D and cut a fixture with this diameter. Save the circular cutout for later use.
The material for the rims was a challenge to me. I have no sheet-metal tools except a pair of tin snips. Necessity is the mother of invention! In the sheet-metal section of the hardware store I found some four-inch-diameter steel clamps (used to hold an exhaust hose to a clothes dryer) that were close enough in width to what I needed for the rims. If you're not that lucky, you'll have to buy some stock and cut it to the correct width, or have the local sheet-metal shop do it for you.
Cut and trim a length of the strap for a clean butt joint inside the fixture. Make it an accurate fit — everything is built around this key piece! Silver-solder the butt joint while in the fixture.
Remove the rim and wrap it with a single layer of masking tape. Draw a line on the tape midway between the rim edges to mark the spoke line. Place the rim on the circular cutout that you saved earlier, sanding for a snug fit if needed. Using the lines on the cutout, mark and lightly center-punch every nine degrees on the spoke line.
Drill the 40 holes with a clearance drill for the brass eyelets to go through. Punch and drill one hole midway between and slightly outboard of two spoke holes with a 2-56 clearance drill for the air valve. Remove the masking tape. Remove all drilled-hole burrs using fine emery cloth.
Heat the #8 copper wire with a torch; with one end in a vise and the other in pliers, heat the wire until you feel it relax as you stretch it straight. The heat removes the temper and the wire straightens out very easily.
Wind the wire around a tin or glass jar that's slightly smaller in diameter than the rim flanges of the wheel. Cut off just enough to wrap around the rim at the edge. Solder the wire to the edge of the rim, making a close butt joint where the two ends meet. Repeat the process for the other flange.
When the soldering is complete, file the outer edge of the copper wires to nearly a half-round cross-section. Do this on a flat surface first with 100-grit sandpaper, then finish with 220-grit.
Get a pot from the pantry and fill it with enough water to cover the rims; add roughly a teaspoonful of automatic dishwasher detergent granules. Bring the rims to the solution and bring to a boil on the stove. Hard-boil for three minutes, liberally agitating with an acid brush. This degreases the assemblies of all flux, etc., which is corrosive. Rinse the rims in clear, warm water and blow-dry with a heat gun.
Painting the Rim
Use high-temperature (1,200°F) spray paint of your choice (I used aluminum) to paint the rims according to the can instructions, with this exception: disregard their curing process and place the rims in the oven on end, across the wire shelf, and cure at no more than 300°F for one hour. Any hotter and you might melt the solder.
Spray a pair of 2-56 x 1/2 screws and the modified nuts with dull black paint. Fit the 2-56 hole in the rim drilled earlier with the painted 2-56 x 1/2 screw and modified nut, which serves as a very convincing tire valve!
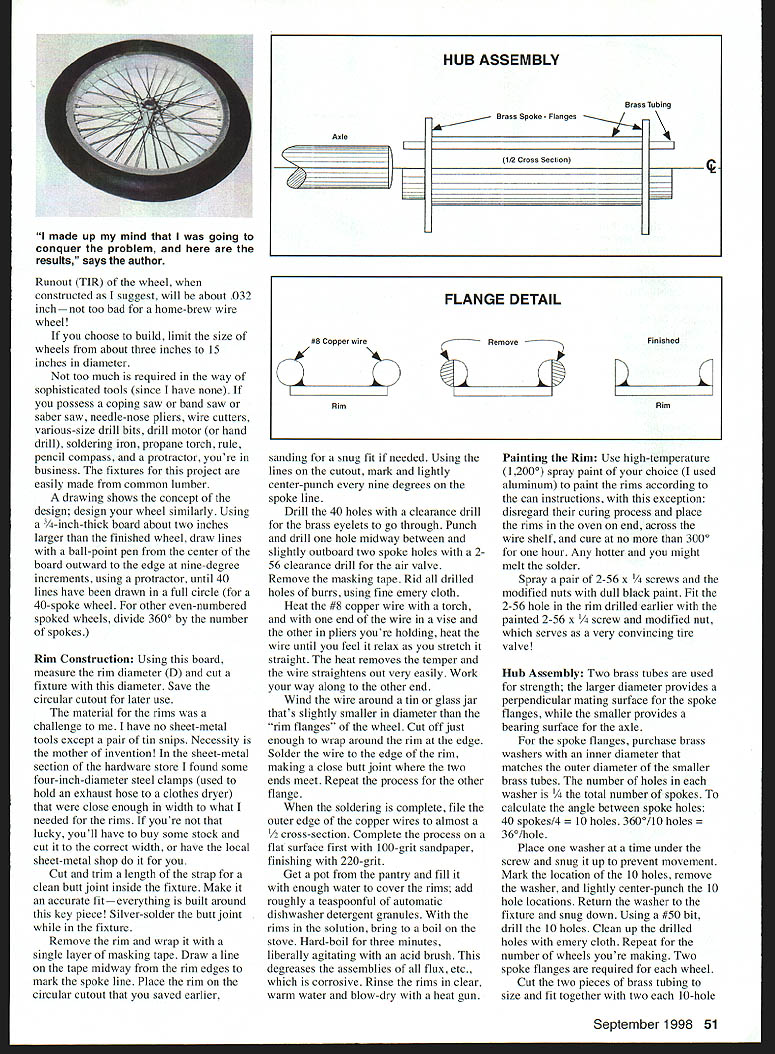
Hub Assembly
Two brass tubes are used for strength; the larger-diameter tube provides a perpendicular mating surface for the spoke flanges, while the smaller one provides a bearing surface for the axle.
For the spoke flanges, purchase brass washers with an inner diameter that matches the outer diameter of the smaller brass tube. The number of holes in each washer is one-quarter the total number of spokes. To calculate the angle between spoke holes: 40 spokes / 4 = 10 holes; 360° / 10 holes = 36° per hole.
Place one washer at a time under a screw and snug it up to prevent movement. Mark the location of the 10 holes; remove the washer, and lightly center-punch the 10 hole locations. Return the washer to the fixture and snug down. Using a #50 bit, drill the 10 holes. Clean up the drilled holes with an emery cloth. Repeat for the other wheel. Two spoke flanges are required for each wheel.
Cut the two pieces of brass tubing to size and fit together with the two each 10-hole flanges to form the hub assembly. The spoke holes in the flanges must be aligned when the assembly is soldered together. This can be done by placing the assembly on a piece of axle stock clamped to the edge of the bench.
Thread pieces of soft wire into two spoke holes 180° apart in one flange, threading them through two matching holes in the other flange. Bend the wire over as you tighten the flanges against the tubing. This arrangement holds the flanges perpendicular to the axle with spoke holes in line and tight up against the shorter but larger piece of tubing.
Now you are ready to solder the hub together; use a 100-watt iron. After the assembly is soldered, snip and discard the two temporary soft-wire holders.
Make another hub assembly. Clean both assemblies immediately, just as you did the rims.
Spoke Construction
The spoke-pairs are .020 music wire. Bend to 107°, leaving 1/8" excess at the rim end. Note: the bottom of the J should be about 1/16–3/32". Preform about 45 spoke-pairs for a pair of wheels (Murphy is alive!).
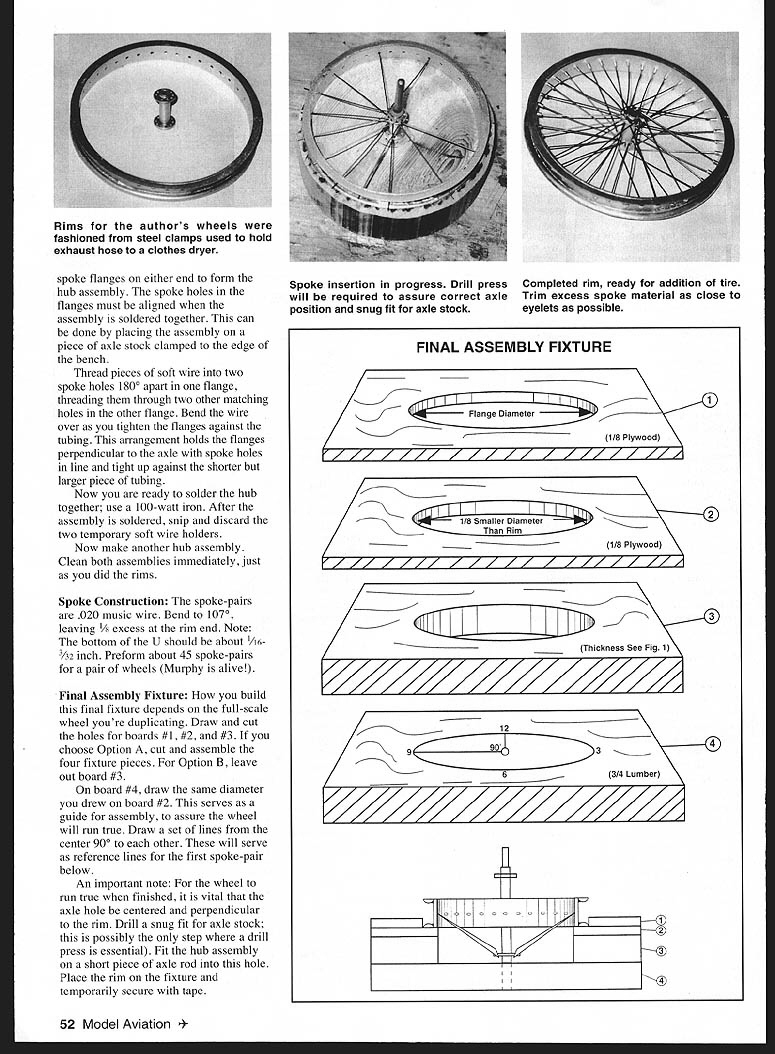
Final Assembly Fixture
How you build this final fixture depends on the full-scale wheel you're duplicating. Draw and cut the holes for boards #1, #2, and #3. If you choose Option A, cut and assemble the four fixture pieces. For Option B, leave out board #3.
On board #4, draw the same diameter you drew on board #2. This serves as a guide for assembly to assure the wheel will run true. Draw a set of lines from the center 90° to each other. These will serve as reference lines for the first spoke-pair below.
An important note: for the wheel to run true when finished, it is vital that the axle hole be centered and perpendicular to the rim. Drill a snug fit for axle stock; this is possibly the only step where a drill press is essential. Fit the hub assembly on a short piece of axle rod into this hole. Place the rim on the fixture and temporarily secure with tape.
Spoke Insertion
With the rim and hub assembly firmly in place, insert one spoke-pair into the spoke flange. With long-nose pliers, grasp the inner spoke and place it in the 9 o'clock rim hole (rebend the inner spoke straight if it has become distorted during this operation). The outer spoke goes into the hole at 12 o'clock.
Insert the second spoke-pair in the very next clockwise hole on the spoke flange. Place the second inner spoke in the fourth hole clockwise of the first inner spoke; the second outer spoke into the fourth hole clockwise from the first outer spoke; and so on until you have inserted 10 spoke-pairs.
An eyelet goes onto each of the 20 spokes. Seat them in the rim holes. (Do not cut off the excess spoke length at this time.) Apply flux to the eyelet and the spoke flange.
Solder the spoke-pairs to the flange on the spare hub, making sure they are spread around the hub evenly. After all 10 spoke-pairs are soldered to the flange, you may snip off the excess spoke material just as close to the eyelet as possible.
With a cloth soaked in flux, wet the top of each eyelet and spoke. Using just a dab of solder on the iron tip, place the heat on the eyelet/spoke assembly and the solder will wick into the eyelet surrounding the spoke. One spoke finished! Repeat for the other 19 spokes.
Remove the axle and tape and carefully lift out the half-finished wheel. Turn the wheel over, reinsert the axle, tape the assembly down, and repeat the process for the other 10 spoke-pairs. Now you have a strong music-wire-spoked wheel! Repeat all this for the number of wheels needed. Clean immediately as you did the rim.
You now have pristine (but naked) spoked wheels. Let's clothe them!
Tire Construction
Purchase heater hose (try an auto or hardware store) that has the outside diameter of the intended tire (5/8" for mine). Using acetone and a cloth, wipe off any printing. Use a green scouring pad to rough the tubing until uniformly dull. This step should leave you with pure black tubing.
Cut a length a little longer than the rim circumference. If using hose with fabric cord, split the hose lengthwise and remove any fabric cord. Fit the split hose or tubing over the rim and trim to length. Butt-joint the ends and glue the joint with thin CyA. Coat the inside of the hose with Goop or contact cement if desired, then slip the tire onto the rim and work it into place. If necessary, secure the tire by a few drops of CyA applied to the inside of the tire where it rests on the rim flange.
Roll the tire over the rim. Repeat the whole process one more time, and presto! you have a beautiful set of home-brew wire wheels for all your buddies to envy as your antique aeroplane sits there on the apron ready for flight.
When they ask how you made them, say "very carefully."
If you have any questions, feel free to call me at (425) 557-9219, or E-mail amfmamac@aol.com, or snail mail at the address below. Good Flying!
Alex Morton 3604 225th Pl. SE Issaquah WA 98029
Materials List
- #8 gauge bare copper wire
- .020 music wire
- 1/32" thick steel strap (see text)
- Brass washers
- Brass tubing
- 1/32" ID brass eyelets (Sig Mfg. Co. Part # SH-212)
- 5/8" diameter rubber hose (heater hose)
- Thin CyA
- Silver solder/liquid flux
- High-temperature silver spray paint
- 2-56 screw and nut
- Flat black paint
- Common dishwasher granules
- Pot for boiling water
Transcribed from original scans by AI. Minor OCR errors may remain.

