
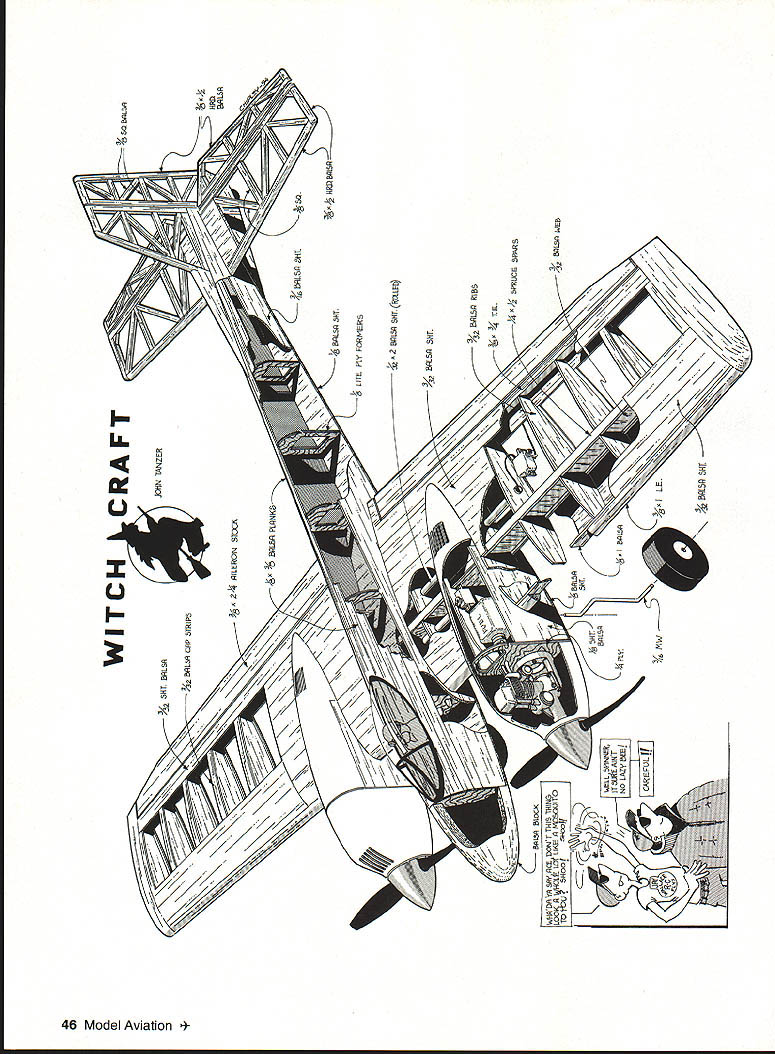
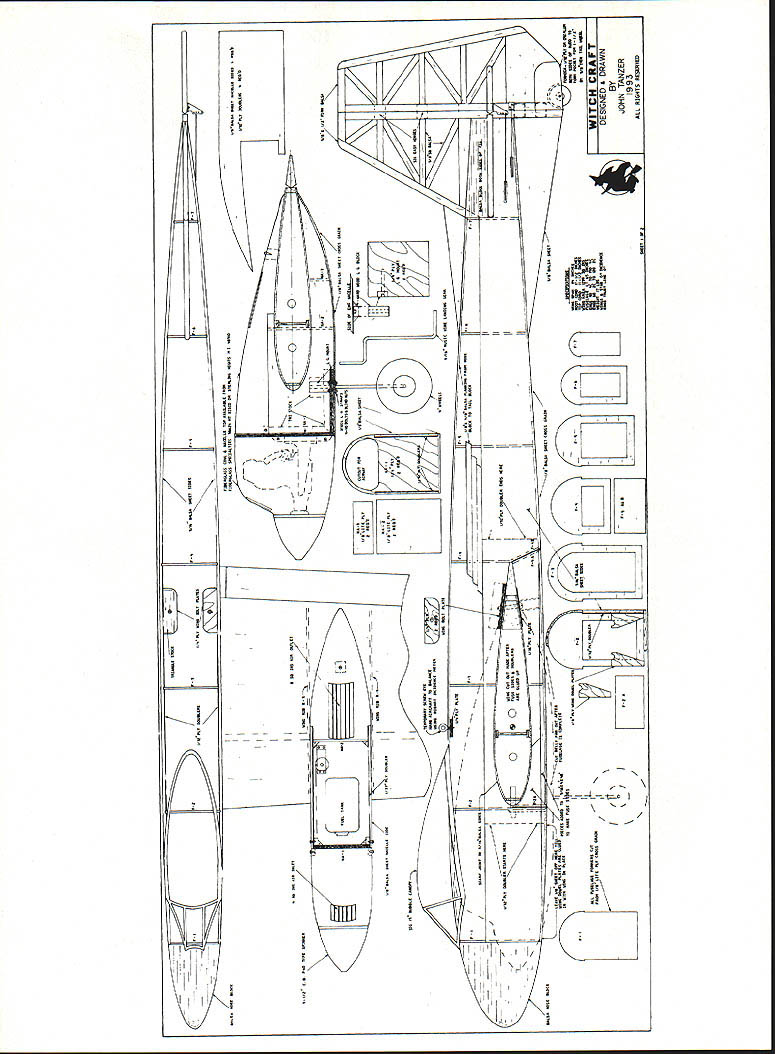
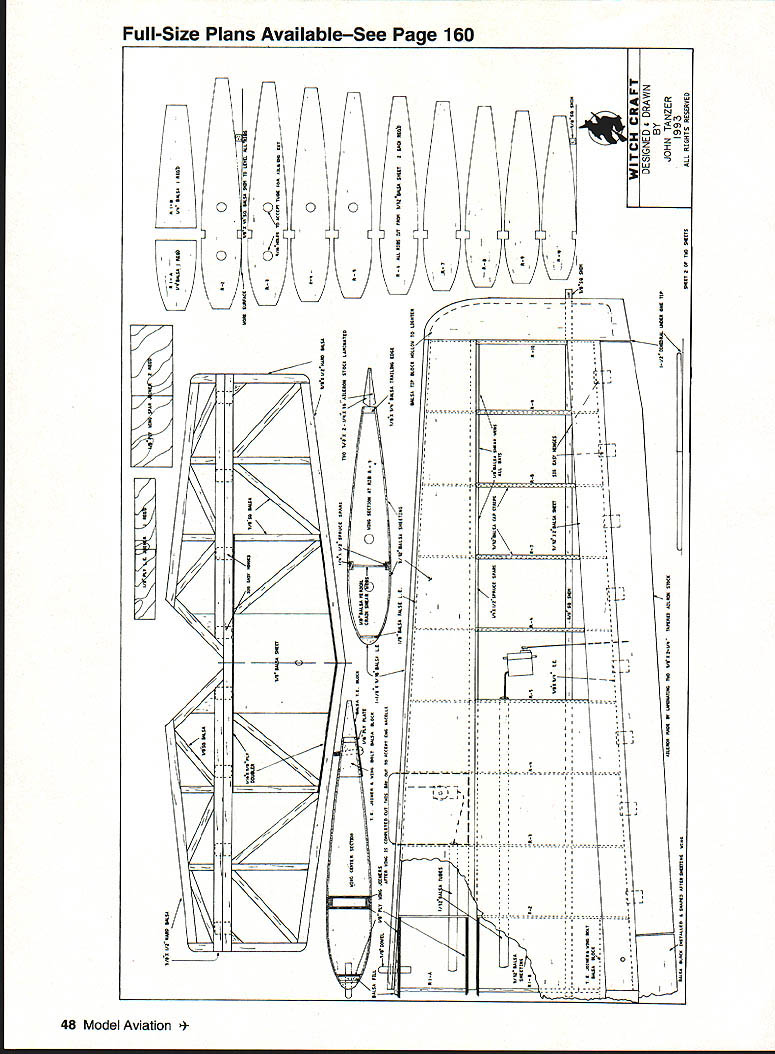
WITCH CRAFT
By John Tanzer
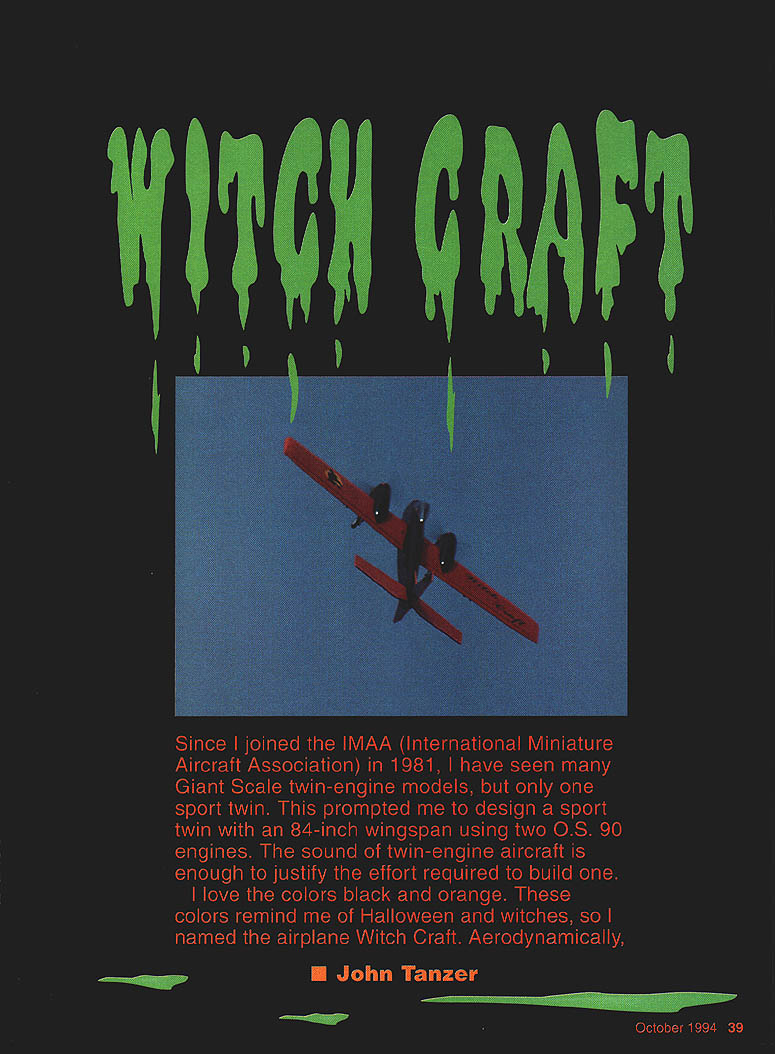
Since I joined the IMAA (International Miniature Aircraft Association) in 1981, I have seen many giant-scale twin-engine models, but only one sport twin. That prompted me to design a sport twin with an 84-inch wingspan using two O.S. 90 engines. The sound of twin engines is enough to justify the effort required to build one.
I love the colors black and orange. These colors remind me of Halloween and witches, so I named the airplane Witch Craft. Aerodynamically, this is a conventional design — an easy-flying, capable aircraft. The wing area is 1,239 sq in and at 17 lb flying weight it is relatively light. The wing is tapered and uses a symmetrical airfoil a little more than 16% thick for reasonable speed and enough lift for comfortable landings.
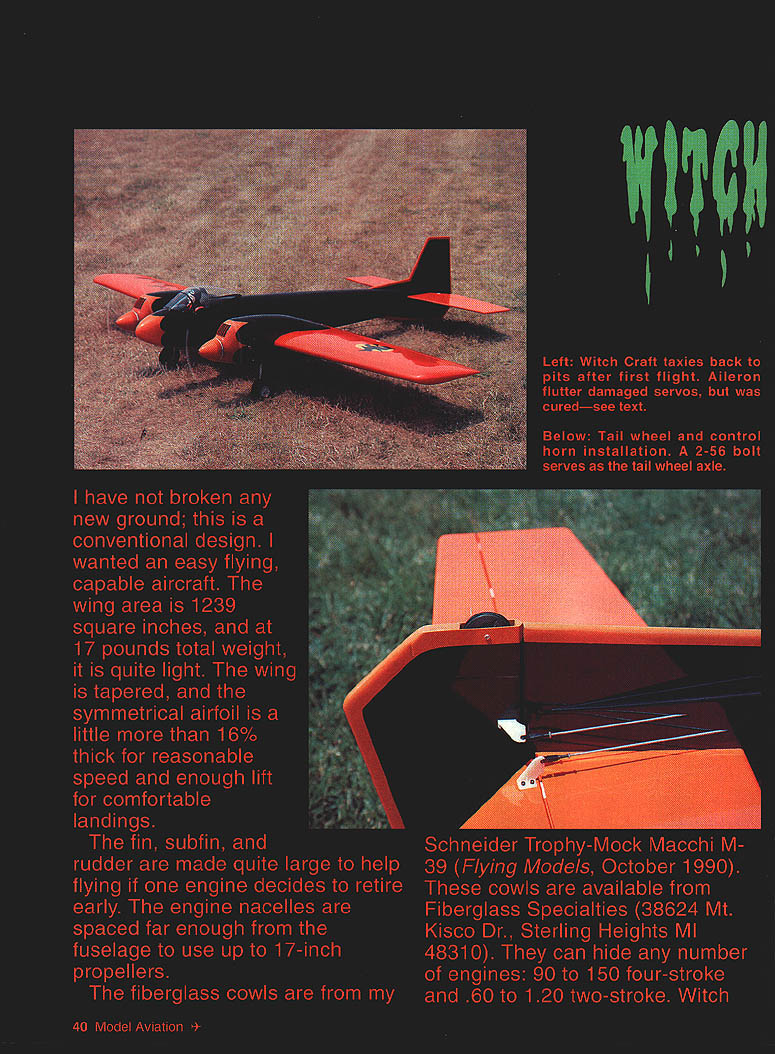
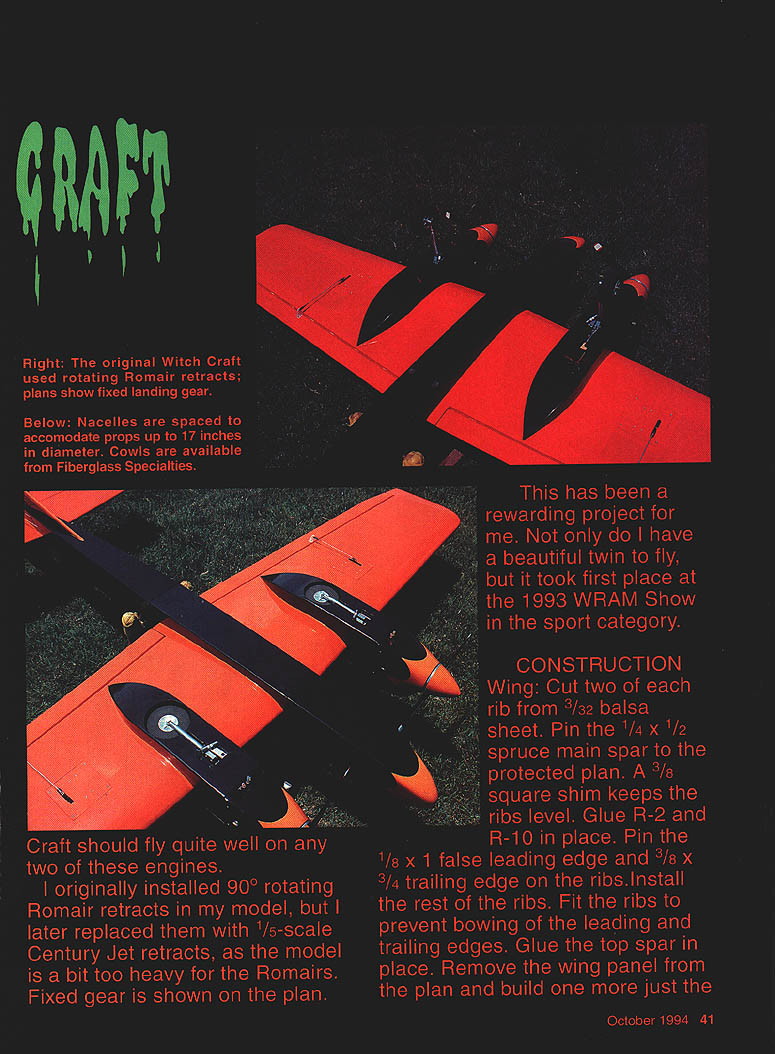
The fin, subfin, and rudder are made quite large to help control if one engine quits. The engine nacelles are spaced far enough from the fuselage to accept up to 17-inch propellers. The fiberglass cowls used on my model were from my Schneider Trophy–Mock Macchi M-39; cowls and nacelle tops are available from Fiberglass Specialties (38624 Mt. Kisco Drive, Sterling Heights, MI 48310). They can hide engines from .90 to 1.50 four-stroke and .60 to 1.20 two-stroke.
Witch Craft was a rewarding project — not only is it attractive, it took first place at the 1993 WRAM Show in the sport category.
CONSTRUCTION
Overview
- Built-up construction throughout.
- Covering and finish: UltraCote on wing and stabilizer; light glass cloth and Z-poxy finishing resin on the fuselage; Sig Koverall and nitrate dope on rudder and fin; Hobbypoxy for paint and trim.
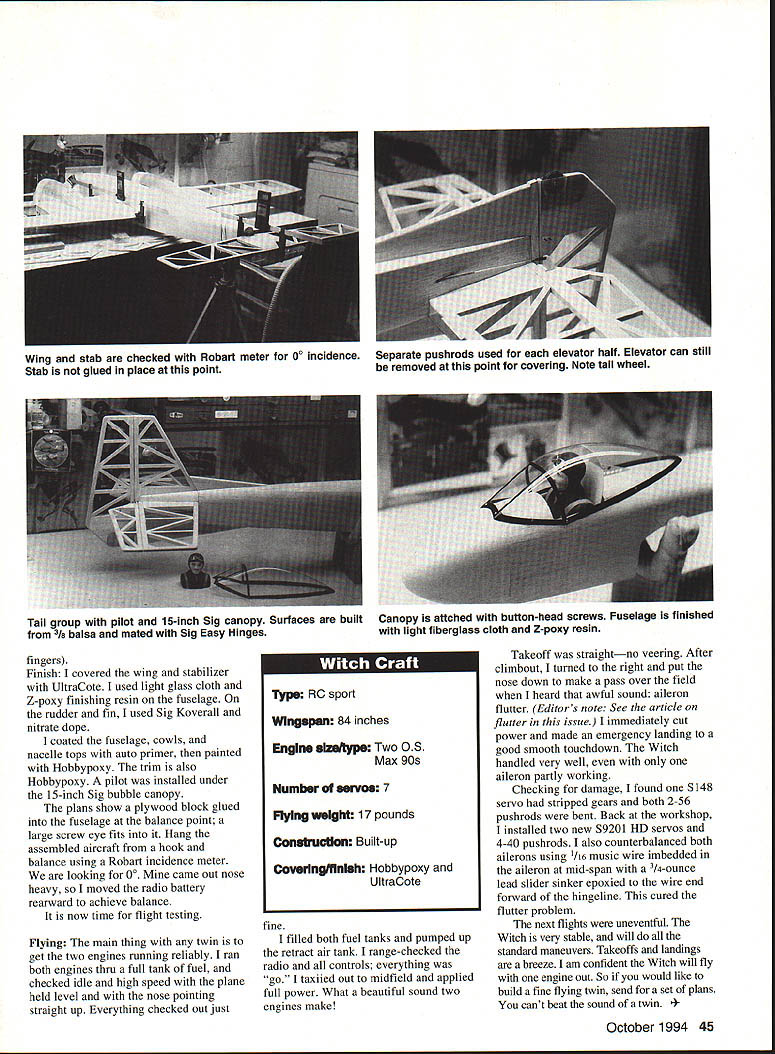
- Use a Robart incidence meter to set incidence and check for wing twist during assembly.
Wing
- Cut ribs and spars
- Cut two of each rib from 3/32" balsa sheet.
- Pin the 1/4" x 1/2" spruce main spar to the plan. Use a 3/8" square shim to keep ribs level.
- Glue ribs R-2 and R-10 in place.
- Pin the 1/8" x 1/2" false leading edge and 3/8" x 3/4" trailing edge on the ribs. Install remaining ribs and fit to avoid bowing.
- Top spar and second panel
- Glue the top spar in place.
- Remove the wing panel from the plan and build the second panel exactly the same.
- Shear webs and spar reinforcement
- Install vertical-grain shear webs.
- Fit 3/32" balsa sheet between ribs against the spars.
- Butt 3/32" balsa sheet for an inside cut to form an I-beam at the top and bottom of the spar, or face-glue spars to form a channel.
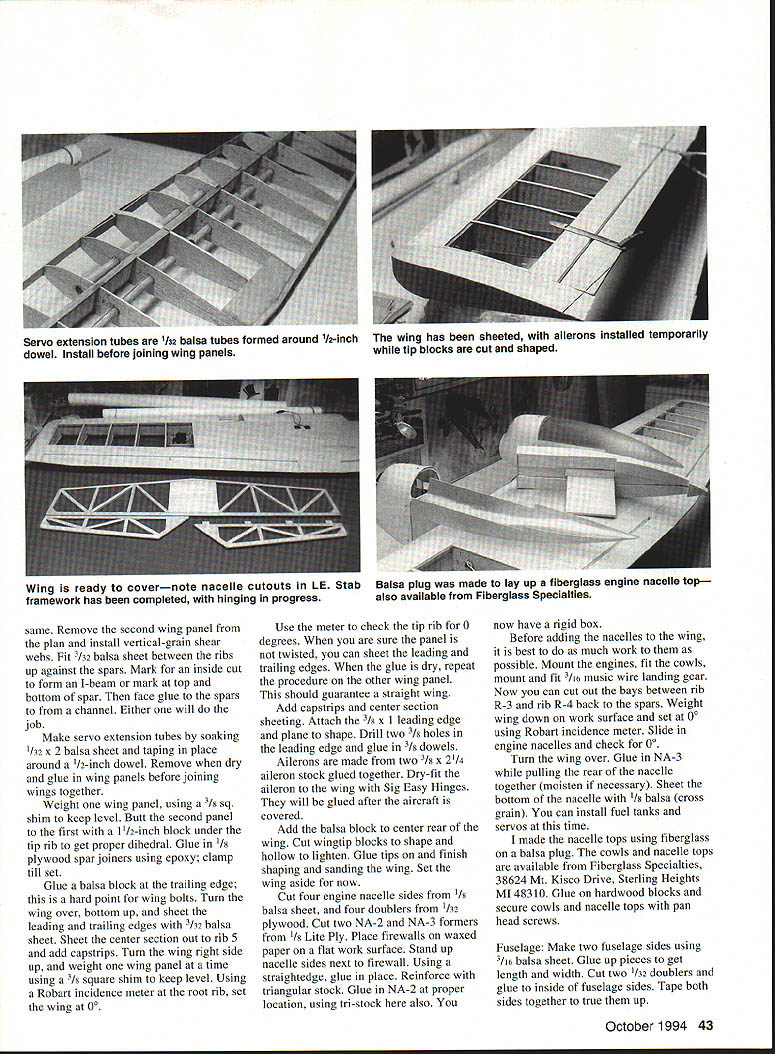
- Servo extension tubes
- Make servo extension tubes by soaking 1/32" x 2" balsa sheet, forming it around a 1/2" dowel, taping until dry, then removing the dowel and gluing the tube into the wing before joining panels.
- Join panels and set dihedral
- Weight one wing panel using a 3/8" sq. shim to keep level.
- Butt the second panel to the first with a 1-1/2" block under the tip rib to obtain proper dihedral.
- Glue 1/8" plywood spar joiners with epoxy and clamp until set.
- Glue a balsa block at the trailing edge as a hard point for wing bolts.
- Sheet leading and trailing edges
- Turn the wing bottom up and sheet the leading and trailing edges with 3/32" balsa sheet.
- Sheet the center section out to rib 5 and add capstrips.
- Turn wing right side up and, one panel at a time, set the root rib to 0° with a Robart incidence meter and check the tip rib to ensure no twist. Only when panel is untwisted, complete sheeting and allow glue to dry before repeating on the other panel.
- Finish wing
- Add capstrips and center-section sheeting.
- Attach and shape the 3/8" x 1" leading edge. Drill two 3/16" holes and glue in 3/16" dowels.
- Ailerons: make from two pieces of 3/8" x 2-1/4" aileron stock glued together. Dry-fit using Sig Easy Hinges; hinge permanently after covering.
- Add a balsa block at center rear of the wing.
- Cut, hollow, and shape wingtip blocks; glue on tips and sand smooth.
- Set the wing aside.
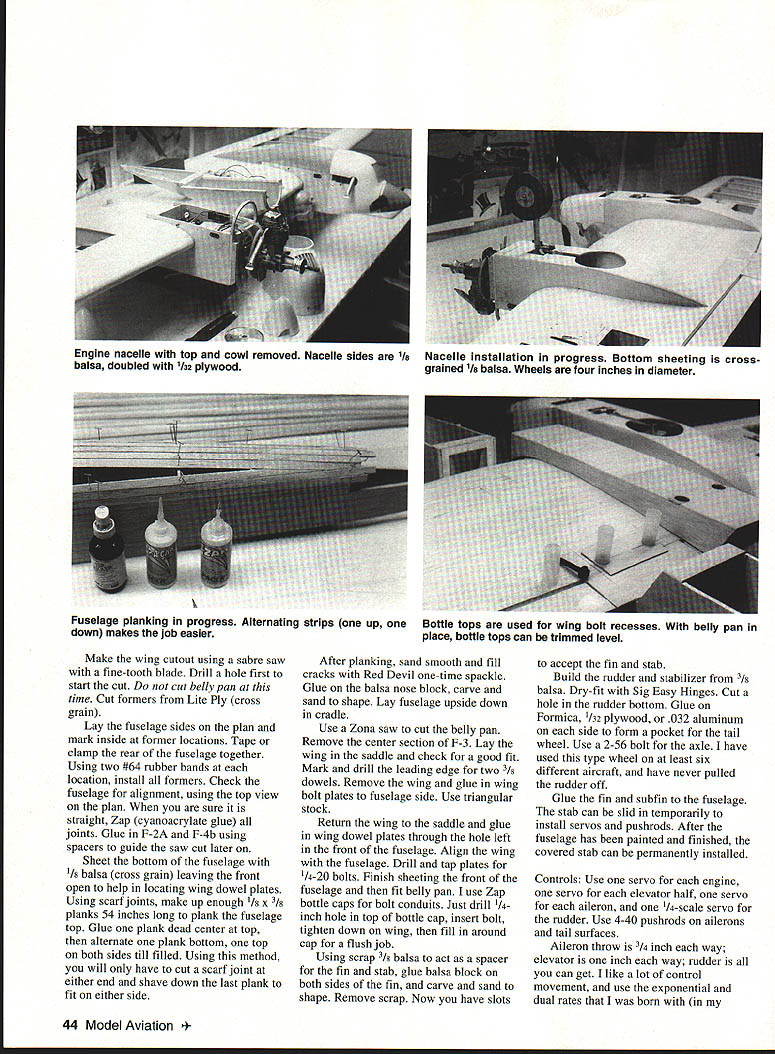
Engine nacelles
- Parts and box assembly
- Cut four nacelle sides from 1/8" balsa sheet and four doublers from 1/32" plywood.
- Cut NA-2 and NA-3 formers from 1/8" Lite Ply.
- Place firewalls on waxed paper on a flat surface. Stand nacelle sides next to firewall and glue using a straightedge; reinforce with triangular stock. Glue NA-2 in proper location to form a rigid box.
- Pre-fit off-wing
- Do as much nacelle work off the wing as possible: mount engines, fit cowls, and fit 3/16" music wire landing gear.
- Cowls and nacelle tops can be made from fiberglass over a balsa plug or ordered from Fiberglass Specialties.
- Fit to wing
- Cut out bay between rib R-3 and R-4 back to the spars.
- Weight the wing down and set to 0° using the Robart incidence meter. Slide nacelles in and check for correct alignment.
- Turn wing over, glue in NA-3 while pulling the rear nacelle together and moistening where necessary.
- Sheet the bottom of the nacelle with 1/8" balsa cross-grain.
- Install fuel tanks and servos at this time.
- Glue hardwood blocks to nacelles to secure cowls and nacelle tops with pan-head screws.
Fuselage
- Sides and doublers
- Make two fuselage sides from 3/16" balsa sheet; glue up pieces to obtain required length and width.
- Cut two 1/32" doublers and glue inside fuselage sides.
- Tape both sides together and true them up. Lay sides on the plan and mark inside former locations.
- Assembly and formers
- Tape and clamp the rear fuselage together. Use #64 rubber bands to hold and install formers.
- Check alignment with the top-view plan; zap joints with CA as needed.
- Glue F-2A and F-4B in place, using spacers to guide later saw cuts.
- Bottom sheeting and planking
- Sheet the bottom with 1/8" balsa cross-grain, leaving the front open to help locate wing-dowel plates.
- Using scarf joints, make enough 1/8" x planks (54" long) for top planking. Glue the center plank dead center, then alternate planks on bottom and top both sides until filled. Sand smooth and fill cracks (Red Devil one-time spackle recommended).
- Nose, belly pan, and wing saddle
- Glue a balsa nose block, carve and sand to shape.
- Lay fuselage upside down in a cradle. Use a Zona saw to cut the belly pan and remove center section F-3.
- Fit the wing saddle and check for a good fit. Mark and drill the leading edge for two 1/8" dowels.
- Remove the wing, glue wing-bolt plates to fuselage sides using triangular stock, then reinstall wing saddle and secure wing-dowel plates through.
- Wing bolts and conduits
- Drill and tap plates for 1/4-20 bolts. A practical trick: use Zap bottle caps as bolt conduits — drill a 1/2" hole in the cap, insert the bolt, tighten on the wing and fill around the cap for a flush finish.
- Tail and tailwheel
- Use scrap 3/32" balsa as spacers for fin and stab alignment; glue balsa blocks on both sides of the fin, carve and sand, then remove scrap to leave slots for fin and stab.
- Build rudder and stabilizer from 3/8" balsa. Dry-fit with Sig Easy Hinges.
- Cut a hole in the rudder bottom and glue Formica, 1/32" plywood, or .032" aluminum on each side to form a pocket for the tailwheel. Use a 2-56 bolt for the axle.
Controls and linkages
- Recommended servos and channels:
- One servo for each engine (2).
- One servo for each elevator half (2).
- One servo for each aileron (2).
- One 1/4-scale servo for the rudder (1).
- Total number of servos: 7.
- Use 4-40 pushrods on ailerons and tail surfaces (upgrade from 2-56 if heavier servos are used).
- Control throws:
- Ailerons: 2-3/4" each way.
- Elevator: 1" each way.
- Rudder: maximum travel achievable.
- Use exponential and dual rates as needed.
Counterbalancing ailerons
- If you encounter aileron flutter, counterbalance each aileron by embedding 1/16" music wire in the aileron at mid-span, with a 1/4-ounce lead slider sinker epoxied to the wire forward of the hinge line. This method cured flutter on my model.
Finish and covering
- Cover wing and stabilizer with UltraCote.
- Fuselage: use light glass cloth and Z-poxy finishing resin.
- Rudder and fin: cover with Sig Koverall and finish with nitrate dope.
- Primer and paint: coat fuselage, cowls, and nacelle tops with auto primer, then paint with Hobbypoxy; use Hobbypoxy for trim.
- Pilot: install a pilot figure under the 15-inch Sig bubble canopy if desired.
Balance and final setup
- The plans show a plywood block glued into the fuselage at the balance point; a large screw eye fits into it for hanging.
- Hang the assembled aircraft from a hook and check balance using a Robart incidence meter — target 0°.
- If nose heavy, move the radio battery rearward until balance is achieved.
FLYING
- Preflight checks:
- Run both engines through a full tank and check idle and high speed with the plane held level and with the nose pointing straight up.
- Fill both fuel tanks and pump up the retract air tank.
- Range-check the radio and verify all controls.
- Takeoff and handling:
- Taxi and apply full power — takeoff was straight with no veering.
- After climbout the Witch made a clean pass, but experienced aileron flutter on the first flight. I cut power and made an emergency landing with a good smooth touchdown. The aircraft handled well despite a partially disabled aileron.
- Repairs and improvements:
- Damage: one S148 servo stripped gears and both 2-56 pushrods were bent.
- Remedies: installed S9201 HD servos on 4-40 pushrods and counterbalanced both ailerons (see above). The flutter problem was cured.
- Subsequent flying:
- Later flights were uneventful. The Witch is very stable and will do standard maneuvers. Takeoffs and landings are easy. I am confident the Witch will fly with one engine out.
If you would like to build a fine flying twin, send for a set of plans — you can't beat the sound of a twin.
SPECIFICATIONS
- Type: RC sport
- Wingspan: 84 inches
- Wing area: 1,239 sq in
- Engine size/type: Two O.S. Max 90s
- Number of servos: 7
- Flying weight: 17 pounds
- Construction: Built-up
- Covering/finish: Hobbypoxy and UltraCote
SOURCES / NOTES
- Fiberglass cowls and nacelle tops: Fiberglass Specialties, 38624 Mt. Kisco Drive, Sterling Heights, MI 48310.
Transcribed from original scans by AI. Minor OCR errors may remain.

