
World Champion Miss RJ
By Zdenek and Milos Malina
Our successful participation in the World Championship F3D FAI Pylon Races last August in Chicopee, MA was a long journey with a happy ending for us. We hope this is not the end of our aeromodeling days. We want to continue racing and hope we can visit the U.S.A. again.
We spent 20 unforgettable days with our American friends, and we would like to thank all who made our stay in the U.S. possible and so enjoyable. Everywhere the people were so friendly; it was as if we had known them all our lives. It was simply fantastic, and we have many happy memories to cherish. Saying goodbye when it was all over was hard and very moving.
Model Aviation magazine offered us the chance to write about ourselves, our modeling background, our preparations—anything to do with pylon racing. It is not very easy to write about oneself; if you've ever tried it, you'll understand. Here is our story.
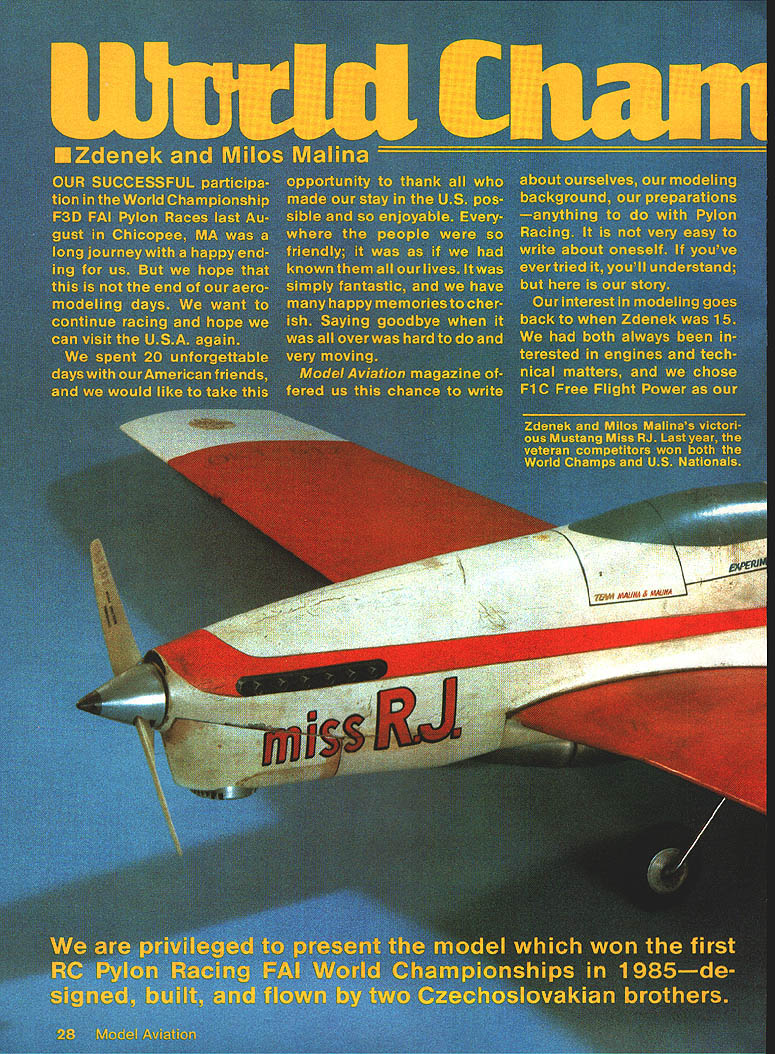
Our interest in modeling goes back to when Zdenek was 15. We had both always been interested in engines and technical matters, and we chose F1C Free Flight Power as our first event. Milos soon lost interest in that event, which left Zdenek on his own. He began taking part in many contests and traveled a great deal at home and abroad, fortunately winning quite often. In 1966 he became the European F1C Champion; those were very successful years for him.
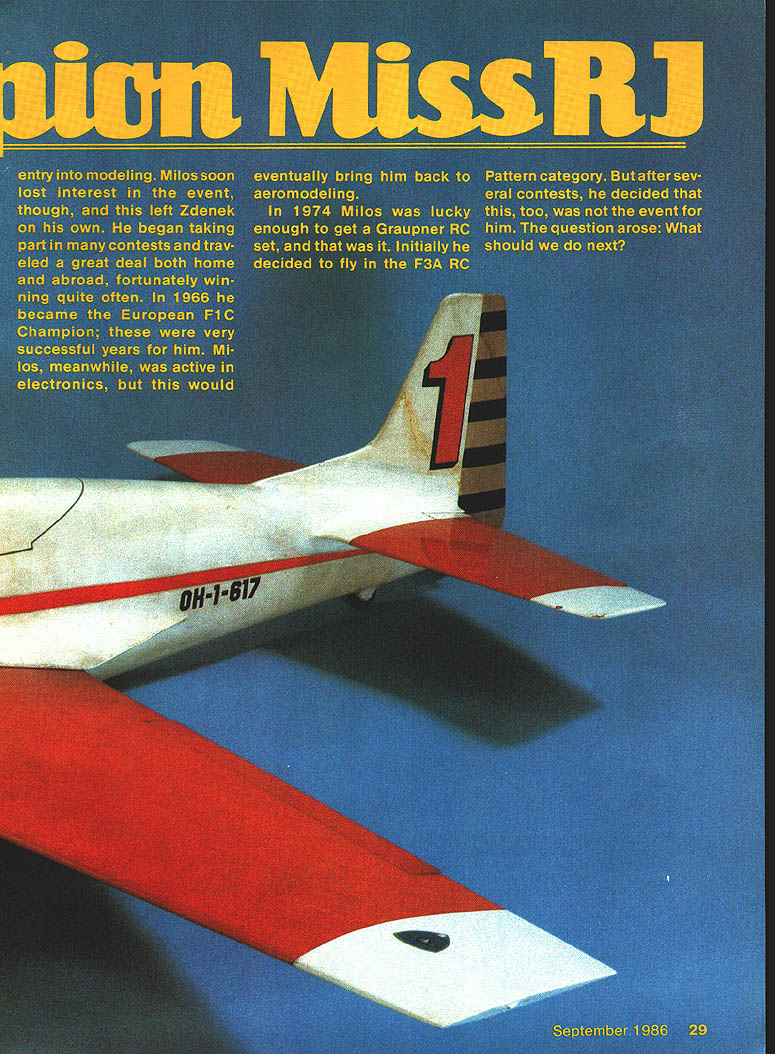
Milos, meanwhile, was active in electronics, but this eventually brought him back to aeromodeling. In 1974 Milos was lucky enough to get a Graupner RC set, and that was it. Initially he decided to fly in the F3A RC Pattern category. After several contests he decided that this, too, was not for him. The question arose: what should we do next?
We can't remember whose idea it was to try pylon racing. All we knew about it was that it existed in the U.S. and had been popular there for a number of years. After some research we discovered that pylon races were being run in Europe as well, particularly in Sweden, West Germany, Great Britain, and even Hungary.
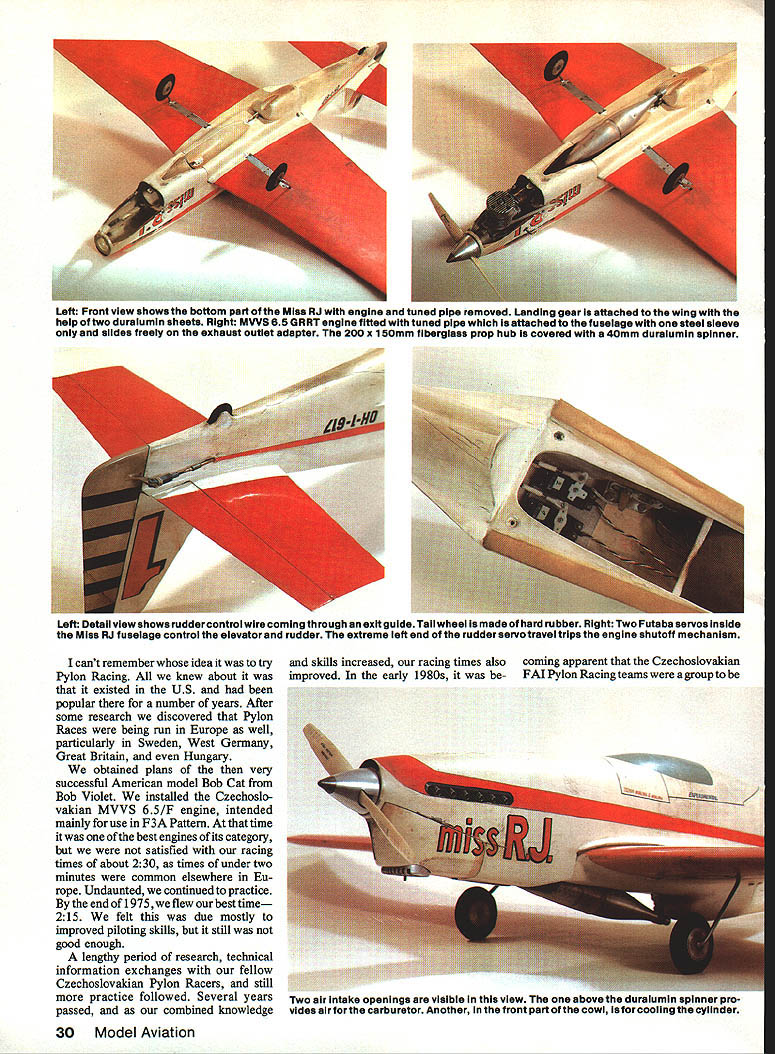
We obtained plans of the then-successful American model Bob Cat from Bob Violet. We installed the Czechoslovakian MVVS 6.5/F engine, intended mainly for use in F3A Pattern. At that time it was one of the best engines of its category, but we were not satisfied with our racing times of about 2:30, as times under two minutes were common elsewhere in Europe. Undaunted, we continued to practice. By the end of 1975 we flew our best time—2:15. We felt this was due mostly to improved piloting skills, but it still was not good enough.
A lengthy period of research, technical information exchanges with our fellow Czechoslovakian pylon racers, and still more practice followed. Several years passed, and as our combined knowledge and skills increased, our racing times improved. In the early 1980s, it was becoming apparent that the Czechoslovakian FAI pylon racing teams were a group to be taken seriously.
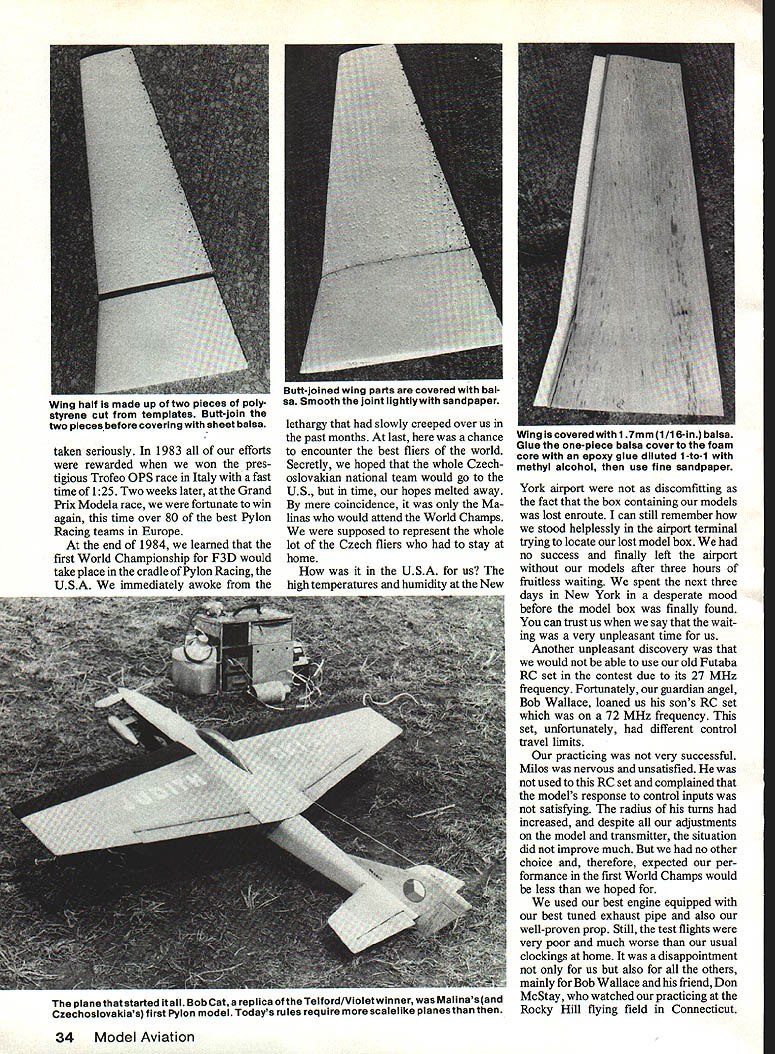
In 1983 all our efforts were rewarded when we won the prestigious Trofeo OPS race in Italy with a fast time of 1:25. Two weeks later, at the Grand Prix Modela race, we were fortunate to win again, this time over 80 of the best pylon racing teams in Europe.
At the end of 1984 we learned that the first World Championship for F3D would take place in the cradle of pylon racing, the U.S.A. We immediately awoke from the lethargy that had slowly crept over us in the past months. At last, here was a chance to encounter the best fliers in the world. Secretly we hoped the whole Czechoslovakian national team would go to the U.S., but in time our hopes melted away. By mere coincidence, it was only the Malinas who would attend the World Champs. We were supposed to represent the whole lot of the Czech fliers who had to stay at home.
How was it in the U.S.A. for us? The high temperatures and humidity at the New York airport were not as discomfiting as the fact that the box containing our models was lost en route. I can still remember how we stood helplessly in the airport terminal trying to locate our lost model box. We had no success and finally left the airport without our models after three hours of fruitless waiting. We spent the next three days in New York and then were in a desperate mood before the model box was finally found. You can trust us when we say the waiting was very unpleasant.
Another unpleasant discovery was that we would not be able to use our old Futaba RC set in the contest due to its 27 MHz frequency. Fortunately, our guardian angel, Bob Wallace, loaned us his son's RC set, which was on a 72 MHz frequency. This set, unfortunately, had different control travel limits.
Our practicing was not very successful. Milos was nervous and unsatisfied. He was not used to this RC set and complained that the model's response to control inputs was not satisfying. The radius of his turns had increased, and despite all our adjustments on the model and transmitter, the situation did not improve much. But we had no other choice and thus expected our performance in the first World Champs would be less than we hoped for.
We used our best engine equipped with our best tuned exhaust pipe and our well-proven prop. Still, the test flights were very poor and much worse than our usual times at home. It was a disappointment not only for us but also for others, mainly for Bob Wallace and his friend Don McStay, who watched our practicing at the Rocky Hill flying field in Connecticut. Each day we spent a lot of time trying to figure out what was wrong, but we could not identify anything to blame.
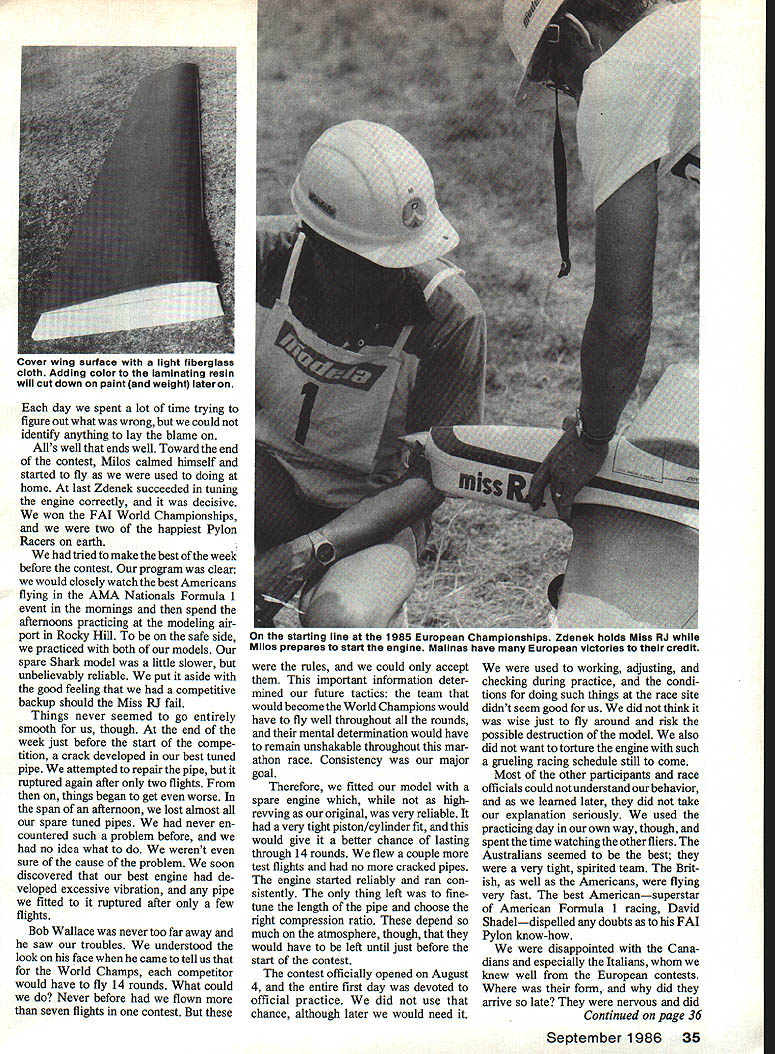
All's well that ends well. Toward the end of the contest, Milos calmed himself and started to fly as we were used to doing at home. At last Zdenek succeeded in tuning the engine correctly, and it was decisive. We won the FAI World Championships, and we were two of the happiest pylon racers on earth.
Before the contest we tried to make the best of the week. Our program was clear: watch the best Americans flying in the AMA Nationals Formula 1 event in the mornings and practice at the Rocky Hill modeling airport in the afternoons. To be on the safe side, we practiced with both of our models. Our spare Shark model was a little slower but unbelievably reliable. We put it aside with the good feeling that we had a competitive backup should the Miss RJ fail.
Things never seemed to go entirely smoothly on our first day, though. At the end of the week just before the start of the competition, a crack developed in our best tuned pipe. We attempted to repair the pipe, but it ruptured again after only two flights. From then on, things began to get worse. In the span of an afternoon we lost almost all our spare tuned pipes. We had never encountered such a problem before, and we had no idea what to do. We weren't even sure of the cause. We soon discovered that our best engine had developed excessive vibration, and any pipe we fitted to it ruptured after only a few flights.
Bob Wallace was never far away, and he saw our troubles. We understood the look on his face when he told us that for the World Champs each competitor would have to fly 14 rounds. What could we do? Never before had we flown more than seven flights in one contest. But these were the rules, and we could only accept them. This important information determined our future tactics: the team that would become the World Champions would have to fly well throughout all rounds, and their mental determination would have to remain unshakable throughout this marathon. Consistency was our major goal.
Therefore we fitted our model with a spare engine which, while not as high-revving as our original, was very reliable. It had a very tight piston/cylinder fit, which gave it a better chance of lasting through 14 rounds. We flew a couple more test flights and had no more cracked pipes. The engine started reliably and ran consistently. The only adjustments left were to fine-tune the pipe length and choose the right compression ratio. These depended so much on the atmosphere that they had to be left until just before the contest started.
The contest officially opened on August 4; the entire first day was devoted to official practice. We did not use that chance, although later we would need it. We were used to working, adjusting, and checking during practice, and the conditions at the race site didn't seem good for us. We did not think it wise to fly around and risk possible destruction of the model. We also did not want to torture the engine with such a grueling racing schedule still to come.
Most other participants and race officials could not understand our behavior, and as we learned later, they did not take our explanation seriously. We used the practice day in our own way and spent the time watching other fliers. The Australians seemed to be the best; they were a tight, spirited team. The British and the Americans were not flying very fast. The best American—superstar of American Formula 1 racing David Shadel—dispelled any doubts as to his FAI pylon know-how.
We were disappointed with the Canadians and especially the Italians, whom we knew well from European contests. Where was their form, and why did they arrive so late? They were nervous and did not talk much. We flew a couple of unsatisfying practice flights at the end of the practice day and decided to leave everything till tomorrow.
We arrived at the contest site early the next morning with Bob Wallace and began to fine-tune the Miss RJ. We attempted to find the right compression ratio and tuned pipe length, but we could not seem to hit upon the correct combination. The engine was definitely not turning at its highest revs. It was about then that we began to question our decision to sit out the practice day. Finally, we tried reducing the prop diameter, but much time had gone by and the first race officials and contestants began to appear. The Contest Director soon prohibited additional practicing for safety reasons.
There was nothing else for us to do but wait. We felt our engine was running well and reliable, but we also felt it was capable of higher rpm. We decided to hold out the last possible adjustment (shortening the tuned pipe to the minimum) until after the first round.
Finally luck started to run our way, and we landed at the end of the heat matrix for the first round. This gave us the chance to watch other competitors fly and to know what kind of times we had to beat. The times were not as fast as they had been during practice, and this helped to calm us, but we were still very nervous on our first takeoff. What would our time be?
You can't know how happy we were after the speakers announced we had taken the lead with the best time of 1:24.6 for the first round. It was great to know this when we had not been flying at full speed and still had some engine tuning in reserve. For the next round we shortened the pipe by about 4 mm and recorded 1:22.9. Without further hesitation, we then shortened the pipe to its minimum.
At last the engine was running at full revs. Our times in the following rounds—around 1:20—confirmed we were right. Soon a gap began to develop between us and the other competitors and we became quite conservative. Then it happened: in the seventh round Zdenek was not careful enough and the tail struck his foot during release. Our model did not take off, and we received a zero score. Our blood froze. We knew that from then on we could not make any more mistakes. As a result, we began to fly conservatively. Luckily, we could afford this as we had a lead of 14 seconds over our closest competitor.
We knew we only needed to finish all remaining rounds with average times. Our last flight was also the last heat of the World Championships. Therefore it was uncertain until the last moment who would be the World Champions. Even though it looked all we had to do was the last heat, neither of us spoke before that final takeoff. We realized how little stood between us and the title, and yet the tiniest mistake or malfunction would mean our defeat.
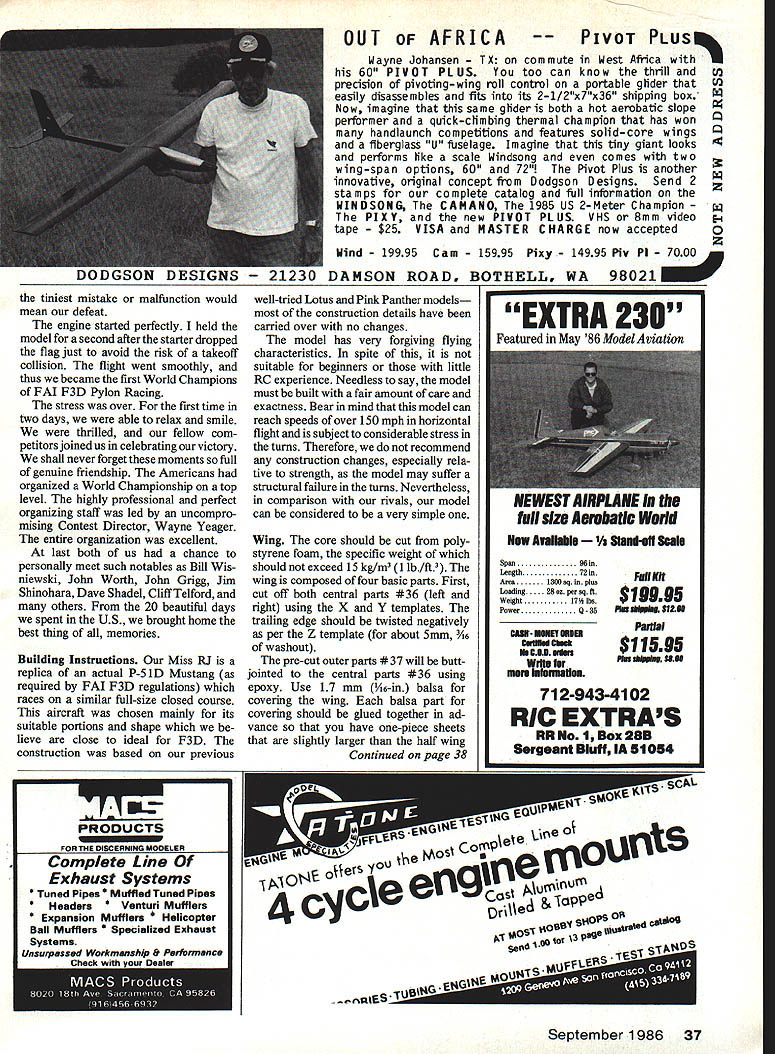
The engine started perfectly. I held the model for a second after the starter dropped the flag just to avoid the risk of a takeoff collision. The flight went smoothly, and thus we became the first World Champions of FAI F3D pylon racing.
The stress was over. For the first time in two days we were able to relax and smile. We were thrilled, and our fellow competitors joined us in celebrating our victory. We shall never forget those moments full of genuine friendship. The Americans had organized a World Championship on a top level. The highly professional organizing staff was led by an uncompromising Contest Director, Wayne Yeager. The entire organization was excellent.
At last both of us had a chance to meet such notables as Bill Wisniewski, John Worth, John Grigg, Jim Shinohara, Dave Shael, Cliff Telford, and many others. From the 20 beautiful days we spent in the U.S., we brought home the best thing of all: memories.
Miss RJ — The Model
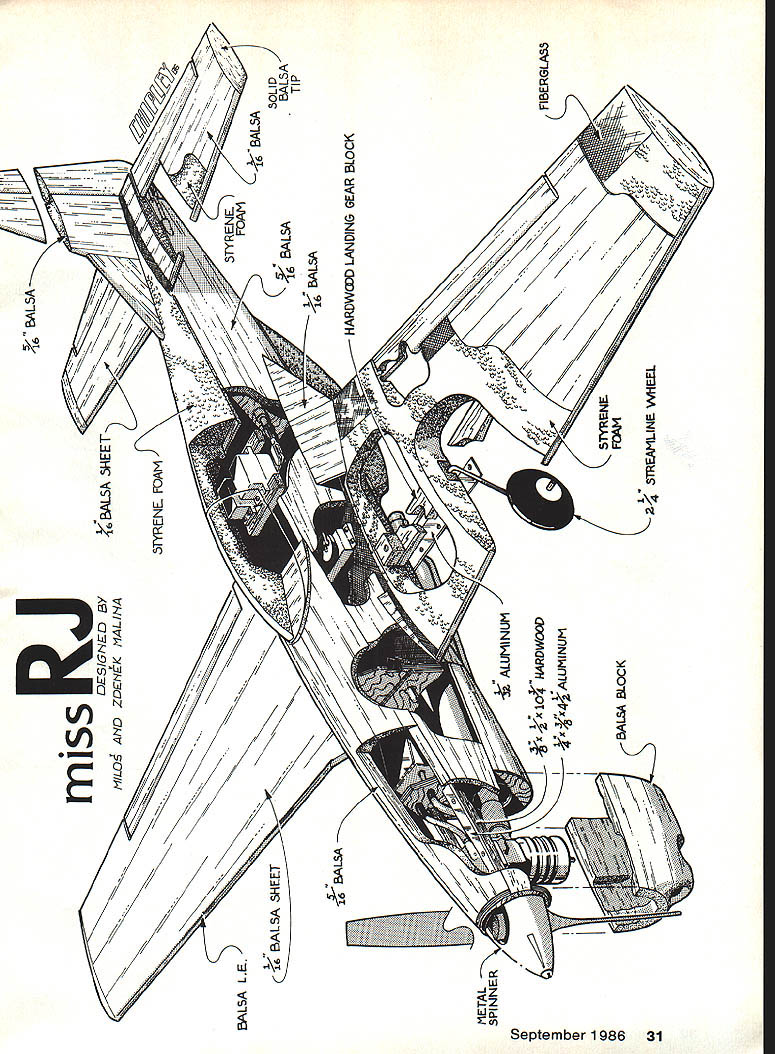
We are privileged to present the model which won the first RC pylon racing FAI World Championships in 1985—designed, built, and flown by two Czechoslovakian brothers. Miss RJ is a replica of a P-51D Mustang (as required by FAI F3D regulations), chosen mainly for its suitable proportions and shape which we believe are close to ideal for F3D. The construction was based on our previous well-tried Lotus and Pink Panther models—most construction details have been carried over with no changes.
The model has forgiving flying characteristics but is not suitable for beginners or those with little RC experience. It must be built with care and exactness. This model can reach speeds of over 150 mph in horizontal flight and is subject to considerable stress in the turns. Do not change construction details that affect strength; structural failure in the turns can result. Nevertheless, compared with our rivals, Miss RJ can be considered a relatively simple model.
Specifications
- Category: RC model of F3D for pylon racing
- Wing span: 1300 mm
- Length: 1050 mm
- Weight: 2200 g (maximum)
- Engine: MVVS 6.5 F
- Material notation: B = balsa, P = plywood
- All measurements are in millimeters
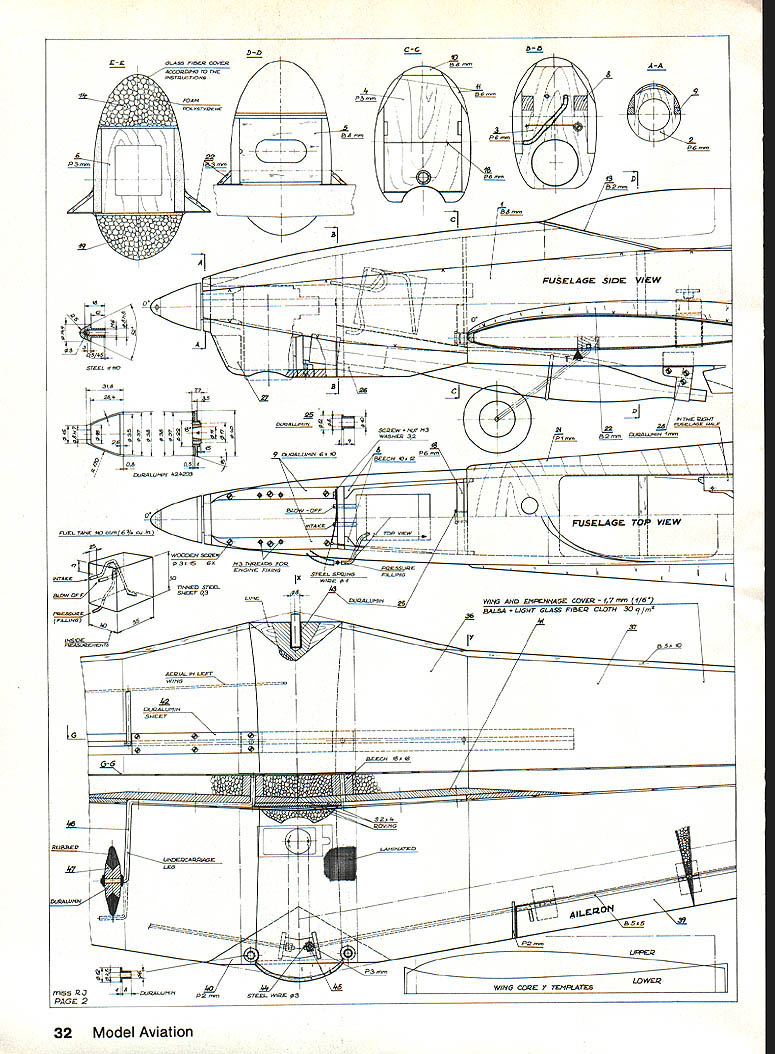
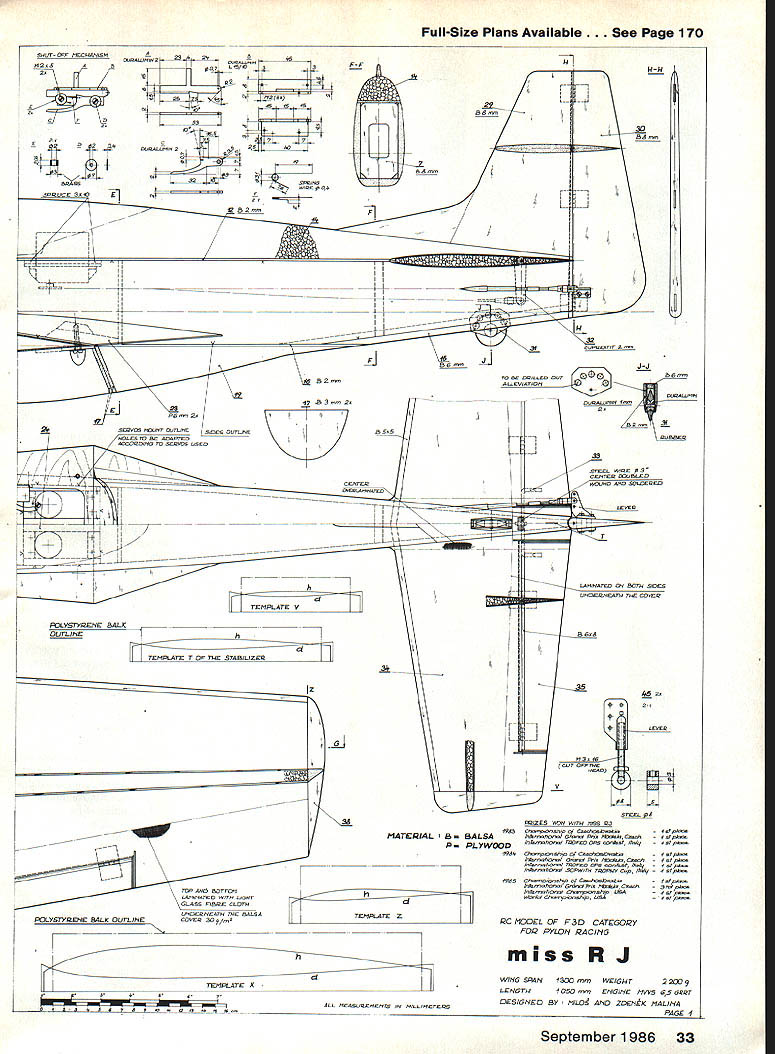
Notes on drawings and details (image captions summarized)
- Left-front view shows bottom part of Miss RJ; engine end and tuned pipe removed, landing gear attached, wing held by two duralumin sheets.
- Right view: MVVS 6.5/F engine fitted; tuned pipe attached; fuselage steel sleeve slides freely; exhaust-outlet adapter; 200 x 150 mm fiberglass prop hub covered by 40 mm duralumin spinner.
- Detail views show rudder-control wire exit guide; tail wheel made of hard rubber.
- Two Futaba servos inside Miss RJ fuselage control elevator and rudder; extreme left-end rudder-servo travel trips engine-shutoff mechanism.
- Two air-intake openings visible above the duralumin spinner provide air to the carburetor. Another front cowl provides cooling for the cylinder.
- Wing and empennage cover: 1.7 mm (1/16") balsa + light glass fibre cloth 50 g/m^2. Top and bottom covered with light glass fibre cloth; underneath the balsa cover 30 g/m^2.
Full-size plans were available (original publication reference).
Wing
- Core material: polystyrene foam, specific weight not exceeding 15 kg/m^3 (1 lb/ft^3).
- Wing is composed of four basic parts. Cut both central parts (#36 left and right) using the X and Y templates. Trailing edge should be twisted negatively as per Z template (about 5 mm, 3/16" washout).
- Pre-cut outer parts (#37) butt-joint to central parts #36 with epoxy.
- Use 1.7 mm (1/16") balsa for covering. Glue balsa sheets together in advance so you have one-piece sheets slightly larger than the half wing.
Lamination and assembly
- Gently sand both the polystyrene foam core and balsa cover before gluing.
- Apply epoxy thinned with methyl alcohol to the balsa. Use light glass cloth to laminate the trailing edge.
- Wait about 30 minutes for alcohol to evaporate, then place the balsa-covered wing core into a plastic vacuum bag. Expel the air so the balsa sheeting adheres perfectly to the foam core. Pressure should be enough that any unevenness of the polystyrene core appears on the balsa surface.
- After 8–10 minutes, remove the vacuum bag and plastic bag.
- Sand the wing surface and trailing edge to shape. Glue leading edge, end rib #38, and hardwood block #41 for the landing gear in place using epoxy.
- When epoxy cures, sand panels and cover with light fiberglass cloth using about 1/2 oz. of epoxy per wing panel. Use lower pressure this time to avoid deformation.
- Vacuum for about 10 hours, remove and allow to cure another 24 hours.
Ailerons and center joint
- Cut out ailerons (#39) and glue a 5 x 5 mm (3/16" sq.) piece to the leading edge of the aileron; shape and cover with light fiberglass cloth.
- Contour aileron wells for a perfect fit; attach ailerons with three hinges.
- Aileron pushrod #44: 3 mm (1/8") music wire in two plywood mounts, P2 (2 mm, 3/32") and P3 (3 mm, 1/8"). Ensure free movement with no slop at the hinge.
- Butt the wing halves together along the whole center profile maintaining correct dihedral. Epoxy wing panels together. Stiffen the trailing edge at center with 2 mm (3/32") plywood #40 with holes for wing screws.
- Insert and glue a wedge of hard balsa with a duralumin tube #43 into the leading edge at the wing center and cover with one coat of light fiberglass cloth.
- Cut opening for servo and glue a 2 mm (3/32") plywood plate for servo mounting.
Empennage
- Elevator #35: attached with four hinges; controlled by a 2 mm (5/64") brass lever #32 soldered in place with a copper sheet. Two halves joined with 3 mm (1/8") steel music wire #33 glued into them.
- Fin and rudder (#29 and #30): made from 8 mm (5/16") balsa, glued together, shaped and profiled, then covered with light fiberglass cloth. Rudder #30 attached with three hinges; pushrod attached to its left side.
Fuselage
Preparation
- Cut formers #2, 3, 4, 5, 6, and 7.
- Cut fuselage sides #1 from 8 mm (5/16") light balsa and cover the inside with medium fiberglass cloth.
- Bolt together engine mounting blocks #8 from 10 x 12 x 235 mm hardwood pieces. Mount duralumin strips #9 (6 x 10 x 115 mm). Insert fiberglass cloth between contact areas before screwing and apply epoxy.
Fuel tank and shutoff
- Fuel tank: maximum 110 cm^3 (6 3/4 cu in), made of brass or tin-plated steel sheet soldered together. Check for leaks with a syringe. Make all bends round to avoid cracks.
- Shutoff mechanism: make exactly per plans. Main body is aluminum angle 10 x 15 mm (3/8 x 5/8"). Mounting plate for servos is 2 mm (3/32") cupriplex (glass laminate). Elevator and rudder pushrods are a Graupner torque tube stiffened with 1.5 mm (1/16") steel wire; ends fitted with clevises for ball links.
Assembly
- Glue formers #2 and #7 between the fuselage sides first, ensuring they are vertical to the fore-aft axis.
- Close fuselage sides at their rear up to oblique former #13 from above and up to former #17 from below with 2 mm balsa strips to avoid fuselage twisting later.
- When epoxy has cured, glue engine mount parts #8 and #9 between formers #2 and #3 in the front fuselage.
- Glue the fuel tank between formers #3 and #4 using resin glue; ensure tank outlets are well glued into former #3.
- Screw a 1 mm (1/32") steel wire to former #3 to release fuel tank pressure when the engine is shut off. Glue a guide between formers #3 and #4 to activate the fuel line.
- Close the front upper part of the fuselage to oblique former #13 with balsa strips #10 and #11.
Miss RJ continued assembly
- Make sure the stabilizer (#34) and the polystyrene foam fuselage top (#14) are correctly shaped, then glue them to the fuselage sides. Sand the fuselage top and cover with one coat of medium-weight fiberglass and one coat of light fiberglass. Sand smooth and butt-joint fin #29.
- Re-check fuel tank tightness before closing the front bottom of the fuselage, then apply a 10 mm (3/8") balsa strip between formers #3 and #4. Make a 20 mm (3/4") radius notch into the balsa strip for the tuned pipe. Cover the notch with three coats of medium fiberglass cloth. Cover the engine mount area similarly.
- Engine cowl #27: sand from a balsa block and carefully fiberglass. The cowl is held by one screw.
- Place servo rails #24 in the fuselage, fix pushrod guides for rudder and elevator, and cover remaining lower fuselage. Rudder servo should be on the right when viewed from above; when rotated to its leftmost position it should activate the engine shutoff mechanism. Check both servos operate freely with no lateral movement.
- Attach wing using two 4 mm (1/8") wood screws threading into part #23 (two 6 mm (1/4") plywood layers glued between fuselage sides). Leading edge is held by an 8 mm (5/16") hardwood dowel inserted into duralumin tube #43.
- Glue 1 mm (1/32") plywood wing fillet #21 between fuselage and wing; bolt wing in place to assure a tight fit. When dry, glue remaining fillet parts #22 and sand to shape.
- Glue polystyrene #19 to the wing bottom and rear fuselage, sand accordingly, and cover polystyrene parts with one coat of medium and one coat of light fiberglass cloth.
- Attach tail wheel #31 to rear of fuselage, and glue a 2 mm (3/32") cupriplex bracket into the wing for tuned pipe attachment.
- Landing gear: 4 mm (5/32") landing gear legs fixed in hardwood blocks #41, sealed and covered with 1 mm (1/32") duralumin plates #42 so bottom wing area is smooth.
Finishing
- Sand the fuselage to shape and cover with two coats of medium fiberglass cloth up front between formers #2 and #4 and with one coat elsewhere. Cover empennage and wing fillets to be smooth.
- After thorough sanding, cover the fuselage once more with light fiberglass cloth. When epoxy hardens, wet-sand with fine sandpaper and coat with your favorite finishing epoxy. A good surface finish is important for flying performance.
Trimming and Racing
The position of the center of gravity (CG), the quality of construction, and the weight (which should not exceed 2,200 g — 4 lb. 14 oz. with empty fuel tank) have a decisive effect on flying performance. The model must be straight and have an excellent finish.
Before the first flight:
- Balance the model so the CG corresponds to the plans.
- Check all radio system operations, and repeat checks with the engine running at full revs.
During initial flights:
- Trim the model during the first flight and adjust pushrods after landing.
- Carefully move the CG during further flights to find the best control feel. The model is more responsive to rudder and elevator when the CG is moved rearward and vice versa. A well-trimmed model should be slightly nose heavy—never tail heavy.
- The main purpose of test flying is to find optimum CG and best combination of rudder, elevator, and aileron travel limits.
Engine and propeller
- We used a Modela MVVS 6.5 GRRT engine with an MVVS tuned exhaust running a 200 x 150 mm prop at 21,000–22,000 rpm on the ground.
- Never use a plastic prop—sooner or later it is likely to tear apart. The resulting vibration will damage or destroy the model and the engine. Use only a tuned metal spinner that runs true.
Vibration and safety
- If any disturbing vibrations occur, stop flying immediately and find the cause. Do not fly again until the cause is determined, as vibration can lead to a crash. Common causes: loose or unbalanced prop, loose engine mounting screws, loose wheel or landing gear leg, or imperfect matching of the wing with the fuselage.
- Vibrations are the most serious threat to a pylon racing model; they also damage servos and limit their durability.
Practice recommendations
- During test flying, practice seriously with your mechanic. Fly on a pylon race circuit only—random flying in open sky has no purpose and is hazardous.
- A test flight should not be much longer than a competition flight.
- Fly often (at least once a week) in any weather, but with a reasonable number of takeoffs.
- After each flight, check the model carefully, clean it with a good cleaner, and preserve it with protective wax.
Good luck and safe flying.
Transcribed from original scans by AI. Minor OCR errors may remain.

