
You Need a STOOGE
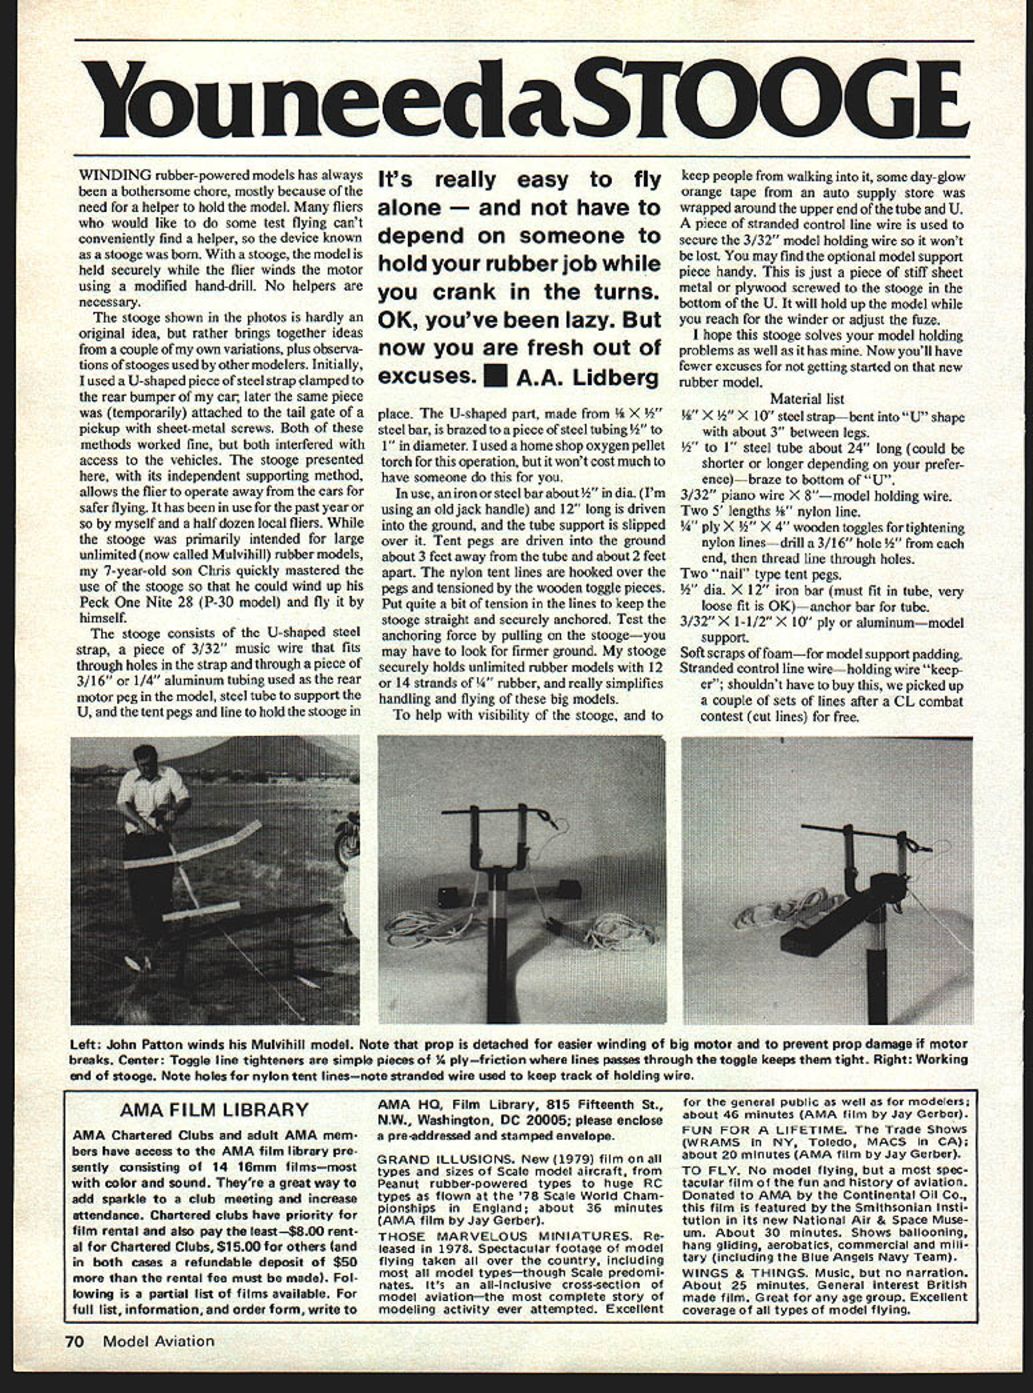
Winding rubber-powered models has always been a bothersome chore, mostly because of the need for a helper to hold the model. Many fliers who would like to do some test flying can't conveniently find a helper, so the device known as a stooge was born. With a stooge, the model is held securely while the flier winds the motor using a modified hand-drill. No helpers are necessary.
The stooge shown here is not an original idea but brings together a couple of my own variations plus observations of stooges used by other modelers. Initially I used a U-shaped piece of steel strap clamped to the rear bumper of my car; later the same piece was temporarily attached to the tail gate of a pickup with sheet-metal screws. Both methods worked, but they interfered with access to the vehicles. The stooge presented here has an independent supporting method so the flier can operate away from vehicles for safer flying.
It has been in use for the past year or so by myself and a half dozen local fliers. While the stooge was primarily intended for large unlimited (now called Mulvihill) rubber models, my 7-year-old son Chris quickly mastered its use so he could wind up his Peck One Nite 28 (P-30 model) and fly it by himself.
It's really easy to fly alone — don't depend on someone to hold the rubber job while you crank in the turns. OK, you've been lazy. But now you are fresh out of excuses.
A. A. Lidberg
Construction
The stooge consists of:
- A U-shaped steel strap (made from 1/8" x 1/2" steel bar) brazed to a piece of steel tubing (1/2" to 1" diameter).
- A piece of 3/32" music (piano) wire that fits through holes in the strap and through a piece of 3/16" or 1/4" aluminum tubing used as the rear motor peg in the model (this is the model-holding wire).
- A steel tube to support the U, which slips over an anchor bar driven into the ground.
- Tent pegs and lines to hold the stooge in place.
The U-shaped strap should be bent with about 3" between the legs. The strap is brazed to the bottom of the tube; a home-shop oxygen-acetylene torch can do the brazing, or you can have someone else do it for you.
An optional model support piece can be added: a piece of stiff sheet metal or plywood screwed to the stooge in the bottom of the U. It will hold up the model while you reach for the winder or adjust the fuze. Pad this support with soft foam scraps to protect the model.
Setup and Use
- Drive an iron or steel bar (about 5/8" dia., 12" long — an old jack handle works well) into the ground. The tube support slips over this anchor bar.
- Drive two tent pegs into the ground about 3 feet away from the tube, with the pegs about 2 feet apart.
- Hook two 5' lengths of 1/4" nylon line over the pegs and tension them with wooden toggles (drill a 3/16" hole 1/2" from each end of the toggles, then thread the line through).
- Put quite a bit of tension in the lines to keep the stooge straight and securely anchored. Test the anchoring force by pulling on the stooge — you may have to look for firmer ground.
With good anchoring, the stooge securely holds unlimited rubber models with 12 or 14 strands of 1/4" rubber and greatly simplifies handling and flying of large models.
Visibility and Accessories
- Wrap day-glow orange tape around the upper end of the tube and the U to help visibility and keep people from walking into the stooge.
- Use a piece of stranded control line wire as a keeper to secure the 3/32" model-holding wire so it won't be lost. (You likely won’t have to buy this; cut-up control lines from contests work fine.)
- Soft foam scraps make good padding for the model support.
I hope this stooge solves your model-holding problems as well as it has mine. Now you'll have fewer excuses for not getting started on that new rubber model.
Material list
- 1/8" x 1/2" x 10" steel strap — bent into "U" shape with about 3" between legs.
- 1/2" to 1" steel tube about 24" long (could be shorter or longer depending on preference) — braze to bottom of "U".
- 3/32" piano wire x 8" — model holding wire.
- Two 5' lengths of 1/4" nylon line.
- 3/4" ply x 1/2" x 4" wooden toggles for tightening nylon lines — drill a 3/16" hole 1/2" from each end, then thread line through holes.
- Two "nail" type tent pegs.
- 5/8" dia. x 12" iron bar (must fit in tube, very loose fit is OK) — anchor bar for tube.
- 3/32" x 1-1/2" x 10" ply or aluminum — model support.
- Soft scraps of foam — for model support padding.
- Stranded control line wire — holding wire "keeper".
Transcribed from original scans by AI. Minor OCR errors may remain.

