
Zippy Sport Peanut
by Bill Warner
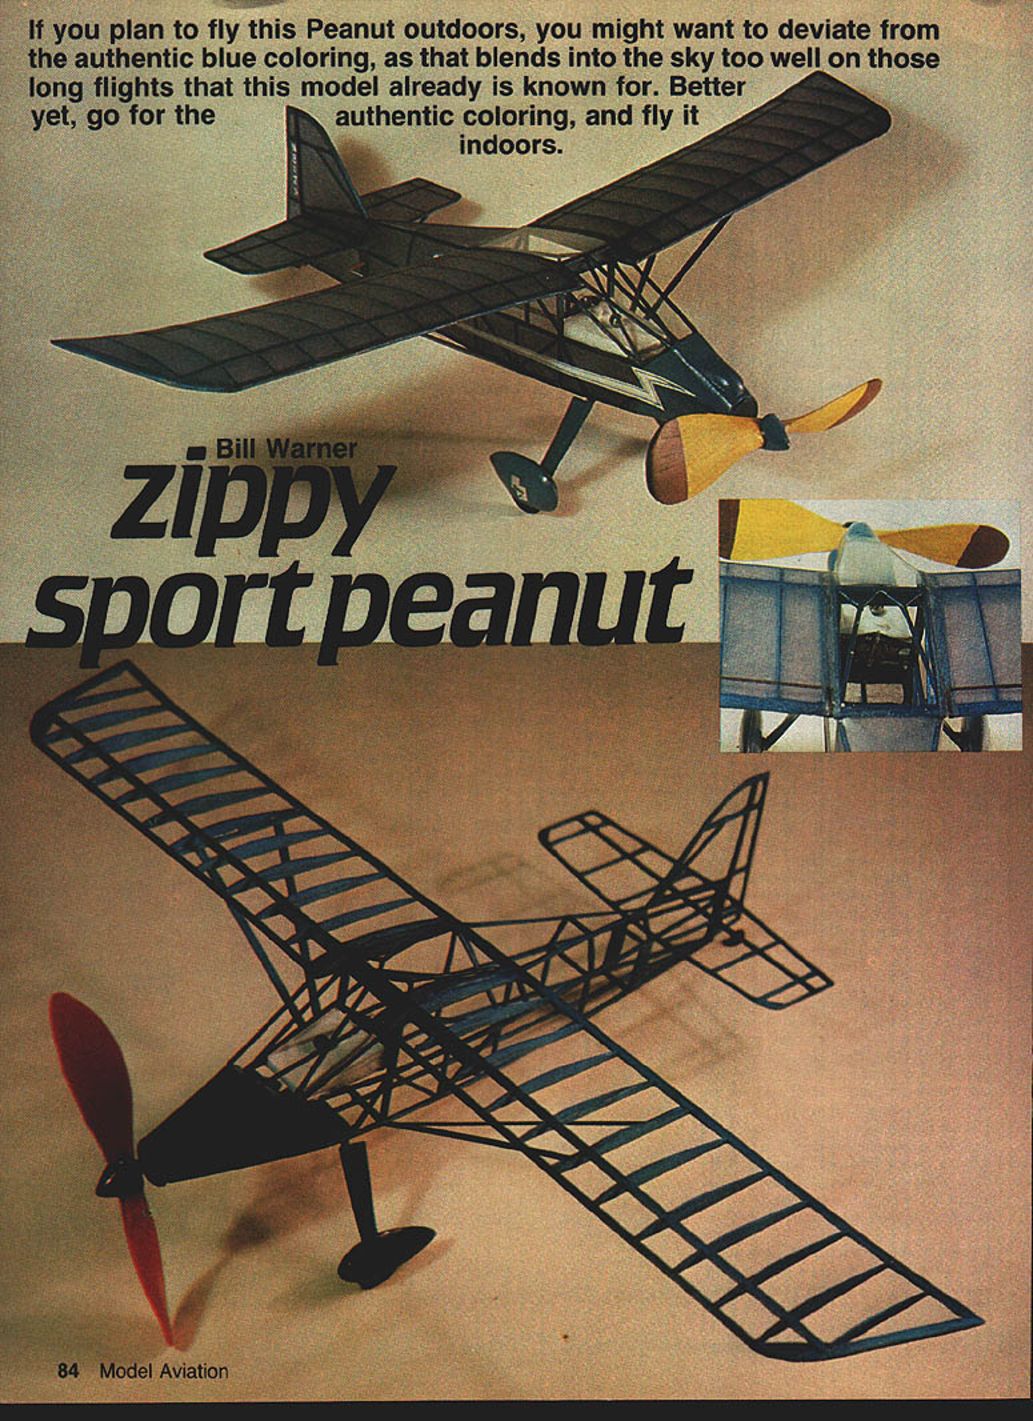
If you plan to fly this Peanut outdoors, you might want to deviate from the authentic blue coloring, as that blends into the sky too well on those long flights that this model already is known for. Better yet, go for the authentic coloring, and fly it indoors.
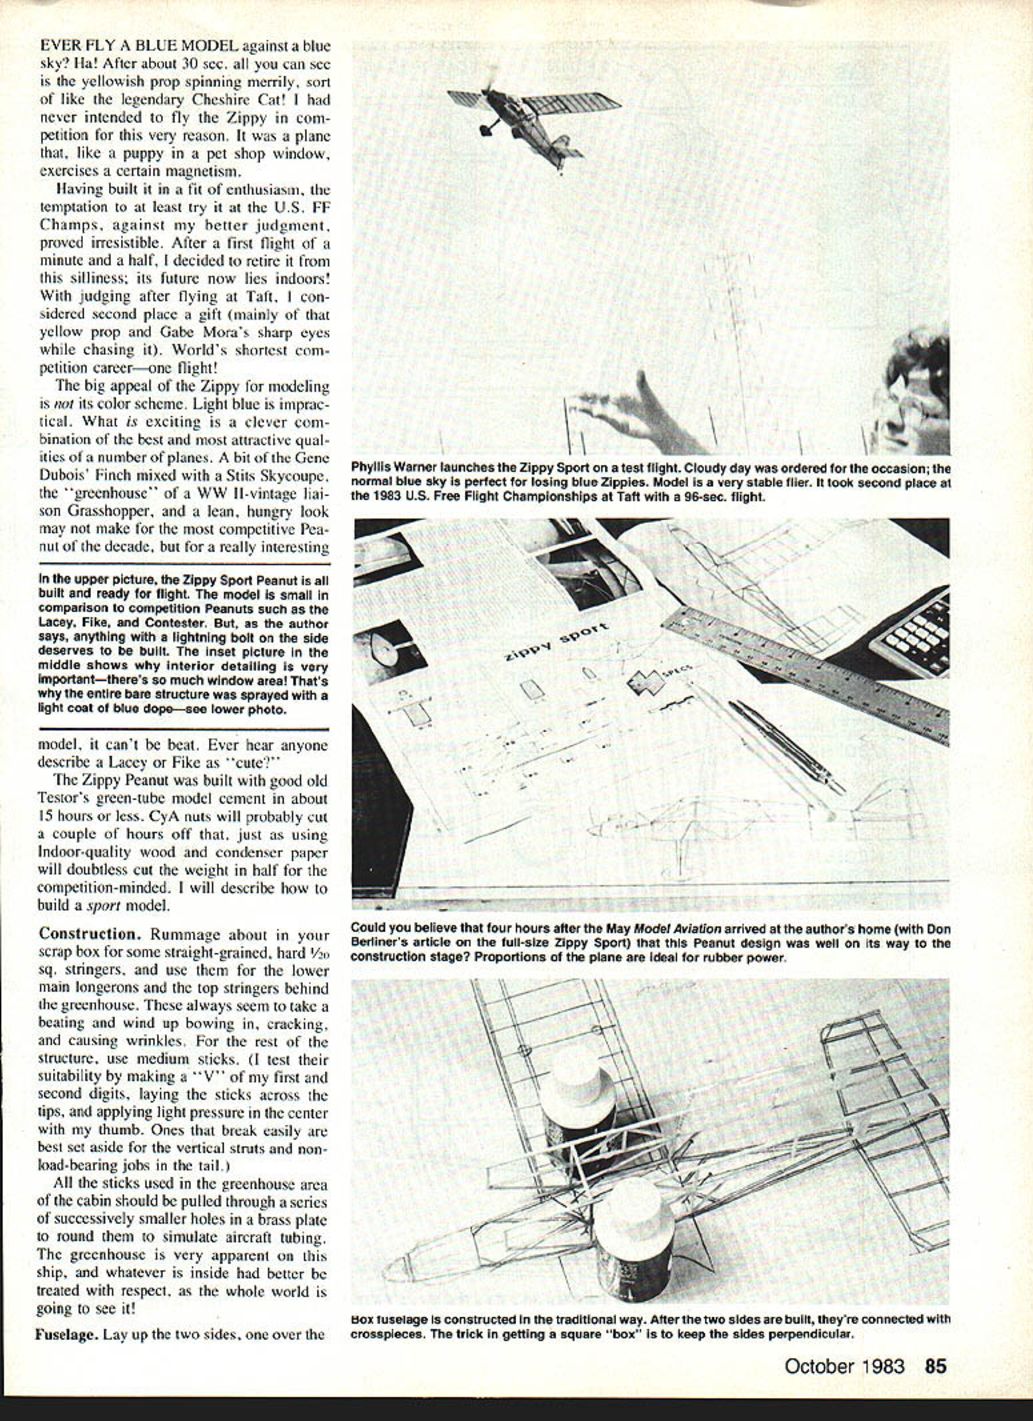
Ever fly a blue model against a blue sky? After about 30 seconds all you can see is the yellowish prop spinning merrily, sort of like the legendary Cheshire Cat! I had never intended to fly the Zippy in competition for this very reason. It was a plane that, like a puppy in a pet shop window, exercises a certain magnetism.
Having built it in a fit of enthusiasm, the temptation to at least try it at the U.S. FF Champs, against my better judgment, proved irresistible. After a first flight of a minute and a half, I decided to retire it from this silliness; its future now lies indoors. With judging after flying at Taft, I considered second place a gift (mainly of that yellow prop and Gabe Mora's sharp eyes while chasing it). World's shortest competition career—one flight!
The big appeal of the Zippy for modeling is not its color scheme. Light blue is impractical. What is exciting is a clever combination of the best and most attractive qualities of a number of planes: a bit of Gene Dubois' Finch mixed with a Stits Skycoupe, the "greenhouse" of a WWII-vintage liaison Grasshopper, and a lean, hungry look. It may not be the most competitive Peanut of the decade, but for a really interesting model it can't be beat. Ever hear anyone describe a Lacey or Fike as "cute?"
In the photos, the Zippy Sport Peanut is shown all built and ready for flight. The model is small in comparison to competition Peanuts such as the Lacey, Fike, and Contester. The inset shows why interior detailing is very important—there's so much window area! That's why the entire bare structure was sprayed with a light coat of blue dope.
The Zippy Peanut was built with good old Testor's green-tube model cement in about 15 hours or less. CyA nuts will probably cut a couple of hours off that; just as using indoor-quality wood and condenser paper will doubtless cut the weight in half for the competition-minded. The instructions below describe how to build a sport model.
Construction
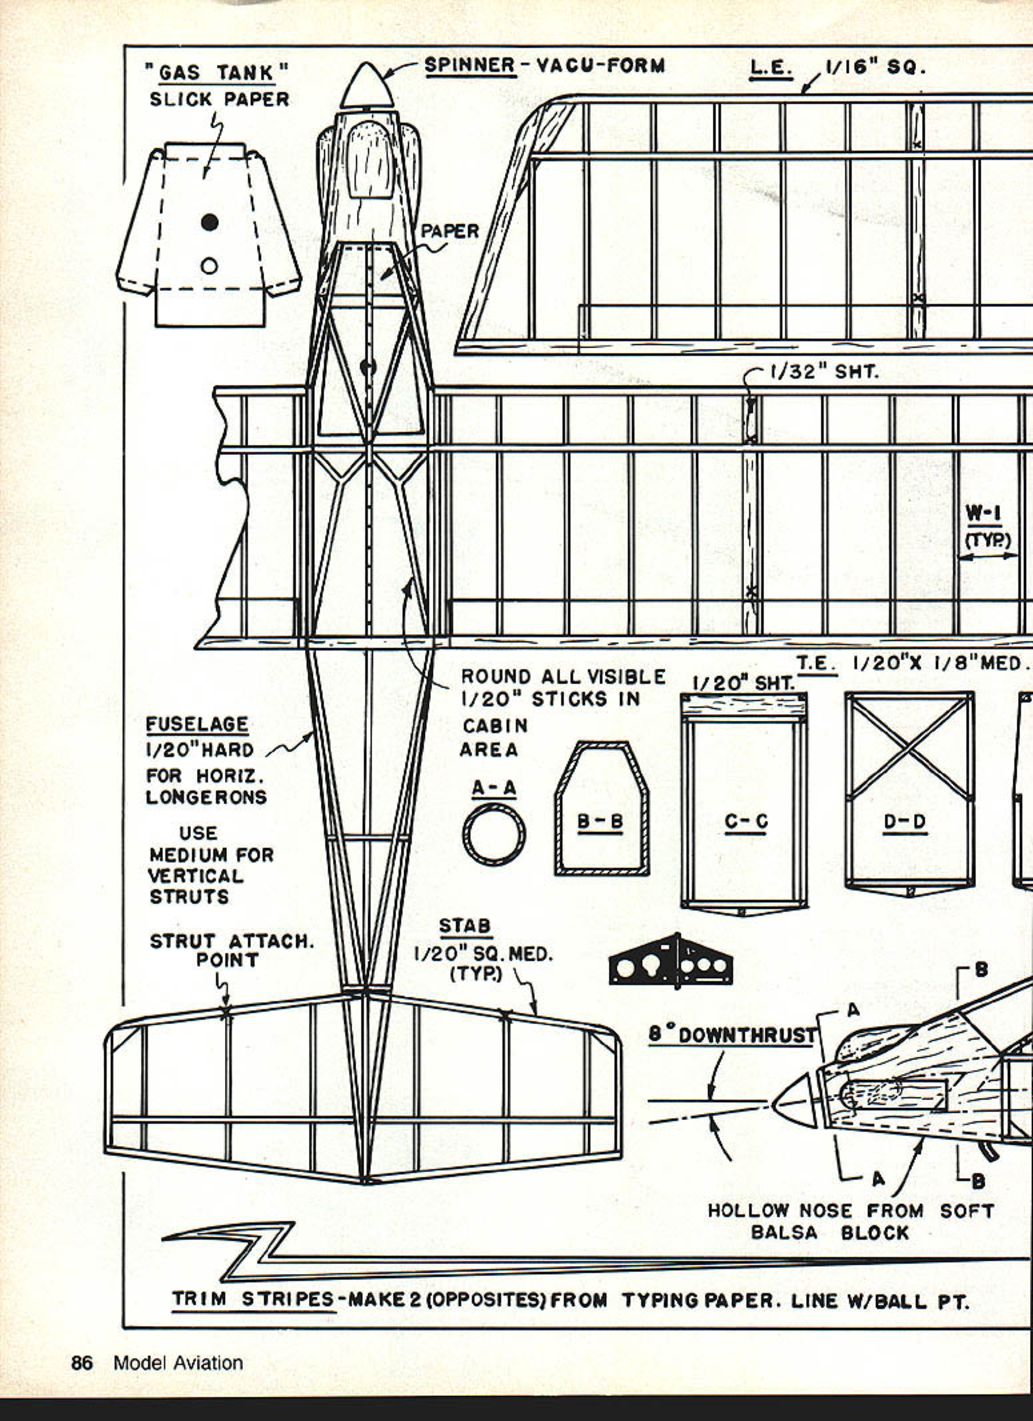
- Rummage in your scrap box for some straight-grained, hard 1/20" sq. stringers, and use them for the lower main longerons and the top stringers behind the greenhouse. These always seem to take a beating and wind up bowing in, cracking, and causing wrinkles.
- For the rest of the structure, use medium sticks. Test their suitability by making a "V" of your first and second digits, laying the sticks across the tips, and applying light pressure in the center with your thumb. Ones that break easily are best set aside for vertical struts and non-load-bearing jobs in the tail.
- All sticks used in the greenhouse area of the cabin should be pulled through a series of successively smaller holes in a brass plate to round them and simulate aircraft tubing. The greenhouse is very apparent on this ship, and whatever is inside had better be treated with respect—the whole world is going to see it!
- It's easier to use a mixture of clear dope and talcum powder first, then sand smooth with 600-grit wet-or-dry paper before gluing the structure.
Fuselage
- Lay up the two sides, one over the other, and pin them to the board. After the two sides are built, connect them with crosspieces. The trick to getting a square box is to keep the sides perpendicular to the board. Add the top crossstruts and top longerons.
- Round all visible sticks in the cabin area by pulling them through progressively smaller holes in a brass plate to simulate aircraft tubing.
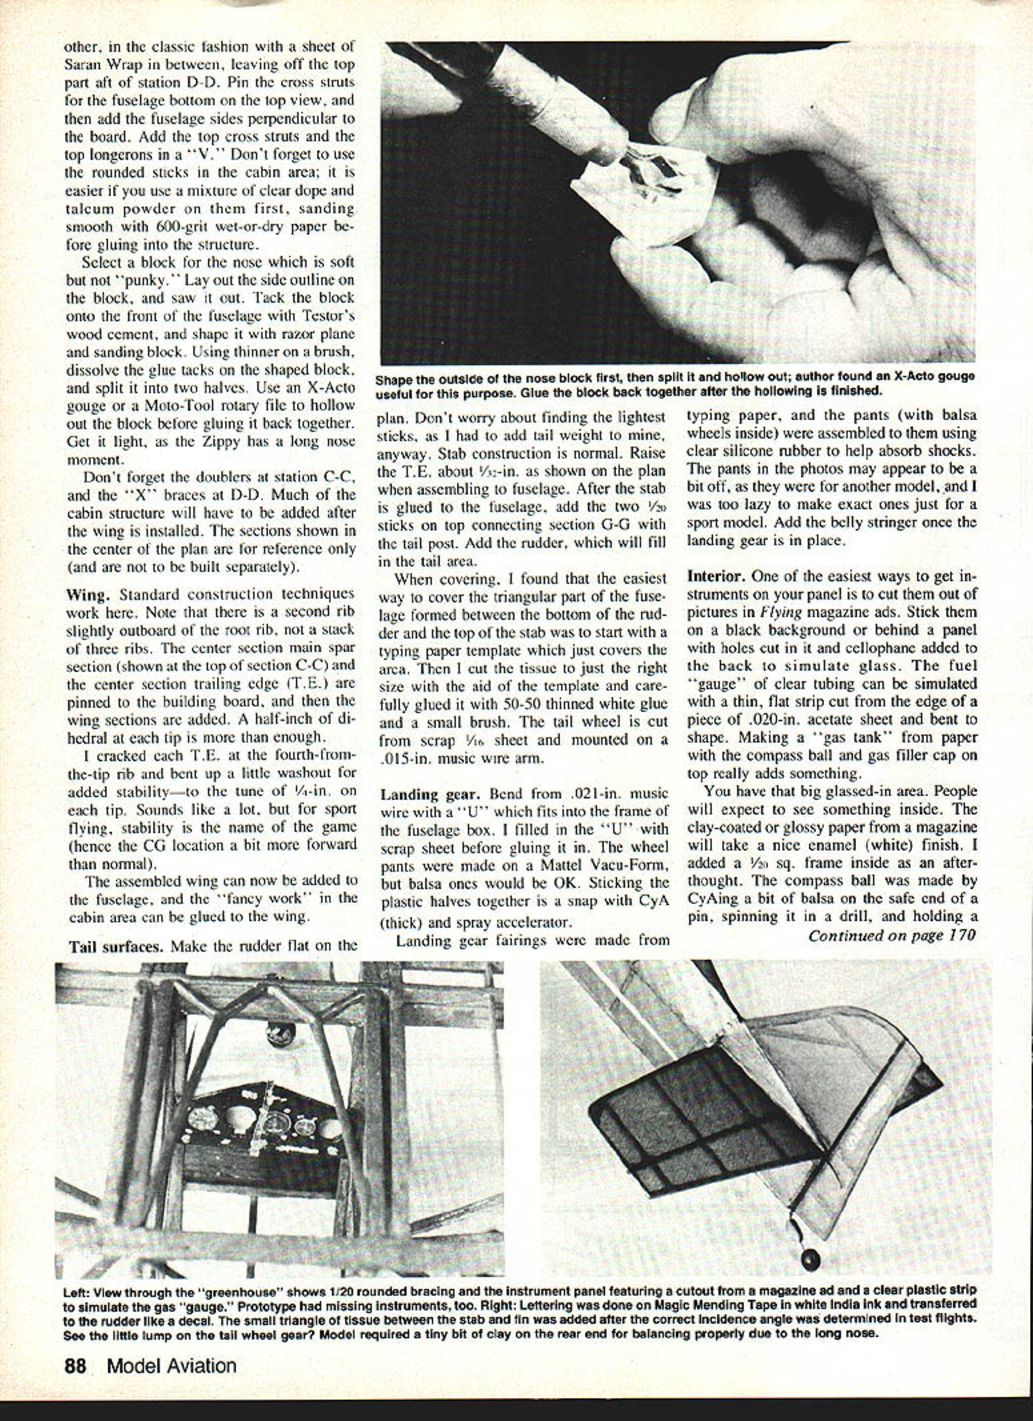
- Select a block for the nose which is soft but not punky. Lay out the side outline on the block and saw it out. Tack the block onto the front of the fuselage with Testor's wood cement and shape it with a razor plane and sanding block.
- Using thinner on a brush, dissolve the glue tacks on the shaped block and split it into two halves. Use an X-Acto gouge or a Moto-Tool rotary file to hollow out the block before gluing it back together. Get it light, as the Zippy has a long nose moment.
- Don't forget the doublers at station C-C and the "X" braces at D-D. Much of the cabin structure will have to be added after the wing is installed. The sections shown in the center of the plan are for reference only (and are not to be built separately).
Plans and specifications (from plan notes)
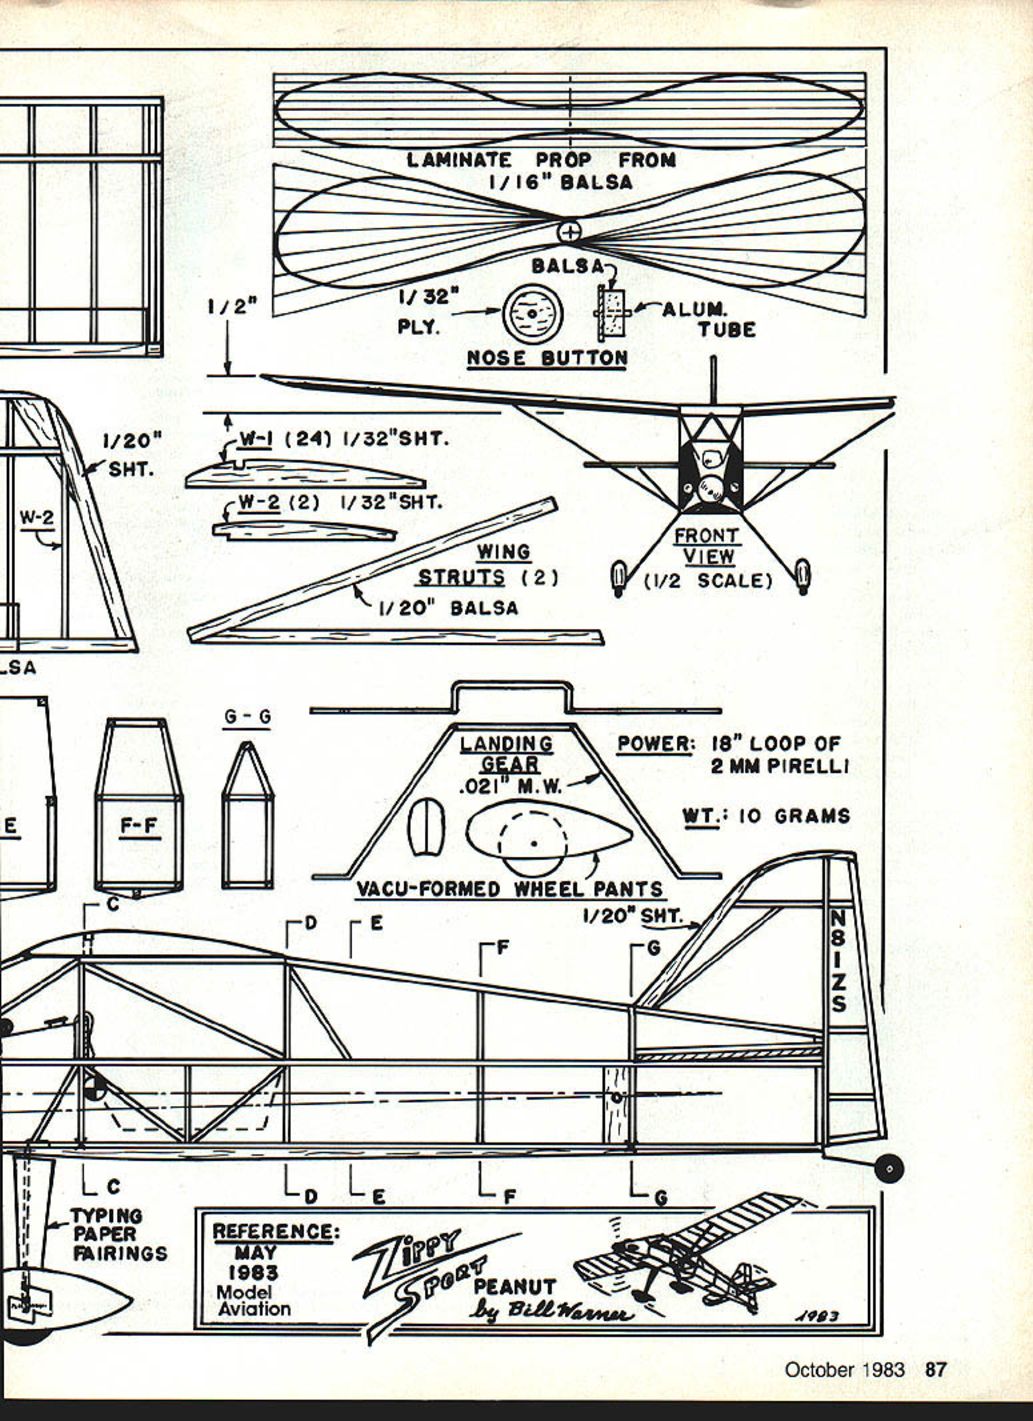
- Laminate prop from 1/16" balsa
- 1/32" ply
- Balsa
- Alum. tube
- Nose button
- Front view (1/2 scale)
- W-1 (24) 1/32" sheet
- W-2 (2) 1/32" sheet
- Wing struts (2) 1/20" balsa
- 1/20" sheet
- Hollow nose from soft balsa block
- Trim stripes — make 2 opposites from typing paper. Line with ballpoint pen.
- Landing gear .021" music wire
- Vacu-formed wheel pants
- Power: 18" loop of 2 mm Pirelli (flat rubber)
- Weight: 10 grams
- Typing paper fairings
- Reference: May 1983 Model Aviation
Wing
- Standard construction techniques apply. Note that there is a second rib slightly outboard of the root rib, not a stack of three ribs.
- Pin the center section main spar and center section trailing edge to the building board, then add the wing sections.
- A half-inch of dihedral at each tip is more than enough.
- I cracked each trailing edge at the fourth-from-the-tip rib and bent up a little washout for added stability—about 1/4" on each tip. Sounds like a lot, but for sport flying stability is the name of the game (hence the CG location a bit more forward than normal).
- The assembled wing can now be added to the fuselage, and the "fancy work" in the cabin area can be glued to the wing.
Tail surfaces
- Make the rudder flat on the plan. Slab construction is normal.
- Don't worry about finding the absolute lightest sticks; I had to add tail weight to mine anyway.
- Raise the trailing edge about 3/32" as shown on the plan when assembling to the fuselage.
- After the stabilizer is glued to the fuselage, add the two 1/32" sticks on top connecting section G-G with the tail post. Add the rudder, which will fill in the tail area.
- To cover the triangular part of the fuselage between the bottom of the rudder and the top of the stab, start with a typing-paper template that just covers the area. Cut the tissue to size with the aid of the template and carefully glue it with 50/50 thinned white glue applied with a small brush.
- The tail wheel is cut from scrap 1/16" sheet and mounted on a .015" music wire arm.
Landing gear
- Bend from .021" music wire with a "U" that fits into the frame of the fuselage box. Fill the "U" with scrap sheet before gluing it in.
- The wheel pants were made on a Mattel vacu-form, but balsa ones would be acceptable. Stick the plastic halves together with thick CyA and spray accelerator.
- Landing gear fairings were made from typing paper, and the pants (with balsa wheels inside) were assembled to them using clear silicone rubber to help absorb shocks.
- Add the belly stringer once the landing gear is in place.
Interior
- One of the easiest ways to get instruments on your panel is to cut them out of pictures in Flying magazine ads. Stick them on a black background or behind a panel with holes cut in it and cellophane added to the back to simulate glass.
- The fuel "gauge" of clear tubing can be simulated with a thin, flat strip cut from the edge of a piece of .020" acetate sheet and bent to shape.
- Making a "gas tank" from paper with the compass ball and gas filler cap on top really adds something.
- Clay-coated or glossy magazine paper will take a nice enamel (white) finish. I added a 3/32" sq. frame inside as an afterthought.
- The compass ball was made by CyA-ing a bit of balsa on the safe end of a pin, spinning it in a drill, and holding a sanding block against the balsa to shape it into a ball.
Covering and finish
- Spray the entire framework with thinned blue dope (just enough to cover lightly), though you could paint only the parts that show.
- Brush a couple of coats of thinned Testor's green-tube cement where the clear plastic will touch around the frame edges.
- Cut typing-paper patterns the size of the windows (cheaper than plastic if you make a mistake). Then cut the plastic (.003" sheet), lay it on the frame, and brush film-splicing cement around the edge of the window; the cement will creep under and stick it fast.
- Pre-shrink your Japanese blue tissue on a sturdy frame using water spray. Cover the model using white glue on a small brush thinned to about 50% consistency with water. If additional shrinking is required, spray lightly with rubbing alcohol from a hair sprayer.
- A minimal wrinkling is preferable to a warped tail.
- Finish the model with two coats of rather thin nitrate clear dope to which about 10 drops of TCP have been added per ounce. Use Sig-Lite-Cote dope if you do not have access to nitrate/TCP dope.
- Trim striping can be made from typing paper with line-work done with a blue ballpoint pen and ruler. Make a right and a left and stick them on with dope. Try white glue or 3M spray contact cement if preferred.
Front end and prop
- Shape and add the blisters. Construct the plug-in nose button to fit snugly from a 1/8" ply disc and balsa. Drill for a 1/2" I.D. aluminum tube, and CyA-glue the tube in place after roughening its exterior with rough sandpaper.
- The prop shaft should be .025" wire to prevent binding.
- A scraped and cut-down plastic prop may be used, though tail ballast will be required. I prefer to make props from stacks of balsa strips, cementing with CyA or white glue.
- Camber the front of the blades, then sand the back faces slightly concave with 60-grit garnet paper wrapped around a felt-tip pen. Keep a plastic prop handy for reference the first time.
- Don't get the center too thin, as it will break. Make two or three props of different pitches.
- Add a free-wheeler to the prop by cutting a ring of 1/2" aluminum tube to encircle the 1/2" tube inserted through the prop hub. CyA-glue the ring and shape it carefully with a pattern file to the "wolf's-tooth" spiral free-wheeling ramp found on most plastic propellers.
- A vacu-formed spinner is optional. When using a spinner, cement a bead on the hook end of the prop shaft at a position to prevent the shaft from moving forward during free-wheeling and striking the inside of the spinner. I use Testor's cement and thread wrapping behind the bead, as CyA tends to run into the aluminum tube.
Flight
- Hold the plane out, close one eye, and sight along the root of the wing toward the tips. Any warps other than the intended 1/4" washout should be steamed out before flying.
- When the wings are de-warped, add the wing struts—they will hold them flat. Make sure the tail parts are not twisted. Steam out slight warps or make new tail surfaces if you can't remove the warps.
- Balance the model at the place indicated on the plan (under the main wing spar). A bit of clay on the nose or tail may be necessary.
- Use a 32" loop of 2 mm flat rubber (Pirelli or FAI). Holding one end, twist the free end about 30–40 times, tie the motor, lube it, and insert it with a stuffer stick. The rubber should braid itself nicely on the first winding. Gradually work up to full winds.
- Don't fly on days with strong thermals and blue skies!
Addendum
- For a kit and extensively researched three-view well-suited for indoor flying, Gerald Myers' and Lew Gitlow's work on the Zippy Sport is available from Indoor Model Supply, P.O. Box C, Garberville, CA 95440 for $8.45.
- For the serious competitor, additional reference material may be found in the May 1983 issue of Model Aviation and in Homebuilt Aircraft.
- For information on the full-size plane, Fishercraft, Inc., 4356 Narrows Rd., Perry, OH 44081, sells plans for the full-size version; for $6.00 you can obtain information on the full-size plane, and plans for the "biggie" go for $100.
Transcribed from original scans by AI. Minor OCR errors may remain.

